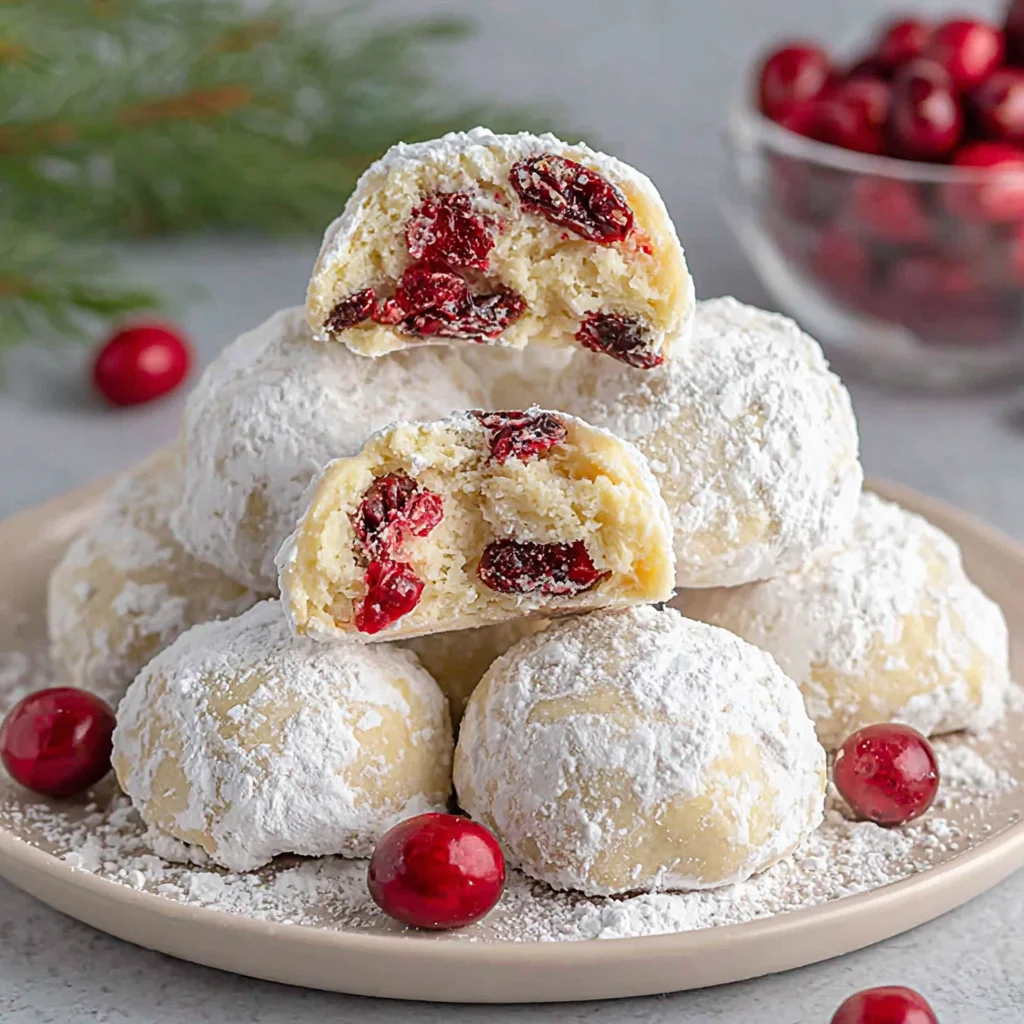
The holidays are a time for gathering with loved ones, sharing stories, and, of course, indulging in delicious treats. And what better way to celebrate than with a batch of homemade Cherry Snowball Cookies? These melt-in-your-mouth delights are not only incredibly easy to make but also bursting with festive flavors. Imagine the delightful aroma of almond extract mingling with the bright sweetness of maraschino cherries, all wrapped up in a delicate, powdered sugar coating. These cookies are the perfect addition to your holiday cookie platter, a delightful treat for a cozy night in, or a thoughtful gift for friends and family. This recipe provides a step-by-step guide to creating these delectable Cherry Snowball Cookies, guaranteeing a successful baking experience even for novice bakers. Get ready to experience the magic of these classic cookies, elevated with a burst of cherry cheer.
Why You’ll Love This Cherry Snowball Cookies Recipe
There are so many reasons why this Cherry Snowball Cookies recipe will become a staple in your holiday baking repertoire. First and foremost, the taste is simply divine. The combination of buttery, melt-in-your-mouth shortbread, the tangy sweetness of maraschino cherries, and the delicate hint of almond extract creates a flavor profile that’s both classic and unique. It’s the perfect balance of sweet and tart, making these cookies irresistible to all. The texture is another key element that sets these cookies apart. The chilling process ensures that the dough is easy to handle, resulting in perfectly round, evenly baked cookies with a slightly crisp exterior and a tender, soft interior. They’re not overly sweet, offering a refined taste that complements the bold cherry flavor. The beautiful, snowy appearance adds to their charm, making them a visually appealing addition to any holiday gathering or festive occasion. These cookies are wonderfully versatile; they can be adapted to suit dietary needs or personal preferences (see variations below). Beyond taste and texture, the ease of preparation is a significant advantage. With minimal ingredients and straightforward instructions, even beginners can achieve perfect results. The recipe is easily scalable, allowing you to make a small batch for a family gathering or a larger quantity for a holiday cookie exchange. And lastly, the nostalgic appeal of snowball cookies adds a touch of warmth and tradition to your holiday baking.
Why You Should Try This Cherry Snowball Cookies Recipe
Beyond the deliciousness and ease of preparation, there’s a compelling reason to try this specific Cherry Snowball Cookies recipe: it’s a recipe perfected through time and tested by many happy bakers. Unlike many online recipes, this one prioritizes a balance of flavor and texture, avoiding common pitfalls like overly dry cookies or a dough that’s too difficult to work with. The step-by-step instructions, paired with helpful tips and tricks, guide you through the entire process, ensuring success every time. Moreover, this recipe is designed to be adaptable. Whether you want to experiment with different extracts, add a touch of zest, or create a gluten-free version, the fundamental techniques remain the same. This flexibility empowers you to personalize the recipe, making it your own. It’s more than just a recipe; it’s an opportunity to connect with the joy of baking and share delicious, homemade treats with loved ones. This isn’t just about making cookies; it’s about creating memories and spreading holiday cheer, one delicious snowball at a time. Give this recipe a try and experience the difference that comes from a well-crafted, time-tested, and adaptable recipe.
Ingredients and Utensils for Perfect Cherry Snowball Cookies
Gathering the right ingredients and having the proper tools on hand are crucial for a successful baking experience. This section details both, ensuring you’re well-prepared to make a delightful batch of Cherry Snowball Cookies.
Ingredients:
- 2 cups (2 sticks) unsalted butter, softened: Using softened butter is key for proper creaming with the sugar. Make sure your butter is at room temperature – it should be pliable but not melted.
- 1 cup granulated sugar: This provides the sweetness and helps create the light and fluffy texture of the dough.
- 1 teaspoon almond extract: This adds a delightful nutty aroma and enhances the overall flavor profile. Pure almond extract is recommended for the best taste.
- 4 cups all-purpose flour: This is the structural component of your cookies, giving them their shape and texture. Make sure to measure your flour accurately; spooning and leveling is the most accurate method.
- 1 cup finely chopped maraschino cherries, drained (reserve the juice): The star of the show! Finely chopped cherries distribute their flavor evenly throughout the cookies. Don’t forget to save the juice – you can use it later for an extra touch of cherry flavor.
- 1 cup powdered sugar, for rolling: This creates the signature snowy coating on your cookies. Using a fine powdered sugar will ensure a smooth, even coating.
Utensils:
- Large mixing bowl: Choose a bowl large enough to comfortably accommodate all the ingredients during mixing.
- Electric mixer (handheld or stand mixer): While you can cream the butter and sugar by hand, an electric mixer will make the process significantly easier and faster. A stand mixer is ideal for larger batches.
- Measuring cups and spoons: Accurate measurements are crucial for consistent results. Use dry and liquid measuring cups as needed.
- Rubber spatula or wooden spoon: This is essential for scraping down the sides of the bowl and ensuring all ingredients are incorporated.
- Plastic wrap: Used to wrap the dough ball for chilling.
- Baking sheets: Two or more baking sheets are recommended, especially if you’re making a large batch. Non-stick baking sheets or those lined with parchment paper will prevent sticking.
- Parchment paper: This prevents the cookies from sticking to the baking sheets and makes cleanup easier.
- Cookie scoop or tablespoon: This will ensure that all your cookies are roughly the same size and bake evenly.
- Wire rack: Essential for cooling the cookies and allowing air circulation, preventing them from becoming soggy.
- Small pastry brush (optional): For brushing the warm cookies with cherry juice for extra flavor.
Detailed Steps for Making Delicious Cherry Snowball Cookies
This section provides a detailed walkthrough of the recipe, with tips to ensure perfect results every time.
- Cream Butter and Sugar: In your large mixing bowl, cream together the softened butter and granulated sugar until the mixture is light and fluffy. This process incorporates air into the dough, resulting in tender cookies. Use your electric mixer on medium speed for about 3-5 minutes, or until the mixture is pale and creamy. If doing this by hand, be prepared for some arm workout!
- Add Extract: Beat in the almond extract until it’s thoroughly incorporated into the butter and sugar mixture. Scrape down the sides of the bowl as needed.
- Incorporate Flour: Gradually add the flour to the wet ingredients, mixing on low speed (or gently by hand) until just combined. **Do not overmix.** Overmixing develops the gluten in the flour, resulting in tough cookies. Mix only until the flour is incorporated and the dough just comes together.
- Add Cherries: Gently fold in the finely chopped maraschino cherries using a rubber spatula or wooden spoon. Be careful not to overmix; a few streaks of cherry are perfectly acceptable.
- Chill the Dough: This is a crucial step. Form the dough into a ball, wrap it tightly in plastic wrap, and refrigerate for at least 2 hours, or preferably overnight. Chilling the dough firms it up, making it much easier to handle and preventing the cookies from spreading too much during baking.
- Preheat Oven: Preheat your oven to 350°F (175°C). Line your baking sheets with parchment paper. This will prevent the cookies from sticking and make cleanup a breeze.
- Shape the Cookies: Roll the chilled dough into 1-inch balls. Use a cookie scoop or a tablespoon for uniform size. If the dough is too sticky, chill it for another 15-30 minutes.
- Bake: Place the cookie balls onto the prepared baking sheets, leaving about 1-2 inches between each cookie. Bake for 12-15 minutes, or until the edges are lightly golden brown. Keep a close eye on them, as ovens can vary. If the edges are browning too quickly, reduce the oven temperature slightly.
- Roll in Powdered Sugar: While the cookies are still warm, roll them in the powdered sugar. This is best done in batches to ensure even coating. Gently toss the warm cookies in the powdered sugar, ensuring they are completely coated. **For an extra special touch,** you can lightly brush the warm cookies with some of the reserved cherry juice before rolling them in the powdered sugar. This adds an extra layer of flavor and moisture.
- Cool and Serve: Let the cookies cool completely on a wire rack before serving. This allows them to set and prevents them from becoming soggy.
Tips, Variations, and Troubleshooting for Cherry Snowball Cookies
This section provides helpful tips, variations, and troubleshooting advice to help you achieve perfect Cherry Snowball Cookies every time.
Tips for Success:
- Don’t overmix the dough: Overmixing develops the gluten, leading to tough cookies.
- Chill the dough thoroughly: This makes the dough easier to handle and prevents spreading during baking.
- Use a cookie scoop for uniform size: This ensures even baking.
- Keep an eye on the cookies while baking: Ovens vary, so it’s important to monitor the baking process to prevent burning.
- Let the cookies cool completely before serving: This prevents them from becoming soggy.
Variations:
- Different Extracts: Experiment with other extracts like vanilla, lemon, or orange for a unique flavor twist.
- Add Zest: A little lemon or orange zest adds a refreshing touch to the cookies.
- Gluten-Free Version: Substitute all-purpose flour with a gluten-free blend designed for baking.
- Vegan Version: Use vegan butter and ensure your powdered sugar is vegan-friendly.
- Chocolate Chunk Addition: Fold in some semi-sweet or dark chocolate chunks for a delicious combination.
Troubleshooting:
- Cookies are too flat: The dough wasn’t chilled enough. Chill the dough for longer before shaping and baking.
- Cookies are too dry: The oven temperature may have been too high, or the cookies were baked for too long. Reduce the baking time and/or oven temperature slightly for the next batch.
- Cookies are burning too quickly: Reduce the oven temperature by 25°F (14°C) and check more frequently.
Nutritional Information and Health Benefits of Cherry Snowball Cookies
While Cherry Snowball Cookies are undoubtedly a treat, it’s helpful to understand their nutritional profile. A single cookie (approximately 1-inch diameter) contains roughly 150-200 calories, depending on the specific ingredients and their quantities. The nutritional breakdown is approximate and may vary slightly. The primary components are carbohydrates from the flour and sugar, fats from the butter, and a small amount of protein. While not a health food, these cookies do offer some minor benefits. Maraschino cherries, while processed, contain small amounts of antioxidants. Almond extract, derived from almonds, is a source of vitamin E, a powerful antioxidant. Butter, while high in fat, provides some fat-soluble vitamins. However, moderation is key when enjoying these cookies, as excessive consumption of sugar and saturated fat can have negative health consequences. Enjoy them as an occasional treat rather than a regular part of your diet.
FAQs about Cherry Snowball Cookies
FAQs
Can I freeze Cherry Snowball Cookies?
Yes, you can freeze Cherry Snowball Cookies. Bake them as directed, let them cool completely, and then store them in an airtight container in the freezer for up to 3 months. Allow them to thaw at room temperature before serving.
How long do Cherry Snowball Cookies last at room temperature?
Cherry Snowball Cookies are best enjoyed within 3-4 days of baking when stored in an airtight container at room temperature. After that, the cookies may start to dry out.
What can I substitute for maraschino cherries?
While maraschino cherries provide a classic flavor, you can experiment with other dried or candied fruits like cranberries, chopped apricots, or even chopped dates for a different flavor profile. Keep in mind that the moisture content may slightly alter the texture.
Conclusion
Making Cherry Snowball Cookies is a delightful baking experience that yields a reward far greater than the effort involved. These cookies are a perfect blend of buttery shortbread, tangy cherry, and a subtle hint of almond, all encased in a delicate cloud of powdered sugar. The recipe’s simplicity and adaptability cater to all skill levels, making it an ideal choice for both novice and experienced bakers. Beyond the deliciousness, the process of making these cookies offers a chance to connect with the joy of baking and create memories to cherish. We encourage you to try this recipe and share your baking experience with us in the comments below. Don’t forget to share your photos on social media using #CherrySnowballCookies! And if you’re looking for more delicious holiday baking inspiration, check out our other recipes on the site, such as Christmas Gooey Butter Cookies or Christmas Thumbprint Cookies. Happy baking!
For even more cookie inspiration, check out this amazing Pinterest board: Pinterest Cookie Recipes
Cherry Snowball Cookies
Ingredients
Equipment
Method
- Cream together the softened butter and granulated sugar until light and fluffy. Use an electric mixer or mix by hand.
- Beat in the almond extract and salt.
- Gradually add the flour, mixing until just combined. Do not overmix.
- Stir in the finely chopped maraschino cherries.
- Form the dough into a ball, wrap tightly in plastic wrap, and refrigerate for at least 2 hours, or preferably overnight.
- Preheat oven to 350°F (175°C). Line baking sheets with parchment paper.
- Roll the chilled dough into 1-inch balls. Place onto prepared baking sheets, leaving some space between each cookie. Bake for 12-15 minutes, or until edges are lightly golden.
- While still warm, roll the cookies in powdered sugar. For extra flavor, brush with reserved cherry juice before rolling in powdered sugar. Let cool completely on a wire rack before serving.