If there’s one appetizer that consistently steals the show at any gathering be it game day, a holiday party, or a casual weekend get-together it’s the classic jalapeño popper. We all crave that irresistible blend of creamy, cheesy filling hugged by a crispy, savory exterior, finished with a delightful kick of heat. But what if we told you that you could capture all that legendary flavor in a stunning, make-ahead centerpiece? Enter the Jalapeño Popper Cheese Ball: a genius mashup that delivers the maximum popper experience with zero frying required.
This recipe is not just a dip; it is a declaration of comfort food transformed into an elegant, yet approachable, spreadable masterpiece. We blend two types of creamy cheese, load it with crispy bacon, fresh minced jalapeños, and subtle garlic, and then roll the entire creation in a crunchy, savory coating of Panko and reserved bacon crumbles. The result is a vibrant, unforgettable appetizer that your guests will be clamoring for. Forget the fussy stuffing and deep frying this Jalapeño Popper Cheese Ball is simple to prepare, incredibly customizable, and absolutely mandatory for your next event.
By following our detailed guide, you will master the essential techniques like properly softening the cream cheese and achieving the perfect chill that guarantee a flawless texture and flavor distribution. Get ready to elevate your appetizer game and watch this Jalapeño Popper Cheese Ball disappear faster than you can say “extra crispy bacon.”
Why the Jalapeño Popper Cheese Ball is Your Next Party Must-Have
The beauty of the cheese ball format is its ability to take a complicated concept and make it manageable, impressive, and deeply satisfying. The Jalapeño Popper Cheese Ball is the epitome of this transformation. When you serve this recipe, you are offering more than just a spread; you are delivering a complete sensory experience that hits every textural and flavor note imaginable.
Unbeatable Flavor Concentration: Unlike traditional jalapeño poppers where the filling is baked inside a thin pepper half, here, the spicy, garlicky, and smoky elements are intensely concentrated within the rich, fatty cream cheese matrix. Every bite is a balanced explosion of flavors: the cool tang of cream cheese, the salty crunch of bacon, and the vibrant, fresh heat of the jalapeño. This recipe ensures that the flavor consistency is perfect from the first scoop to the last smear.
The Perfect Textural Contrast: Texture is paramount in any great appetizer. Our recipe calls for fully softening the cream cheese base, ensuring a smooth, easily spreadable interior a stark contrast to the crunchy, toasted Panko and crispy bacon on the exterior. This dual texture creamy inside, crunchy outside is what keeps people coming back for more. We specifically use Panko breadcrumbs because their flaky structure provides a superior crispness compared to standard breadcrumbs, making that exterior coating truly stand out.
Designed for Make-Ahead Success: One of the biggest advantages of making a spicy cheese ball is its make-ahead capability. Appetizers are often the source of stress right before guests arrive. This Jalapeño Popper Cheese Ball not only allows, but demands, several hours of chilling time (or ideally, overnight). This essential step allows the intense flavors of the garlic, jalapeños, and bacon to fully meld into the cheese base, making it taste even better the next day. You can form the ball and leave it tightly wrapped in the refrigerator up to 48 hours in advance, leaving you with only the simple task of rolling it in the coating just before serving.
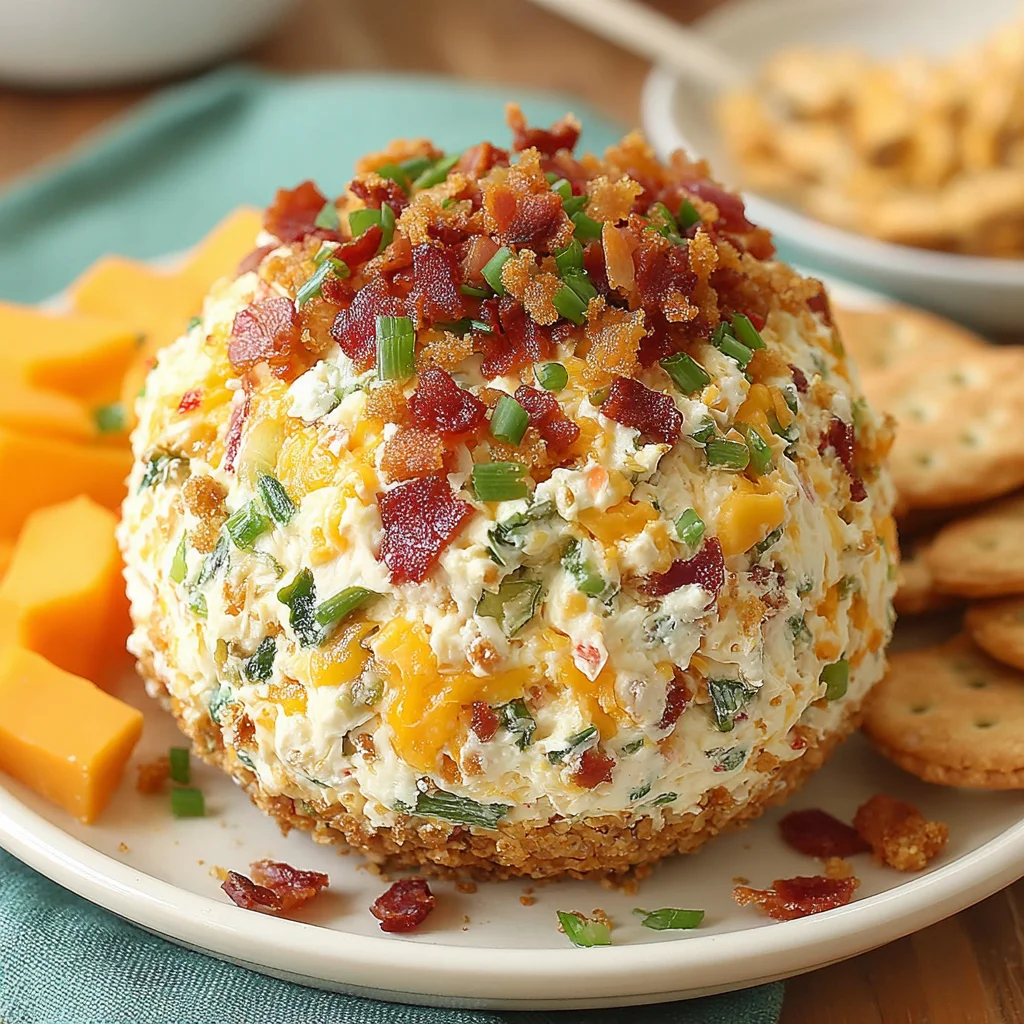
High Visual Impact: Let’s be honest presentation matters. A perfectly formed sphere, studded with vibrant green chives (or cilantro) and speckled with dark, crispy bacon and golden Panko, makes an instant statement on your appetizer table. It’s an inherently festive and appealing presentation that immediately signals a delicious time. Pair it with an assortment of sturdy crackers, pretzel sticks, and fresh vegetable slices, and you have an easy, elegant spread. For more delicious dips perfect for game days, check out our guide on The Ultimate French Onion Dip another crowd-pleasing appetizer ready for scooping!
More Than Just a Dip: Why You Must Try This Jalapeño Popper Cheese Ball
While the creamy and crispy elements of this appetizer are certainly compelling, the decision to transform the beloved jalapeño popper into a cheese ball format offers significant practical and culinary benefits that elevate it above standard party fare. This recipe doesn’t just replicate a flavor; it enhances the overall appetizer experience through convenience and versatility.
Controlling the Heat Profile: A common complaint about traditional poppers is the inconsistent level of heat. Sometimes, you bite into a mild pepper; other times, your mouth is on fire. By finely mincing fresh jalapeños and integrating them directly into the cheese mixture, you gain complete control. You can sample the mixture before chilling and adjust the seasoning or even add a pinch of cayenne or a few dashes of hot sauce for an extra kick without fearing an overwhelmingly spicy bite. The recipe provides guidance (2 peppers for moderate, 3 for maximum), allowing you to tailor the spice level perfectly to your guests’ preferences. This precision is difficult to achieve when stuffing whole peppers.
Superior Serving Ease: Think about serving traditional hot appetizers. They require warming, often dry out, and can be messy to eat. This Jalapeño Popper Cheese Ball is served at a slightly softened room temperature, making it effortlessly scoopable and spreadable. There’s no greasy residue from frying, no hot filling to burn your palate, and no complicated serving equipment needed. Just a platter, a knife or spreader, and your crackers of choice. It’s inherently low-maintenance, which is exactly what a host needs.
The Perfect Pairing Powerhouse: Because the base flavor is so robust creamy, smoky, and spicy this cheese ball pairs exceptionally well with almost any beverage, from hoppy craft beers (the bitterness cuts the creaminess beautifully) to crisp white wines or even robust iced tea. Its adaptability makes it the ideal anchor for an appetizer spread. It works alongside sweet dips, like our holiday Cranberry Jalapeño Dip, or savory, simpler offerings like a classic 3-Ingredient Sausage Cream Cheese Dip, ensuring there is a palate cleanser for everyone.
The “No-Bake” Advantage: In the world of complex party prep, the term “no-bake” is music to a host’s ears. This recipe requires absolutely no oven time, freeing up valuable appliance space, particularly during major holidays when the oven is perpetually dedicated to roasts and casseroles. The entire process mixing, shaping, and chilling can be executed on the countertop and in the refrigerator. This simplicity is a major selling point for busy home cooks who want maximum flavor return for minimal kitchen hassle. The intense, savory flavor you achieve here, despite the lack of baking, is truly astounding and a testament to the quality of the fresh ingredients used, making this a truly essential addition to your recipe arsenal.
Essential Ingredients and Tools for the Perfect Jalapeño Popper Cheese Ball
Achieving perfection with this Jalapeño Popper Cheese Ball relies heavily on ingredient quality and preparation. Because this is a no-cook mixture (besides the bacon), the flavor of each component shines through, making premium preparation non-negotiable. Below, we break down every essential item you need, emphasizing the crucial preparatory steps.
Deep Dive into the Ingredients
The successful execution of this recipe begins long before the mixing bowl comes out. Pay close attention to the state and preparation of your key ingredients.
For the Cream Cheese Base:
- 2 (8-ounce) packages full-fat cream cheese: This is the foundation of the cheese ball. It is absolutely essential that the cream cheese is completely softened to room temperature. If it’s cold, your mixture will be lumpy, difficult to blend smoothly, and the other ingredients will not distribute evenly. Allow at least 60 to 90 minutes on the counter, or gently microwave for 10-15 seconds per package if you are truly pressed for time, though natural softening is always best.
- 1 cup finely shredded Monterey Jack cheese (or sharp white cheddar): Monterey Jack melts beautifully into the cream cheese, adding stretch and a slightly milder flavor that lets the jalapeño and bacon shine. If you prefer a sharper tang, substituting with sharp white cheddar is an excellent choice. Ensure the cheese is finely shredded to integrate seamlessly into the base without causing graininess.
For the Jalapeño Popper Filling:
- 8 slices thick-cut bacon: The bacon provides the mandatory smoky and salty element. Thick-cut bacon holds its structure better after cooking and contributes a deeper, richer flavor. Cook it until it is extremely crispy (but not burnt) so that it crumbles easily into fine pieces. Remember to reserve 2 tablespoons of these fine crumbles for the decorative outer coating.
- 2 to 3 medium fresh jalapeños: The spice and freshness factor. The key to avoiding overwhelming heat is meticulous preparation: stems, seeds, and all white membranes must be thoroughly removed. This is where most of the capsaicin (heat) resides. Once cleaned, mince the peppers very, very finely. Larger chunks will not fold evenly and can create unexpected pockets of intense heat. Always wear gloves or wash your hands thoroughly after handling capsaicin to prevent painful irritation.
- 1/4 cup finely sliced green onions: Use only the white and light green parts. These add a subtle, fresh oniony counterpoint to the richness of the cheese and bacon.
- 1 teaspoon fresh garlic, finely minced: Use fresh garlic, not dried powder. The intensity of fresh garlic is necessary to stand up to the cheese and bacon flavor. Mincing it very finely prevents large, overwhelming bites of raw garlic.
- 1/2 teaspoon kosher salt and 1/4 teaspoon freshly ground black pepper: Basic seasoning to enhance all the savory components. Always taste the mixture slightly (after mixing everything but before final shaping) to ensure the salt level is adequate, especially if you used low-sodium bacon.
For the Outer Coating/Garnish:
- 1/2 cup crispy Panko breadcrumbs: Panko is paramount here. Its airy, flaky texture provides a far crunchier, more satisfying coating than standard breadcrumbs. Toasting the Panko briefly in a dry pan until light golden brown (and allowing it to cool completely) will deepen its flavor and enhance its crunch factor, though this is optional.
- The reserved 2 tablespoons of finely crumbled crispy bacon: This adds color, texture, and reinforces the smoky flavor of the coating.
- 1/4 cup finely snipped fresh chives or finely diced fresh cilantro (optional): This provides a beautiful pop of color against the white cheese and brown coating. Chives offer a mild, oniony flavor, while cilantro offers a brighter, herbaceous note (highly recommended if you lean toward a Tex-Mex flavor profile).
Recommended Kitchen Utensils for the Perfect Jalapeño Popper Cheese Ball
While this recipe doesn’t require specialized cooking equipment, having the right tools makes the process smoother, especially when dealing with the heavy, sticky cream cheese base.
- Stand Mixer or Hand Mixer: While a wooden spoon and elbow grease are acceptable, a stand mixer fitted with a paddle attachment (or a hand mixer) is highly recommended. It ensures the cream cheese is whipped into that necessary smooth, light consistency (Step 1) quickly and efficiently, without overworking the mixture and warming it up too much.
- Large Mixing Bowl: Necessary for combining the base and folding in the filling ingredients.
- Rubber Spatula: Essential for scraping down the sides of the bowl and, most importantly, for gently folding in the bacon and jalapeños. Folding helps distribute these chunky ingredients evenly without deflating the cream cheese or turning the mixture into a uniform mush.
- Sharp Knife and Cutting Board: Crucial for the precise, fine mincing of the jalapeños and garlic, as well as slicing the green onions. Precision chopping contributes to the overall smooth texture of the cheese ball.
- Plastic Wrap (Cling Film): Used for shaping the ball and tightly wrapping it for its essential chilling phase. Always use a generous amount to avoid the sticky mess of handling the soft cheese directly.
- Shallow Dish or Plate: Used specifically for holding the Panko and bacon coating mixture, allowing for easy, even rolling in Step 4.
By investing in the right ingredients and ensuring the cream cheese is properly softened, you set the stage for a spectacular and easy-to-manage appetizer. The quality of your bacon and the fine mince of the jalapeños are the subtle differences that take this from a good cheese ball to the absolute ultimate Jalapeño Popper Cheese Ball.
Step-by-Step Guide to Crafting Your Jalapeño Popper Cheese Ball
The process of making this signature appetizer is straightforward, but it relies on key techniques, especially regarding temperature and chilling time. Following these steps precisely will guarantee a beautifully smooth, firm, and flavorful Jalapeño Popper Cheese Ball.
Step 1: The Art of the Cream Cheese Base
The foundation must be perfect. If this step is rushed, the entire texture of your cheese ball will suffer.
- Soften Completely: Confirm that the two packages of cream cheese have reached full room temperature. Press a finger into the block; it should yield easily without resistance. This temperature is crucial for preventing a lumpy texture.
- Whip the Base: Place the softened cream cheese into a large mixing bowl. Using a stand mixer (paddle attachment) or a hand mixer, beat the cream cheese on medium-low speed. Beat until the cheese is visibly lighter in color, smooth, and completely uniform in texture. This process should take only 1 to 2 minutes. Do not overbeat, as incorporating too much air can make the final product slightly spongy.
- Add Secondary Cheese: Incorporate the 1 cup of finely shredded Monterey Jack (or cheddar). Mix on low speed just until the shredded cheese is evenly distributed within the cream cheese base. Stop the mixer, scrape down the sides of the bowl, and ensure everything is thoroughly combined.
Step 2: Integrating the Popper Flavors
This stage requires careful mixing to distribute the flavorful fillings evenly without crushing or warming the cream cheese too much.
- Bacon Integration: Take the majority of the finely crumbled, crispy bacon and add it to the cream cheese mixture. Reserve the 2 tablespoons of bacon for the final coating.
- Add Heat and Aromatics: Add the very finely minced, deseeded jalapeños, the minced fresh garlic, and the finely sliced green onions to the bowl.
- Seasoning: Sprinkle the 1/2 teaspoon of kosher salt and the 1/4 teaspoon of black pepper over the ingredients.
- Gentle Folding: This is a critical step. Put down the electric mixer. Use a rubber spatula to gently fold the ingredients together. Start at the bottom of the bowl and lift the mixture over the top, rotating the bowl as you go. Continue this folding motion until the jalapeños and bacon are perfectly and evenly distributed throughout the cheese base. Do not overmix. If you mix too vigorously, the cream cheese will become too warm and soft, making Step 3 difficult, and risking a gritty texture.
Step 3: Forming and Chilling the Cheese Ball
Chilling is not optional; it’s the transformative step that allows the Jalapeño Popper Cheese Ball to firm up and for the flavors to deepen and meld.
- Prepare the Wrap: Lay out a large piece of plastic wrap (about 18-24 inches) on your clean counter surface.
- Scoop and Shape: Scoop the entire cheese mixture onto the center of the plastic wrap.
- Initial Forming: Gather the edges of the plastic wrap and begin gently guiding the mixture into a round, spherical shape. Use the plastic wrap itself as a barrier between your hands and the cheese. Try to make the shape as smooth and uniform as possible.
- Tight Seal and Chill: Once shaped, pull the plastic wrap tightly around the ball, pressing out any remaining air bubbles. Seal the wrap completely. Place the tightly wrapped cheese ball onto a small flat surface (like a plate or sheet pan). Refrigerate for a minimum of 4 hours, or preferably overnight. The firmer the ball, the easier it will be to coat and handle.
For more appetizer inspiration, especially for savory dips and spreads, you might enjoy browsing the boards on our Pinterest account for recipes and ideas!
Step 4: Achieving the Crispy Outer Coating and Finishing the Ball
The grand finale the crunchy, flavorful exterior that gives this appetizer its signature texture.
- Prepare the Coating: About 20 minutes before you plan to serve, prepare the coating. In a shallow dish, combine the 1/2 cup of Panko breadcrumbs, the reserved 2 tablespoons of crispy bacon crumbles, and the optional snipped fresh chives (or cilantro). Stir well until the coating is uniformly mixed.
- Unwrap and Roll: Remove the firm, chilled cheese ball from the refrigerator and discard the plastic wrap. Gently place the cold ball directly into the center of the coating mixture.
- Adherence: Roll the cheese ball, turning it often, until the entire surface is covered. Use the palms of your hands to gently press the coating onto the surface. This firm, yet delicate pressure helps the Panko and bacon adhere securely to the cold cheese ball, preventing the coating from flaking off when served.
Step 5: Serving and Presentation
A properly served cheese ball is slightly soft, making it easy for guests to spread.
- Temper: Transfer the finished, coated Jalapeño Popper Cheese Ball to your chosen serving platter. Allow the cheese ball to sit at room temperature for 15 to 20 minutes before serving. This crucial tempering time slightly softens the outer layer, making it much easier to scoop and spread without destroying the ball’s shape.
- Serve: Arrange your crackers (sturdy varieties like Wheat Thins, Rye Crisps, or bagel chips are excellent), pretzels, and sliced fresh vegetables (carrots, celery, bell peppers) around the platter. Provide a small cheese knife or spreader for guests.
- Storage: Leftovers must be wrapped tightly in fresh plastic wrap and stored in the refrigerator for up to 5 days. Note: The Panko coating may soften slightly upon refrigeration, but the flavor remains excellent.
Expert Tips and Flavor Variations for Your Jalapeño Popper Cheese Ball
While the core recipe for the Jalapeño Popper Cheese Ball is perfection, there are countless ways to customize it to suit dietary needs or enhance its flavor profile. Using these expert tips ensures a flawless result every time, and the variation suggestions allow you to put your own unique spin on this classic appetizer.
Common Mistakes to Avoid for a Perfect Jalapeño Popper Cheese Ball
Success often lies in avoiding simple pitfalls, particularly when dealing with dairy-heavy, no-bake recipes.
- Ignoring the Room Temperature Rule: As mentioned, cold cream cheese results in lumps. Lumps trap air and make the ball weak, potentially leading to cracking or crumbling when you try to roll it. Plan ahead and ensure the cheese is fully softened.
- Skipping the Chill Time: A cheese ball needs firmness to hold its shape and accept the coating. If you rush the chilling (less than 4 hours), the ball will be too sticky, and the coating will clump instead of adhering evenly. If serving for a major holiday, always chill overnight.
- Using Large Jalapeño Chunks: The jalapenos must be finely minced. If the pieces are too large, they won’t distribute evenly, and the ball structure will be compromised, leading to a lumpy surface when chilled.
- Overmixing: Once the bacon, peppers, and garlic are added, switch to a spatula and use gentle folding motions. Overmixing incorporates too much air and friction, which melts the cheese and makes the mixture overly soft and oily.
Ingredient Alternatives and Flavor Swaps
Need to adapt the recipe for dietary reasons or just want to try a new twist on your spicy cheese ball?
Cheese Substitutions:
- For a smokier flavor: Substitute the Monterey Jack with smoked Gouda or smoked cheddar. The smokiness complements the bacon and the heat of the jalapeño beautifully.
- For extra heat: Swap the Monterey Jack for shredded Pepper Jack cheese. This adds consistent, milder heat throughout the cheese base.
- Low-Fat Option: While full-fat cream cheese is recommended for the best flavor and texture, you can use Neufchatel cheese (one-third less fat) with good results. Avoid completely fat-free cream cheese, as it tends to become rubbery when cold.
Coating Variations:
- Gluten-Free Coating: For a gluten-free Jalapeño Popper Cheese Ball, swap the Panko breadcrumbs for finely crushed pork rinds (chicharrones) or finely crushed tortilla chips. These offer a fantastic crunch and enhance the savory flavor profile.
- Nutty Crunch: Swap half of the Panko for finely chopped pecans or walnuts. Toasting the nuts slightly before crushing and adding them to the coating enhances their flavor dramatically.
- Everything Bagel Twist: Omit the Panko and use a mix of Everything Bagel seasoning, sesame seeds, and poppy seeds for a different savory profile.
Heat Control Adjustments:
- If you prefer zero heat: Substitute the jalapeños with finely minced green bell peppers. You lose the spice, but maintain the vibrant color and vegetal freshness.
- If you want extreme heat: Add a pinch of cayenne pepper to the cheese mixture, or finely mince half of a habanero pepper and integrate it carefully. Alternatively, drizzle the finished cheese ball with hot honey just before serving for sweet heat.
Understanding the Nutritional Profile of the Jalapeño Popper Cheese Ball
When indulging in a rich, flavorful appetizer like the Jalapeño Popper Cheese Ball, it’s helpful to understand the components that contribute to its decadent nature. This recipe is designed to be a centerpiece, an occasional treat focused on flavor and satisfaction rather than a staple diet item. As a dairy-rich, bacon-heavy appetizer, it is naturally high in fats and protein, making it extremely satiating.
Note on Nutritional Estimates: Since cheese ball serving sizes vary greatly depending on the cracker ratio and guest consumption, the following analysis is based on the total ingredients, which typically yield 16-20 servings.
Estimated Nutritional Breakdown (Per 1/16th Serving, without crackers):
| Nutrient | Approximate Value |
|---|---|
| Calories | 200–250 kcal |
| Protein | 8–10 g |
| Total Fat | 18–22 g |
| Saturated Fat | 10–13 g |
| Carbohydrates | 3–5 g (primarily Panko) |
| Sodium | 300–400 mg |
Key Component Benefits and Considerations
Cream Cheese and Monterey Jack (Dairy Base):
- Rich in Fats: The high-fat content is what gives this cheese ball its incredibly smooth texture and rich flavor. These healthy fats help with satiety, meaning a small serving is highly satisfying.
- Protein and Calcium: Cream cheese and Monterey Jack are good sources of protein, which supports muscle maintenance, and calcium, which is essential for bone health.
- Vitamin A: Dairy products contain Vitamin A, important for vision and immune function.
Bacon (Protein and Flavor):
- High in Protein: Bacon contributes a significant amount of high-quality protein, which helps slow the digestion of the fats and carbohydrates, leading to a steady energy release.
- Smoky Flavor: The fat and sodium content in bacon are crucial for the flavor profile. If monitoring sodium intake, choose a lower-sodium bacon variety, but remember to adjust the added kosher salt in the recipe accordingly.
Jalapeños (Freshness and Vitamins):
- Vitamin C and Antioxidants: Fresh jalapeños are surprisingly nutrient-dense. They are an excellent source of Vitamin C, which is a powerful antioxidant and crucial for immune support.
- Metabolic Boost: The capsaicin (the compound that causes heat) found in peppers has been linked to temporary increases in metabolism and acts as a mild anti-inflammatory agent. Since we remove most of the heat-producing membranes, the benefits are retained without overwhelming spiciness.
Dietary Considerations: This Jalapeño Popper Cheese Ball is naturally low in net carbohydrates (excluding the Panko coating, which is minimal per serving), making it suitable for those following a ketogenic or low-carb diet, provided they serve it with appropriate low-carb dippers (like celery sticks, cucumber slices, or low-carb crackers). For those managing cholesterol or fat intake, moderation is key, as is opting for leaner bacon or substituting some of the bacon with roasted red peppers for a savory, smoky flavor that cuts down on saturated fat.
Frequently Asked Questions (FAQ) about the Jalapeño Popper Cheese Ball
Jalapeño Popper Cheese Ball FAQs
Can I use jarred jalapeños instead of fresh ones in the Jalapeño Popper Cheese Ball?
While fresh jalapeños are highly recommended for their crisp texture and vibrant flavor, you can substitute jarred, pickled jalapeños in a pinch. If using pickled peppers, make sure to pat them extremely dry with paper towels before mincing them. This prevents excess moisture from making the cream cheese base soggy or unstable. Start with slightly less than the recipe calls for, as pickled peppers tend to have a stronger, tangier flavor.
How far in advance can I make this Jalapeño Popper Cheese Ball?
The cheese ball is an ideal make-ahead appetizer. You can prepare the mixture and form the sphere up to three days in advance. Store it tightly wrapped in plastic wrap in the refrigerator. Wait until about 20 minutes before serving to roll the firm ball in the Panko and bacon coating; this keeps the coating maximally crispy and fresh for your guests.
Why did my Jalapeño Popper Cheese Ball crack when I tried to roll it?
Cracking usually occurs if the ball was not chilled long enough, causing it to be too soft and yielding under pressure, or if the cream cheese was overworked during mixing. If your ball cracks, gently use the plastic wrap to push the mixture back together. If it’s too warm, re-chill it for an hour before attempting to coat it again. If the crack is minor, the coating will generally hide and reinforce the structure.
What are the best dippers for the Jalapeño Popper Cheese Ball?
Choose dippers that are sturdy enough to handle the thick, heavy spread. Excellent choices include sturdy rye crackers, water crackers, bagel chips, thick pretzel sticks, and pita chips. For a healthier option, serve with raw vegetable sticks like celery, carrots, cucumber, and bell pepper slices, as the crunchy texture complements the soft cheese wonderfully.
Can I freeze the Jalapeño Popper Cheese Ball?
Freezing is possible, but not highly recommended, as it can alter the texture of the cream cheese, making it slightly grainy or crumbly when thawed. If you must freeze, wrap the plain, uncoated cheese ball very tightly in two layers of plastic wrap and a layer of foil. Thaw overnight in the refrigerator, unwrap, and then proceed with the Panko coating just before serving. Best results come from fresh preparation and refrigeration only.
Conclusion: The Perfect Appetizer for Any Occasion
The Jalapeño Popper Cheese Ball stands out as a triumphant example of culinary fusion taking the intensely craveable flavors of a fried classic and transforming them into an easy, elegant, and make-ahead party staple. We have provided you with the detailed blueprint for success: from the necessity of room temperature cream cheese for a smooth base to the crucial overnight chill that allows the sharp, savory flavors of the fresh jalapeños, garlic, and crispy bacon to harmonize perfectly.
This recipe guarantees high impact with low effort. You gain full control over the spice level and the coating texture, ensuring that your appetizer is perfectly tailored to your guests. Whether you are hosting a festive holiday gathering, gearing up for game day, or simply craving a delicious snack to share, this creamy, crispy, and spicy spread is the guaranteed favorite. The perfect textural contrast between the soft, spreadable interior and the crunchy Panko-bacon exterior is utterly addictive, making it impossible to stop at just one scoop.
We encourage you to try this recipe for your next event. Prepare the base tonight, let those flavors deepen in the refrigerator, and tomorrow, you’ll have a spectacular Jalapeño Popper Cheese Ball ready to roll and serve. Don’t forget to experiment with the variations add smoked cheddar or use crushed pork rinds for a zero-carb coating. Once you taste the homemade difference, you’ll never rely on store-bought appetizers again.
Did you make this recipe? Share your variations and serving suggestions in the comments below! We love to see how you customize this ultimate Jalapeño Popper Cheese Ball for your friends and family. Happy dipping!
THE COPY-PASTE READY RECIPE FOR THE ULTIMATE JALAPEÑO POPPER CHEESE BALL
Ingredients
Equipment
Method
- Ensure the cream cheese is fully softened. Cook the 8 slices of bacon until very crispy. Finely crumble the bacon, reserving 2 tablespoons for the exterior coating.
- In a large mixing bowl, beat the softened cream cheese on medium-low speed until it is smooth, light, and completely uniform in texture (about 1 to 2 minutes).
- Add the 1 cup of shredded Monterey Jack cheese to the cream cheese base and mix thoroughly until just combined. Scrape down the sides of the bowl as needed.
- Gently fold the majority of the finely crumbled bacon (all but the reserved 2 tablespoons) into the cream cheese mixture.
- Add the minced jalapeños, fresh garlic, sliced green onions, kosher salt, and black pepper. Use a rubber spatula to fold the ingredients carefully until evenly distributed throughout the cheese mixture. Avoid overmixing.
- Lay out a large piece of plastic wrap. Scoop the entire mixture onto the center of the wrap. Using the plastic wrap as a guide, form the mixture into a tight, round sphere.
- Wrap the cheese ball tightly, pressing out any air, and place it on a plate. Refrigerate for a minimum of 4 hours (or overnight) to allow the flavors to meld and the ball to become firm enough to hold its shape.
- Prepare the coating: In a shallow dish, combine the 1/2 cup Panko breadcrumbs, the reserved 2 tablespoons of crispy bacon crumbles, and the optional snipped chives/cilantro. Stir well.
- Remove the firm cheese ball from the refrigerator and discard the plastic wrap. Roll the cheese ball firmly in the coating mixture, pressing gently to ensure the surface is completely covered and the coating adheres.
- Transfer to a serving platter. Allow the cheese ball to sit at room temperature for 15 to 20 minutes before serving to soften slightly. Serve immediately with sturdy crackers, crostini, or fresh vegetables.