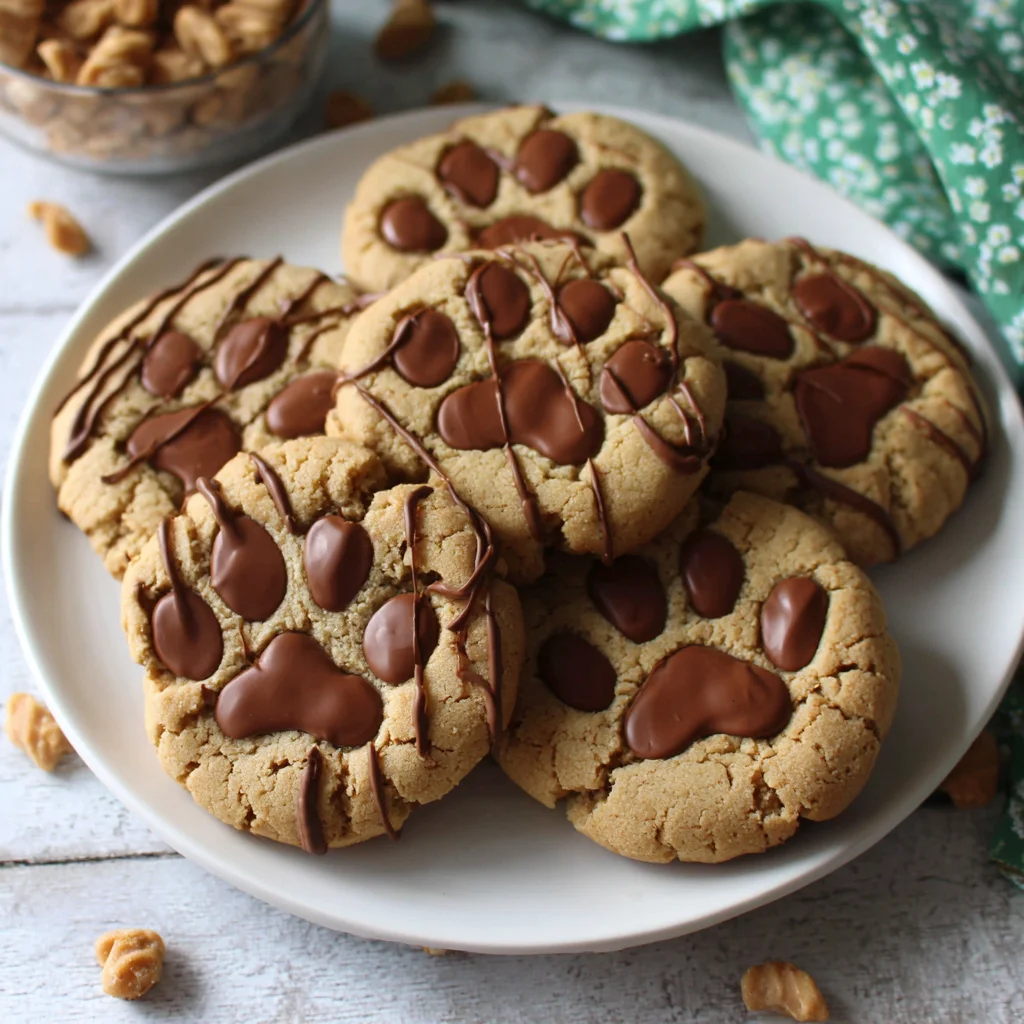
There is a special joy in baking, and when that joy results in a treat that is both incredibly delicious and irresistibly cute, you know you have found a winning recipe. Meet the Peanut Butter Paw Print Cookies a whimsical twist on the classic peanut butter chocolate chip cookie that brings a smile to everyone’s face. These cookies capture everything we love about homemade treats: they are chewy, packed with rich, nutty flavor, have perfectly crisp, sugared edges, and feature the delightful melt of chocolate right where you need it most.
For decades, the humble peanut butter cookie has reigned supreme in the pantheon of comfort desserts. But why settle for a simple cross-hatch when you can create a charming paw print? This recipe takes the foundational perfection of a soft, moist peanut butter dough and elevates it into a centerpiece dessert, perfect for themed parties, holidays, or just a cozy afternoon snack. Whether you are a seasoned baker looking for a cute novelty or a beginner seeking a foolproof method, these Peanut Butter Paw Print Cookies are designed for success. We’ll guide you through every step, ensuring you achieve that ideal balance of sweet, salty, and utterly adorable.
Forget store-bought snacks; the aroma of these cookies baking is enough to transform your kitchen into the warmest, most welcoming place on earth. The magic happens right out of the oven, where the strategic placement of chocolate chips transforms a simple sugar-rolled dome into an unmistakable little paw. If you love peanut butter cookies, and you appreciate a treat with personality, prepare to fall head over heels for the best Peanut Butter Paw Print Cookies you will ever make.
Why You’ll Absolutely Love These Peanut Butter Paw Print Cookies
These aren’t just any cookies; they are an experience. The reasons to adore the Peanut Butter Paw Print Cookies go far beyond their charming appearance. They hit every benchmark for a perfect homemade baked good, satisfying textural cravings and delivering deep, comforting flavor. When you bite into one of these, you are greeted first by the slight crunch of the granulated sugar coating, followed immediately by a soft, tender interior that melts in your mouth.
The Perfect Marriage of Texture and Taste
We use a combination of unsalted butter, creamy peanut butter, and two types of sugar (granulated and packed light brown sugar) to create a sophisticated flavor profile. The brown sugar ensures the cookies remain moist and chewy, lending subtle notes of caramel and molasses that complement the roasted nut flavor of the peanut butter. Meanwhile, the granulated sugar contributes to structural integrity and provides that desirable crispness around the edges.
Many peanut butter cookies tend to be dry or crumbly, but this specific ratio is engineered for ultimate chewiness. When baked for just 10 to 12 minutes, the centers remain slightly underdone the secret to avoiding a tough cookie. The moment they are pulled from the oven, they are transformed into edible perfection, ready to receive their chocolate accessories.
A Touch of Whimsy and Creativity
The visual appeal is undeniable. In a sea of standard drop cookies, these stand out. Creating the paw print is not just fun, it’s functional; the warm chocolate chips melt slightly, adhering securely to the soft dough, creating little pockets of intense chocolate flavor that cut through the richness of the peanut butter. You use one standard semi-sweet chocolate chip for the main paw pad and three mini semi-sweet chocolate chips for the toes, providing a delightful variety in texture and shape. This process is surprisingly quick and makes for a fantastic interactive step, especially if you have little helpers in the kitchen. For more inventive cookie designs, you might enjoy trying out Christmas Thumbprint Cookies, which also rely on immediate post-baking manipulation.
High Yield and Freezer Friendly
This recipe yields approximately three dozen cookies, making it ideal for large gatherings, bake sales, or simply ensuring you have enough for multiple weeks of snacking. The dough freezes beautifully, too! You can easily prepare the dough balls, sugar-coat them, and freeze them on a sheet tray before transferring them to an airtight container. When a craving strikes, just pop the frozen dough balls straight onto a baking sheet, add a few minutes to the baking time, and you’ll have freshly baked Peanut Butter Paw Print Cookies whenever you need them. This convenience makes these treats a regular staple in many households.
The Joy of Baking: Why You Should Try This Peanut Butter Paw Print Cookies Recipe Today
Baking is more than just following steps; it’s a therapeutic and rewarding endeavor. Making Peanut Butter Paw Print Cookies offers a unique combination of simplicity and charming complexity that makes the process truly enjoyable. If you’ve been searching for a reliable, fun, and impressive cookie recipe, this is your sign to start preheating the oven.
Perfect for Every Occasion
While the paw print design might seem seasonal or specific, these cookies are truly versatile. They are sturdy enough for packing in lunch boxes, elegant enough for a dessert platter, and playful enough for birthday parties, especially if your theme involves animals, pets, or outdoor adventures. They make perfect homemade gifts, tucked into decorative tins or bags. The distinct shape also provides an excellent conversation starter people are always curious about how the perfect paw print indentation is created!
Mastering the Peanut Butter Base
A successful paw print cookie starts with an exceptional peanut butter cookie base. This recipe serves as a foundational masterclass in creating the perfect soft-baked peanut butter cookie. Once you master this specific creaming technique and ingredient balance, you can easily adapt it for other classic recipes, such as standard Classic Peanut Butter Cookies or even adding different mix-ins for Peanut Butter Chocolate Chip Cookies. The key is in the precise measurements of fats and sugars, ensuring your cookies spread just enough without becoming flat or greasy.
A Fun Family Project
Baking these cookies is a fantastic activity to share with children or friends. From rolling the dough balls in granulated sugar to the critical step of placing the chocolate chips immediately after baking, there are several hands-on tasks that are safe and fun for all ages. The urgency of adding the chocolate chips while the cookies are piping hot adds an element of excitement and coordination, turning the cooling process into a quick, decisive decorating session.
The satisfaction of pulling a tray of beautifully golden cookies from the oven is unmatched, and watching the chocolate chips adhere to form the adorable paw prints is pure magic. This recipe reinforces the idea that the best treats are often those made with love, right in your own kitchen. We also highly recommend sharing your baking journey on social media; tag us so we can see your adorable batches of Peanut Butter Paw Print Cookies!
Essential Ingredients and Tools for Perfect Peanut Butter Paw Print Cookies
Baking success relies heavily on two factors: high-quality ingredients and the right equipment. To achieve those beautifully chewy, perfectly shaped Peanut Butter Paw Print Cookies, pay close attention to the details of this list. Everything is measured precisely to ensure the perfect moisture and texture.
The Detailed Ingredient List
Using standard, high-quality ingredients is key. Ensure your butter and egg are at room temperature for optimal mixing.
- 1 ¾ cups All-Purpose Flour: Essential for structure. Always measure flour using the spoon-and-level method (spoon the flour into the measuring cup, then level off the top with a straight edge) to prevent overly dense cookies.
- 1 teaspoon Baking Soda: The primary leavening agent. This reacts with the acidic brown sugar to give the cookies their lift and classic puffiness.
- ½ teaspoon Salt: Crucial for balancing the sweetness and enhancing the nutty flavor of the peanut butter.
- ½ cup (1 stick) Unsalted Butter, softened: Must be softened to room temperature (not melted) for proper creaming with the sugars. This incorporation of air is vital for cookie texture.
- ½ cup Creamy Peanut Butter: Use standard creamy peanut butter (like Jif or Skippy) for the best results. Natural peanut butter (the kind that separates) tends to yield a drier, crumblier cookie due to oil content variations.
- ½ cup Granulated Sugar, plus extra for rolling: Used in the dough for sweetness and to aid in creaming. The extra sugar for rolling gives the cookies a beautiful, crunchy exterior and prevents sticking.
- ½ cup Packed Light Brown Sugar: Provides moisture, chewiness, and that subtle molasses flavor that defines a perfect soft-baked cookie. Ensure it is firmly packed into the measuring cup.
- 1 large Egg: Acts as a binder. Ensure it is at room temperature so it incorporates seamlessly into the creamed mixture without curdling.
- 1 teaspoon Vanilla Extract: Enhances all the other flavors. Use pure vanilla extract for the best taste.
The Chocolate Components (For the Paw Print)
Precision in the chocolate chips is what makes the paw prints look perfect:
- 36 Standard Semi-Sweet Chocolate Chips: These are for the large main pad of the paw. (You will need 1 chip per cookie.)
- 108 Mini Semi-Sweet Chocolate Chips: These form the three smaller toe pads. (You will need 3 mini chips per cookie.)
Pro Tip on Chocolate: Keep the chocolate chips separate and ready on the counter. Once the cookies come out of the oven, speed is essential, and you won’t want to be measuring or separating them during the critical window.
Recommended Tools and Utensils for Cookie Perfection
Having the right tools streamlines the baking process and guarantees consistent, bakery-quality results. Don’t underestimate the importance of tools like the mixer and the cookie scoop when making Peanut Butter Paw Print Cookies.
Mixing Equipment
- Stand Mixer (Highly Recommended): A stand mixer fitted with the paddle attachment is ideal for the creaming process, ensuring the butter, peanut butter, and sugars are perfectly combined and aerated.
- Hand Mixer (Alternative): A quality hand mixer works perfectly well, especially for smaller batches, but requires more manual scraping and attention.
- Medium Mixing Bowl: For whisking the dry ingredients together.
- Rubber Spatula: Essential for scraping down the sides of the bowl during mixing and folding the final dry ingredients into the wet mixture.
Baking and Preparation Tools
- Two Large Baking Sheets: Needed to bake the entire batch efficiently. Using two sheets prevents overcrowding the oven, which can lead to uneven baking.
- Parchment Paper or Silicone Baking Mats: Non-negotiable! These prevent sticking and ensure consistent heat distribution. Silicone mats (like Silpats) also help regulate spreading, leading to slightly thicker cookies.
- Wire Cooling Rack: Necessary for the final cooling step, allowing air to circulate around the cookie bottoms to prevent them from getting soggy.
- Shallow Dish: For holding the extra granulated sugar used to coat the dough balls before baking.
- Standard Cookie Scoop (1.5 inches / approx 1.5 tablespoons): This is perhaps the most critical tool for consistent results. Using a scoop ensures every cookie is exactly the same size, which means they all bake evenly. If your cookies are different sizes, some will burn while others remain raw.
By preparing these ingredients and tools in advance, you set yourself up for a smooth, enjoyable baking session that results in picture-perfect Peanut Butter Paw Print Cookies every time.
Step-by-Step Guide to Baking Irresistible Peanut Butter Paw Print Cookies
Following these detailed instructions is the roadmap to cookie success. Pay special attention to the creaming time and the critical step of adding the chocolate chips while the cookies are still piping hot.
Phase 1: Preparation and Dry Ingredients
- Preheat and Prep (Step 1): Preheat your oven to a precise 350°F (175°C). Temperature control is vital for proper spread and chewiness. Line two large baking sheets with parchment paper or silicone baking mats. This prevents sticking and makes cleanup a breeze.
- Combine Dry Ingredients (Step 2): In a medium bowl, whisk together the flour, baking soda, and salt. Whisking ensures the leavening agent (baking soda) and salt are evenly distributed throughout the dough, preventing patches of raw taste or uneven rising. Set this mixture aside.
Phase 2: Creaming and Dough Mixing
- Cream Fats and Sugars (Step 3): This is the most crucial stage for cookie texture. In the bowl of a stand mixer fitted with the paddle attachment, or using a large bowl and a hand mixer, combine the softened butter, creamy peanut butter, granulated sugar, and brown sugar. Beat on medium speed until the mixture is light and fluffy. This should take approximately 3 to 4 minutes. The mixture must visibly lighten in color and increase slightly in volume. Stop frequently to scrape down the sides and the bottom of the bowl to ensure everything is fully incorporated.
- Add Egg and Vanilla (Step 4): Beat in the large egg until just combined. Overmixing the egg can activate too much gluten. Once combined, stir in the vanilla extract until fragrant.
- Mix Dough (Step 5): Gradually add the dry ingredient mixture (from Step 2) to the wet ingredients. Mix on low speed until the dough comes together. Stop mixing immediately once no streaks of flour remain. Overmixing the flour develops gluten, resulting in tough, dry cookies. The dough should be soft but manageable.
Phase 3: Rolling, Coating, and Baking
- Roll the Dough (Step 6): Pour a small amount of extra granulated sugar into a shallow dish for rolling. Scoop the dough using a standard tablespoon or a small cookie scoop (about 1.5 inches in diameter). Consistency is key here! Roll each portion into a smooth, uniform ball.
- Sugar Coat and Place (Step 7): Lightly roll each dough ball in the extra granulated sugar, ensuring the entire surface is fully coated. This sugared layer promotes crisp edges and prevents the dough from spreading too quickly. Place the dough balls onto the prepared baking sheets, spacing them approximately 2 inches apart to allow for spread.
- Bake (Step 8): Bake for 10 to 12 minutes. You are looking for visual cues: the edges should be set and lightly golden brown, but the center of the cookie must still look slightly soft and maybe even a little puffy. Pulling them out at this stage guarantees a chewy center.
Phase 4: Creating the Paw Prints (The Magic Moment)
The next two steps must happen immediately as soon as the cookies exit the oven. Do not wait for them to cool.
- Create the Paw Prints (Immediate Action – Step 9): As soon as the cookies come out of the oven, while they are still hot and pliable, gently press one standard semi-sweet chocolate chip into the center of each cookie. Press just enough to indent the cookie slightly and secure the chip; this forms the main pad of the paw.
- Add the Toes (Step 10): Immediately follow by pressing three mini semi-sweet chocolate chips above the standard chip. These form the smaller toe pads. Arrange them in a slight arc, pressing gently enough that they adhere without cracking the cookie. The residual heat will soften the chocolate, cementing the paw print in place as the cookie cools.
Phase 5: Cooling and Serving
- Cool (Step 11): Allow the Peanut Butter Paw Print Cookies to cool completely on the baking sheet for 5 minutes. This cooling time is essential the cookies are delicate when hot and this period allows them to set and firm up before moving. After 5 minutes, carefully transfer them to a wire rack to finish cooling completely. This ensures the cookies hold their perfect paw print shape and the chocolate chips set firmly into the dough.
- Serve (Step 12): Once fully cooled, these adorable and delicious Peanut Butter Paw Print Cookies are ready to serve and share!
Tips, Variations, and Solving Common Cookie Mistakes
While the recipe for these Peanut Butter Paw Print Cookies is straightforward, a few expert tips can elevate your results. Plus, we offer variations for those with specific dietary needs or flavor preferences.
Pro Tips for Perfect Baking
- Temperature Matters: Ensure your butter and egg are genuinely at room temperature. If they are too cold, they won’t emulsify correctly with the sugars, leading to a denser cookie. If the butter is too warm or greasy, the cookies will spread too much.
- The Flour Test: When adding the dry mixture, remember that less is often more. The moment the flour streaks disappear, stop the mixer. A perfectly mixed dough is the secret to a tender crumb.
- Don’t Skimp on Sugar Rolling: The exterior sugar coating is vital. It creates a satisfying crunch and contributes to the visual appeal.
- Chill if Needed: If your kitchen is very warm, or if your dough feels overly sticky after mixing, cover the bowl and chill the dough for 15-20 minutes. This helps the fats firm up, ensuring the cookies maintain their thickness during baking.
- Crucial Timing: The paw print step requires speed. Have all 144 chocolate chips (36 standard, 108 mini) lined up and ready before the timer goes off. You typically have a window of about 60 to 90 seconds after removing the tray from the oven before the cookies begin to firm up too much.
Ingredient Alternatives and Variations
Want to customize your Peanut Butter Paw Print Cookies? Here are a few popular adjustments:
- Nut Butter Swaps: While creamy, stabilized peanut butter works best for texture, you can try other nut butters. Almond butter or cashew butter can be used, though you might need to slightly increase the flour (by 1-2 tablespoons) if the dough seems oilier than usual.
- Vegan Peanut Butter Paw Print Cookies: Easily convert this recipe by swapping the butter for a high-quality vegan butter stick or refined coconut oil (used in solid form). Replace the large egg with a flax egg (1 tbsp ground flaxseed mixed with 3 tbsp water, rested for 5 minutes).
- Gluten-Free Version: Replace the all-purpose flour with a high-quality 1:1 gluten-free baking blend that contains xanthan gum. No other adjustments should be necessary.
- Chocolate Variations: Feel free to use white chocolate chips, milk chocolate chips, or even dark chocolate chips for the paw prints, depending on your preference. Just ensure you use the standard and mini sizes for the right look.
- Adding Crunch: For extra texture, you can substitute the creamy peanut butter with crunchy peanut butter, just be aware that the overall cookie might be slightly less uniform.
Troubleshooting Common Cookie Issues
My cookies spread too much and are flat.
This is often caused by butter that was too warm or melted, too little flour, or oven temperature inaccuracy. Ensure the butter is only softened, not greasy. Try chilling the dough balls for 30 minutes before baking to solidify the fats and limit spread.
The chocolate chips won’t stick or the cookie cracks when I press them in.
If the chocolate chips don’t stick, the cookies have cooled too much. This step must be done literally within 10 seconds of pulling them from the oven. If the cookie cracks, you are pressing too hard. Use a gentle, focused pressure just enough to indent the chip into the surface.
For more inspiration on unique baking ideas, consider following our baking boards on Pinterest.
Nutritional Insights: Deliciousness Meets Wholesome Ingredients
While these Peanut Butter Paw Print Cookies are undoubtedly an indulgent treat, they also contain ingredients that offer specific nutritional benefits. Understanding what goes into your favorite baked goods allows you to enjoy them mindfully.
Estimated Nutritional Breakdown (Per Cookie)
Please note: Since exact caloric content varies based on specific brands of peanut butter and flour, these figures are estimates for an average cookie size (approximately 36 servings).
- Calories: Approximately 150-180 kcal
- Protein: 3-4 grams
- Total Fat: 8-10 grams (mostly monounsaturated and polyunsaturated fats from the peanut butter)
- Saturated Fat: 4-5 grams
- Total Carbohydrates: 18-22 grams
- Sugar: 10-14 grams (includes natural and added sugars)
- Fiber: ~1 gram
The Benefits of Peanut Butter
Peanut butter is the star of these Peanut Butter Paw Print Cookies, providing not just flavor, but significant nutritional value:
- Excellent Protein Source: Peanut butter is known for its high protein content, which is essential for muscle repair and provides sustained energy. While a cookie is not a main meal, the inclusion of protein helps stabilize blood sugar more than a purely carbohydrate-based dessert.
- Healthy Fats: The fats found in peanut butter are primarily heart-healthy monounsaturated and polyunsaturated fats. These beneficial fats can help lower bad cholesterol levels and contribute to overall cardiovascular health.
- Vitamins and Minerals: Peanut butter is a good source of Niacin (Vitamin B3), which supports nervous system function, and Vitamin E, a potent antioxidant. It also contains magnesium, crucial for bone health and energy production.
Energy and Moderation
These cookies serve as a satisfying and energizing snack. The combination of simple carbohydrates (from sugars and flour) offers quick energy, while the fats and protein from the peanut butter ensure that energy release is slow and sustained. Because they are so rich and flavorful, moderation is key. They are perfectly sized as a satisfying treat to enjoy with a glass of milk or a cup of coffee.
By preparing these treats at home, you have complete control over the ingredients, ensuring they contain no unnecessary preservatives or artificial flavors just pure, wholesome ingredients combined to create the perfect Peanut Butter Paw Print Cookies.
Frequently Asked Questions (FAQ) About Peanut Butter Paw Print Cookies
We’ve gathered the most common questions about baking this adorable treat to ensure your experience is smooth and successful. Remember, the key to great cookies lies in precision and timing!
Can I use crunchy peanut butter instead of creamy peanut butter for Peanut Butter Paw Print Cookies?
Yes, you can substitute crunchy peanut butter, but be aware it will alter the cookie’s texture. Crunchy peanut butter may make the dough slightly drier and the resulting cookies will have a less uniform texture. If using crunchy, ensure your butter is very soft to compensate for the reduced creaminess.
Why do I need to use two different sizes of chocolate chips for the paw print?
Using two sizes is essential for achieving the realistic paw print appearance. The standard semi-sweet chocolate chip forms the larger, centralized main pad of the paw. The three mini semi-sweet chocolate chips create the smaller, delicate toe pads. Using all one size would make the paw look less distinct.
How do I store Peanut Butter Paw Print Cookies to keep them fresh?
Store fully cooled cookies in an airtight container at room temperature. They will remain fresh and chewy for up to 5 days. For longer storage, the cookies freeze well for up to three months; simply thaw them at room temperature when you are ready to enjoy.
Is it really necessary to roll the dough balls in granulated sugar?
Absolutely. Rolling the dough balls in extra granulated sugar serves two main purposes. First, it prevents the dough from sticking to your hands or the baking sheet. Second, and more importantly, it creates that delicious, slightly crisp, sparkling crust on the outside, providing a perfect textural contrast to the soft, chewy interior.
My Peanut Butter Paw Print Cookies are too dry. What went wrong?
Dry cookies are typically the result of over-baking or over-measuring the flour. Ensure you measure the flour using the spoon-and-level technique, and remove the cookies from the oven when the centers still look slightly soft. Remember, cookies continue to set on the hot baking sheet even after removal, which contributes to the desired chewiness.
Can I make the dough ahead of time and chill it?
Yes, preparing the dough ahead is a great time saver! Mix the dough completely, roll it into balls, and sugar-coat them. Place the dough balls in an airtight container and refrigerate for up to 2 days. When ready to bake, place them directly on the prepared sheets; they may need an extra minute or two in the oven.
Conclusion: Your New Favorite Peanut Butter Paw Print Cookies
You have now mastered the art of baking the most adorable and flavorful treat on the block: the Peanut Butter Paw Print Cookies. This recipe delivers everything a comfort cookie should be richly flavored with creamy peanut butter, perfectly chewy thanks to the right balance of fats and sugars, and finished with a satisfying, crunchy, sugared exterior. The whimsical paw print design, created by the strategic placement of standard and mini semi-sweet chocolate chips, elevates these cookies from simple snacks to celebration-worthy desserts.
We’ve covered every detail, from the importance of creaming your fats until light and fluffy, to the critical, time-sensitive step of adding the chocolate chips while the cookies are still radiating oven heat. Remember that consistency in dough rolling and patience during the short 10-to-12-minute bake time are the keys to achieving bakery-perfect results every single time.
Whether you’re baking for a special occasion, treating your family, or simply indulging in a moment of pure comfort, these Peanut Butter Paw Print Cookies are guaranteed crowd-pleasers. They are an irresistible combination of classic flavor and charming presentation, making them a recipe you will return to again and again.
Don’t let this recipe stop here! We encourage you to try the variations we discussed, whether that means exploring a vegan option or experimenting with a gluten-free flour blend. Baking is all about creativity and making the recipe your own. Once you’ve experienced the joy of these adorable treats, we would love to hear about it! Please leave a comment below sharing your baking experience, and don’t forget to share this recipe with fellow cookie lovers. Happy baking, and enjoy every bite of these delightful, nutty, chocolatey paws!
Peanut Butter Paw Print Cookies
Ingredients
Equipment
Method
- Preheat your oven to 350°F (175°C). Line two large baking sheets with parchment paper or silicone baking mats.
- In a medium bowl, whisk together the flour, baking soda, and salt. Set aside.
- In the bowl of a stand mixer fitted with the paddle attachment, or using a large bowl and a hand mixer, cream together the softened butter, peanut butter, granulated sugar, and brown sugar until the mixture is light and fluffy, usually about 3 to 4 minutes. Scrape down the sides of the bowl as needed.
- Beat in the large egg until just combined, then stir in the vanilla extract.
- Gradually add the dry ingredient mixture to the wet ingredients, mixing on low speed until the dough comes together and no streaks of flour remain. Be careful not to overmix.
- Place a small amount of granulated sugar in a shallow dish for rolling. Scoop the dough using a standard tablespoon or a small cookie scoop (about 1.5 inches in diameter). Roll each portion into a smooth ball.
- Lightly roll each dough ball in the extra granulated sugar, ensuring it is fully coated. Place the dough balls onto the prepared baking sheets, spacing them approximately 2 inches apart.
- Bake for 10 to 12 minutes, or until the edges are set and lightly golden brown, but the center still looks slightly soft.
- Create the Paw Prints (Immediate Action): As soon as the cookies come out of the oven, while they are still hot and pliable, gently press one standard semi-sweet chocolate chip into the center of each cookie to form the main pad of the paw.
- Add the Toes: Immediately follow by pressing three mini semi-sweet chocolate chips above the standard chip to form the smaller toe pads. Arrange them in a slight arc, pressing gently enough that they adhere without cracking the cookie.
- Cool: Allow the cookies to cool completely on the baking sheet for 5 minutes before transferring them to a wire rack to finish cooling. This ensures the cookies hold their shape and the chocolate chips set firmly into the dough.
- Serve: Once fully cooled, the Peanut Butter Paw Print Cookies are ready to serve.