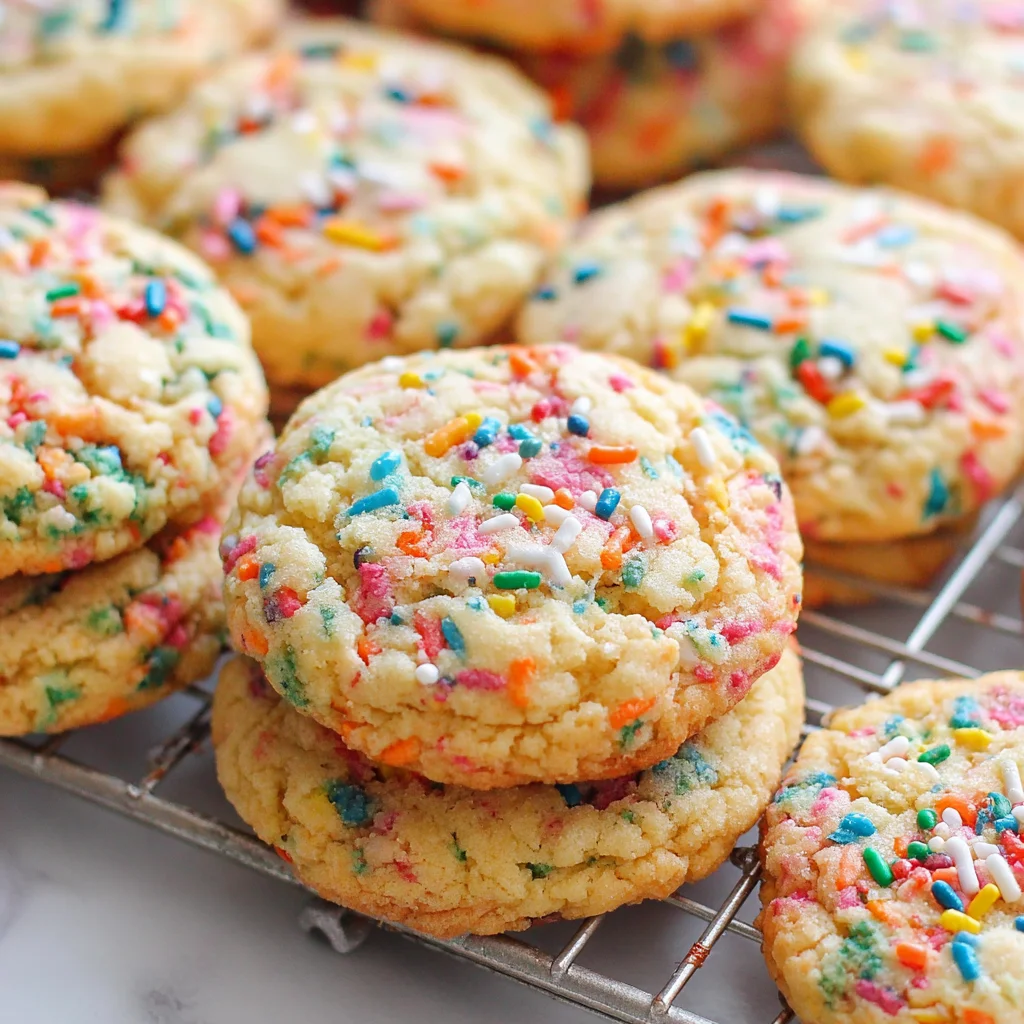
There is something uniquely nostalgic and joyfully celebratory about a perfect Funfetti Cookie. They capture the spirit of a birthday party in a single, chewy, sprinkle-laden bite. Forget the dry, cake-like store-bought versions; these homemade Funfetti Cookies are soft in the center, perfectly crisp around the edges, and bursting with rich vanilla flavor, reminiscent of the classic boxed birthday cake mix we all grew up loving. This isn’t just a recipe; it’s a guaranteed pathway to cookie bliss.
Whether you call them sprinkle cookies, birthday cake cookies, or classic Funfetti Cookies, the result is the same: pure happiness. This recipe is meticulously designed to achieve the ideal texture that crucial balance between chewiness and softness by controlling ingredient temperatures and perfecting the creaming process. If you’ve struggled with cookies spreading too thin or turning out tough, this comprehensive guide will give you the practical steps and troubleshooting advice needed to bake bakery-quality cookies every single time. Get ready to transform simple pantry staples into a batch of colorful, show-stopping treats that are perfect for any celebration, or just a Tuesday afternoon that needs a little sparkle.
Why You’ll Love These Classic Chewy Funfetti Cookies
These aren’t just any sugar cookies dressed up with sprinkles; this recipe yields a deeply flavored, vanilla-rich dough designed specifically to handle the addition of a generous amount of colorful jimmies. The magic is in the texture. We utilize a high ratio of brown sugar to white sugar (though in this specific recipe, we stick to granulated for that classic bright look, adjusting the fats and technique to maintain chewiness), ensuring that the final cookie remains soft and pliable long after it cools.
The flavor profile is the epitome of comfort food. By using high-quality pure vanilla extract, you maximize the “birthday cake” essence that defines a true Funfetti Cookie. When baked, the cookies achieve golden, slightly caramelized edges while the center remains delightfully plush. This contrasting texture is what separates a great cookie from an exceptional one. They hold their shape beautifully, thanks to the controlled creaming and optional chilling step, resulting in thick, satisfying cookies that look as good as they taste.
Moreover, the vibrant aesthetic of these cookies makes them irresistible. The rainbow sprinkles aren’t just decoration; they melt slightly into the dough, creating colorful bursts in every cross-section. They are universally appealing, making them the perfect addition to bake sales, holiday cookie platters, or as a much-needed morale boost. Unlike some cookies that demand excessive effort, this straightforward recipe relies on standard baking principles applied perfectly, allowing even novice bakers to achieve professional-level results. The aroma alone, as these bake, will make your kitchen the happiest place on earth.
Why You Should Try This Homemade Funfetti Cookie Recipe Today
In a world full of complex desserts, the simple pleasure of a homemade Funfetti Cookie stands out. If you’ve been relying on pre-packaged dough or mixes, now is the time to elevate your baking game. The satisfaction of creating these vibrant treats from scratch is unmatched, and the flavor difference is night and day. Homemade cookies allow you to control the quality of ingredients, ensuring fresh, buttery goodness that industrial mixes simply cannot replicate.
This particular recipe is designed for reliability. We focus heavily on utilizing ingredients at the correct temperature a key secret that professional bakers swear by. Room temperature butter and eggs emulsify correctly, trapping air efficiently during the creaming process. This aeration is what gives the final cookie its lift and signature soft chewiness. When the butter and sugar are beaten together until “light and fluffy,” you are building the foundation of the cookie’s texture. Skipping this step or using cold butter results in dense, flat cookies.
Furthermore, these Funfetti Cookies are incredibly versatile for entertaining. They travel well, freeze excellently, and appeal to all ages. Planning a themed party? Need a guaranteed crowd-pleaser? These cookies fit the bill every time. They pair wonderfully with a simple glass of milk, or you can even turn them into ice cream sandwiches for a summer treat. If you’re looking for other comforting baked goods that deliver on flavor and nostalgia, consider whipping up a batch of classic peanut butter chocolate chip cookies or perhaps trying our ultimate recipe for a moist chocolate cake. Expanding your repertoire of comforting baked goods starts right here.
The clear, detailed instructions provided in this guide minimize guesswork, addressing common pitfalls like overmixing or underbaking. We empower you to bake with confidence, transforming simple ingredients into a stunning, celebratory dessert. Give these homemade Funfetti Cookies a try, and we promise they will become a permanent fixture in your cookie rotation.
Mastering the Ingredients and Tools for Perfect Funfetti Cookies
Success in baking relies 90% on preparation and high-quality ingredients. For these chewy Funfetti Cookies, paying close attention to the specific type and temperature of your ingredients is non-negotiable. Below is the detailed breakdown of what you need and why it matters, ensuring your baking adventure is smooth and successful.
The Essential Ingredients for Superior Flavor
| Item | Quantity | Notes on Use and Function |
|---|---|---|
| Unsalted Butter, softened | 1 cup (2 sticks) | Must be truly softened to room temperature (about 68-70°F). Cold butter won’t cream properly, and melted butter will lead to greasy, flat cookies. Using unsalted butter allows you to control the overall salt content. |
| Granulated White Sugar | 1 ½ cups | Provides structure, sweetness, and helps the butter cream efficiently. The high sugar ratio contributes to the spread and the chewy, slightly caramelized edges. |
| Large Eggs | 2 | Room temperature recommended. Eggs act as a binder and add richness. Using them at room temperature prevents the batter from seizing when added to the creamed butter/sugar mixture, resulting in a smoother, more cohesive dough. |
| Pure Vanilla Extract | 1 Tablespoon | Use high quality extract for flavor. This is the primary flavoring agent that gives the cookie its “birthday cake” taste. Do not skimp on the vanilla! |
| All-Purpose Flour | 3 cups | Measured accurately (spooned and leveled). Flour provides the main structure. Improper measurement (scooping directly from the bag) can add up to ½ cup extra flour, resulting in dense, dry cookies. |
| Baking Soda | 1 teaspoon | This chemical leavener provides lift and contributes to the cookie spreading slightly, creating the desired chewy texture. Ensure your baking soda is fresh (active for about 6 months once opened). |
| Salt | ½ teaspoon | Fine grain. Essential for balancing the sweetness and enhancing all other flavors. Do not omit the salt. |
| Rainbow Sprinkles (Jimmies) | ½ cup | Avoid nonpareils as the color may bleed excessively into the dough, resulting in a muddy color rather than vibrant specks. Jimmies (the cylindrical shape) hold their color better during mixing. |
Achieving the right texture in these Funfetti Cookies hinges on the proper measurement and preparation of the dry ingredients. When measuring flour, remember the “spoon and level” technique: gently spoon the flour into your measuring cup until it overflows, then use the back of a knife to level off the excess. Never pack it down, as this compacts the flour and leads to dense, dry cookies.
Required Kitchen Tools & Equipment for Optimal Baking
While this recipe can technically be made with minimal equipment, using the right tools will guarantee a better outcome, especially when it comes to achieving that fluffy, perfectly creamed butter mixture.
- Stand Mixer or Hand Mixer: A stand mixer fitted with the paddle attachment is highly recommended. It provides the sustained power needed to properly cream the butter and sugar for the required 3-4 minutes. A good hand mixer is a suitable alternative, but be prepared for a bit more manual scraping.
- Large Mixing Bowls: You will need one large bowl for the wet ingredients and a separate medium bowl for whisking the dry components together. This ensures the leaveners (baking soda and salt) are evenly distributed before incorporation.
- Rubber Spatula: Essential for scraping down the sides of the bowl during mixing and, crucially, for the final step of gently folding in the sprinkles.
- Parchment Paper or Silicone Baking Mats: These are non-negotiable for non-stick baking and ensuring easy cleanup. They also help insulate the bottom of the cookie, preventing over-browning.
- Cookie Scoop (1.5 to 2 Tablespoons): Using a uniform scoop is the secret to getting perfectly sized, evenly baked Funfetti Cookies. Consistency in size means consistency in baking time, resulting in a batch where every cookie is just right.
- Wire Cooling Rack: Allowing the cookies to cool completely on a rack prevents condensation from making the bottoms soggy.
- Kitchen Scale (Optional but Recommended): For the ultimate accuracy, especially with the flour, a kitchen scale is the gold standard for baking.
By respecting these measurements and utilizing the recommended tools, you set yourself up for absolute success. Remember, baking is a science, and adherence to ingredient roles and measurements, particularly for chewy cookie recipes like these Funfetti Cookies, is key.
Step-by-Step Guide to Baking the Best Chewy Funfetti Cookies (850 words)
Follow these detailed instructions precisely, and you will be rewarded with the chewiest, most delightful Funfetti Cookies imaginable. Pay close attention to mixing times and ingredient temperatures these are the details that elevate a good cookie to a great one.
Step 1: Preparation is Key
- Preheat and Prepare: Preheat your oven to a precise 350°F (175°C). Ovens often run hot or cold, so if you have an oven thermometer, use it! Line two large baking sheets with parchment paper or silicone baking mats. This prevents sticking and ensures even heat distribution.
- Temperature Check: Confirm that your butter and eggs are truly at room temperature. If your butter is still cold, cut it into small pieces and let it sit for another 10-15 minutes. If your eggs are cold, place them in a bowl of warm (not hot) water for 5 minutes.
Step 2: Cream Wet Ingredients – The Foundation of Texture
The creaming process is perhaps the most critical step for achieving chewy cookies. It incorporates air into the butter, which expands during baking, resulting in a softer texture.
- Cream the Butter: In the bowl of a stand mixer fitted with the paddle attachment, beat the softened butter on medium-low speed until it is smooth and creamy (about 1 minute).
- Add the Sugar: Introduce the granulated sugar to the butter. Increase the speed to medium. Beat this mixture for a full 3 to 4 minutes. You must continue beating until the mixture has visibly lightened in color (it should be pale yellow) and become significantly fluffy in texture. This step cannot be rushed!
- Incorporate Eggs and Vanilla: Scrape down the sides and bottom of the bowl. Add the eggs, one at a time, mixing thoroughly after each addition until just combined. Overmixing the eggs can toughen the dough. Finally, stir in the 1 Tablespoon of pure vanilla extract until fully combined. The mixture should now look glossy and homogenous.
Step 3: Combine Dry Ingredients and Avoid Overmixing
Handling the flour correctly is vital to preventing tough cookies. We want to develop just enough gluten for structure, but not so much that the cookie becomes cake-like.
- Whisk Dry Ingredients: In a separate medium bowl, whisk together the measured all-purpose flour, baking soda, and salt. Whisking ensures the leavening agent is evenly distributed.
- Combine Wet and Dry: With the mixer running on the absolute lowest speed, gradually add the dry ingredients to the wet ingredients. Mix only until the flour streaks have almost disappeared. Stop the mixer immediately when the dough is shaggy and there are still a few visible dry patches. The goal is to avoid over-activating the gluten.
Step 4: Fold in the Sprinkles Gently
This is where the fun happens, but caution is necessary to maintain the vibrant colors of your Funfetti Cookies.
- Remove from Mixer: Take the bowl off the stand mixer.
- Fold: Using a rubber spatula, gently fold in the ½ cup of rainbow sprinkles (jimmies). Use an under-and-over motion, stopping as soon as the sprinkles are evenly distributed throughout the dough. Practical Tip: Excessive folding or mixing with the electric mixer will cause the sprinkle colors to bleed, turning your beautiful dough a muddy gray or light brown. Keep it quick and gentle.
Step 5: Scoop and Chill for Perfect Thickness
Chilling is the baker’s secret weapon against flat cookies. It allows the fat to firm up, preventing the dough from spreading too rapidly in the oven.
- The Chill Factor (Recommended): If you have time, cover the dough and chill it in the refrigerator for 30 minutes. If you need thicker, chewier Funfetti Cookies that resist spreading, a 30-minute minimum chill time is highly recommended. For the ultimate texture, chill for up to 2 hours.
- Portion the Dough: Use a medium cookie scoop (about 1.5 to 2 tablespoons) to portion the dough. Roll the portions into smooth, compact balls.
- Arrange: Place the dough balls two inches apart on the prepared baking sheets.
Step 6: Bake Until Golden
- Bake Time: Bake one sheet at a time in the preheated 350°F (175°C) oven for 9 to 12 minutes.
- Check for Doneness: The critical visual cue is that the edges of the cookies must be set and lightly golden brown, but the centers should still look slightly puffy, soft, and somewhat underbaked. If the centers look completely dry, you have likely overbaked them.
- Rotate (Optional): If your oven has hot spots, rotate the pan halfway through baking (around the 5-minute mark) for even coloring.
Step 7: Cool and Enjoy
- Rest on Sheet: Remove the baking sheet from the oven and allow the Funfetti Cookies to cool on the sheet for 5 minutes. This allows them to finish setting up without collapsing.
- Transfer: Carefully transfer the slightly cooled cookies to a wire rack to cool completely.
- Repeat and Store: Repeat the process with the remaining dough. Once completely cooled, store the cookies in an airtight container at room temperature for up to 5 days. They are best enjoyed within the first 48 hours.
Tips, Troubleshooting, and Creative Funfetti Variations
While the classic Funfetti Cookie is perfect as is, understanding how to troubleshoot issues and explore variations ensures you can adapt this recipe for any dietary need or flavor craving.
Funfetti Cookie Troubleshooting and Pro Tips
Why are my cookies flat?
Flat cookies are usually the result of three main issues: 1) Melted Butter: Ensure your butter is softened, not melted. 2) Insufficient Creaming: You must beat the butter and sugar for the full 3-4 minutes to incorporate enough air. 3) Warm Dough: If the dough is too warm when it enters the oven, the fat melts instantly. Always chill the dough, even if only for 30 minutes, especially if your kitchen is warm.
Why are my cookies tough?
Tough cookies are typically caused by overmixing the flour. Once the dry ingredients are added, mix on the lowest speed only until the last streaks of flour disappear. Overmixing develops excess gluten, resulting in a cake-like or tough texture rather than a chewy one.
Storage and Freezing
- Dough: Cookie dough freezes exceptionally well. Scoop the dough balls, place them on a parchment-lined tray, freeze until solid, and then transfer the frozen balls to a freezer-safe bag or container. Frozen dough can be baked straight from the freezer; just add 2-3 minutes to the baking time.
- Baked Cookies: Freeze cooled, baked cookies layered with parchment paper in an airtight container for up to 3 months. Thaw at room temperature.
Variations on the Classic Funfetti Cookies Recipe
The base recipe for these chewy Funfetti Cookies is incredibly adaptable. Here are a few ways to switch up the flavors and ingredients:
- The Almond Kiss: For an even more intense “wedding cake” flavor, replace 1 teaspoon of the vanilla extract with 1 teaspoon of pure almond extract. This subtle addition deepens the complexity beautifully.
- Gluten-Free Funfetti: Substitute the all-purpose flour with a high-quality 1:1 gluten-free baking blend that contains xanthan gum. You may need to add an extra tablespoon or two of flour if the dough seems too sticky, as gluten-free flours absorb liquid differently.
- Vegan Adaptation: Replace the butter with 1 cup of high-quality vegan butter sticks (do not use margarine). Use flax eggs (1 tablespoon ground flaxseed + 3 tablespoons water, per egg, rested for 5 minutes) in place of the large eggs. Note that the texture may be slightly denser, but the flavor remains fantastic.
- Add-Ins: Feel free to fold in ½ cup of white chocolate chips or crushed freeze-dried strawberries alongside the sprinkles for extra texture and flavor bursts.
- Make it Festive: Swap the rainbow jimmies for holiday-specific sprinkles (red and green for Christmas, orange and black for Halloween) to adapt these Funfetti Cookies for any season. If using highly pigmented colors, ensure the folding process is done quickly to minimize color bleeding.
Nutritional Insights and the Joy of the Funfetti Treat
While these classic chewy Funfetti Cookies are undoubtedly a dessert meant for enjoyment and celebration, understanding their approximate nutritional makeup can be helpful for mindful eating. It is important to remember that baked goods, especially those rich in butter and sugar, are energy-dense treats.
The recipe yields approximately 36 medium-sized cookies. Based on the ingredients used, the nutritional profile for a single cookie serving (estimated, as home recipe variations exist) is roughly:
- Calories: Approximately 180-200 kcal
- Total Fat: Approximately 8-10g (primarily from butter)
- Saturated Fat: Approximately 5-6g
- Carbohydrates: Approximately 25-30g (mainly from sugar and flour)
- Protein: Approximately 2-3g (from eggs and flour)
- Sugar: Approximately 15g
It’s clear these Funfetti Cookies are an indulgence, but one that offers immediate psychological benefits! Baking and sharing treats like this are linked to happiness and social connection. The ingredients, while simple, serve specific purposes beyond just flavor.
The use of butter provides essential richness and structure, carrying the vanilla flavor efficiently. While high in saturated fat, butter is what gives the cookie its characteristic melt-in-your-mouth texture. The eggs provide a small amount of high-quality protein and essential vitamins, acting as a key emulsifier and binder. The simple carbohydrates from the sugar and flour provide quick energy, making these cookies an excellent pick-me-up.
Ultimately, these Funfetti Cookies are designed to celebrate life’s moments. Like any dessert, they should be enjoyed in moderation, savored slowly, and shared enthusiastically. For more inspiring baking ideas and comforting recipes that balance indulgence with joy, be sure to find more delicious cookie recipes on our Pinterest page!
Funfetti Cookies FAQ (Frequently Asked Questions)
What kind of sprinkles are best for Funfetti Cookies?
The best sprinkles are “jimmies” (the long, cylindrical shape). Avoid “nonpareils” (the tiny, round balls) because their intense food coloring tends to bleed significantly into the soft cookie dough during mixing, resulting in a dull, muted color rather than bright, distinct specks. Using jimmies ensures your Funfetti Cookies remain vibrant.
Do I have to chill the Funfetti Cookie dough?
Chilling the dough is optional, but highly recommended, especially if you want thick, chewy Funfetti Cookies that do not spread excessively. Even a quick 30-minute chill helps solidify the butter, which prevents the dough from melting too fast in the oven. If you skip this step, expect slightly flatter cookies.
What is the secret to getting that classic “chewy” texture in Funfetti Cookies?
The secret to chewiness lies in two techniques: the extended creaming process and the baking time. Cream the butter and sugar for 3 to 4 minutes to incorporate sufficient air. Secondly, bake the cookies until the edges are set and golden, but the center still looks slightly soft and glossy. The residual heat on the cooling rack will finish the baking process, ensuring a chewy middle.
Can I use cake mix to make Funfetti Cookies?
While cake mix can be used for simpler, faster cookies, this recipe for homemade Funfetti Cookies yields a far superior texture and deeper flavor. Cake mix cookies often rely on oil and have a cake-like texture, whereas this scratch recipe focuses on butter and a specific flour ratio for that desired rich, chewy, and bakery-style result.
How do I prevent my cookie dough from becoming tough after adding flour?
To avoid developing excess gluten and creating tough Funfetti Cookies, always use the lowest speed on your mixer when adding flour. Stop mixing the second the flour is almost incorporated, leaving a few streaks. Finish combining the dough manually with a rubber spatula, reserving the mixer only for the creaming phase.
Conclusion: Your Best Batch of Funfetti Cookies Awaits
You now possess the definitive guide to baking the most delightful, chewy, and nostalgic Funfetti Cookies. This recipe is a testament to the fact that the simplest treats, when executed with precision and high-quality ingredients, can be truly extraordinary. We’ve emphasized the importance of room temperature ingredients, the crucial 3 to 4 minutes of creaming time to build essential air pockets, and the gentle hand needed when folding in those vibrant jimmies to maintain their rainbow integrity.
Remember that baking is a journey, and even the smallest details, such as scooping the flour correctly or opting for a brief chill in the refrigerator, contribute significantly to the final, perfect cookie. These homemade Funfetti Cookies are ideal for bringing a smile to any face, transforming a regular day into a mini celebration, or serving as the ultimate centerpiece for a birthday spread. Their blend of rich vanilla, buttery depth, and irresistible chewiness is guaranteed to make them an instant family favorite.
We encourage you to try this recipe for the Funfetti Cookies soon. Share your baking success stories, tell us which variation you tried, and let us know how much cheer these colorful treats brought to your kitchen. Happy baking!
Classic Chewy Funfetti Cookies (Bakery Style)
Ingredients
Equipment
Method
- Preheat your oven to 350°F (175°C).
- Line two large baking sheets with parchment paper or silicone baking mats. Set aside. Ensure the butter and eggs are at room temperature.
- In the bowl of a stand mixer fitted with the paddle attachment (or using a large mixing bowl and a hand mixer), beat the softened butter until creamy (about 1 minute).
- Add the granulated sugar to the butter. Beat on medium speed for 3 to 4 minutes until the mixture is light, fluffy, and pale yellow. Scrape down the sides of the bowl as needed.
- Beat in the eggs, one at a time, mixing well after each addition. Stir in the vanilla extract until fully combined.
- In a separate medium bowl, whisk together the all-purpose flour, baking soda, and salt.
- With the mixer running on low speed, gradually add the dry ingredients to the wet ingredients. Mix only until just combined. The dough should be soft and shaggy, but do not overmix, as this will result in tough cookies.
- Remove the bowl from the mixer. Gently fold in the ½ cup of rainbow sprinkles using a rubber spatula until they are evenly distributed throughout the dough. Avoid excessive mixing during this step to prevent the sprinkle colors from bleeding into the dough.
- For thicker cookies that don't spread as much, cover the dough tightly and chill in the refrigerator for 30 minutes. (If you skip chilling, the cookies will spread more, but will still be delicious.)
- Use a medium cookie scoop (about 1.5 to 2 tablespoons) to portion the dough. Roll the dough into smooth balls. Place the dough balls two inches apart on the prepared baking sheets.
- Bake one sheet at a time in the preheated 350°F (175°C) oven for 9 to 12 minutes. The cookies are done when the edges are set and lightly golden brown, but the centers still look soft and slightly underbaked.
- Allow the cookies to cool on the baking sheet for 5 minutes before carefully transferring them to a wire rack to cool completely. Repeat the baking process with the remaining dough.