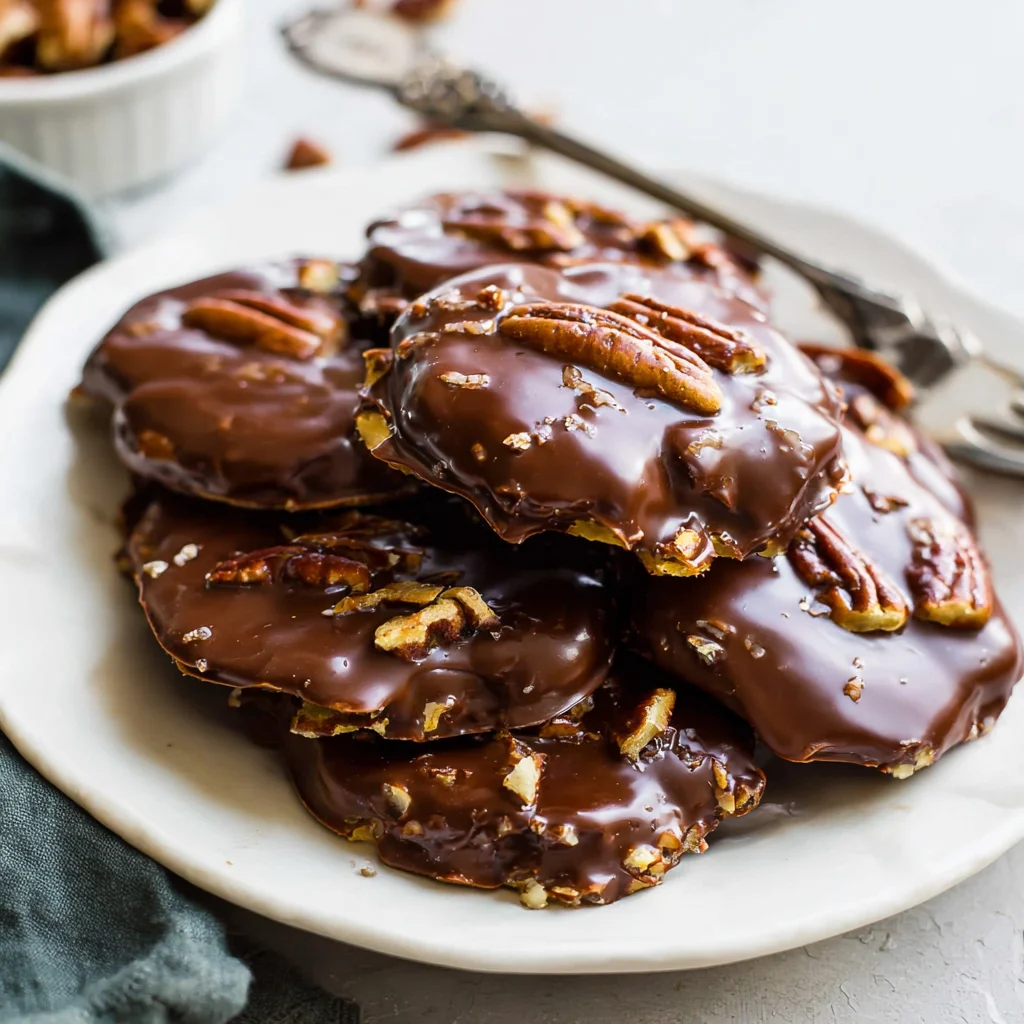
There are very few candies that evoke the same satisfying, luxurious feeling as a perfect chocolate turtle. That irresistible combination of crunchy toasted pecans, gooey rich caramel, and a thick coating of premium chocolate all finished with a delicate kiss of sea salt. While you might associate these treats with high-end confectioneries or holiday tins, learning how to make Homemade Chocolate Turtles is surprisingly simple, deeply rewarding, and far superior to anything you can buy pre-packaged.
Welcome to the ultimate guide to crafting these iconic treats right in your own kitchen. Whether you are searching for the perfect edible gift, a show-stopping holiday dessert, or just a deeply satisfying baking project, this recipe for Homemade Chocolate Turtles delivers on all fronts. Forget complicated techniques; we’re using simple ingredients and smart shortcuts (hello, microwave caramel!) to achieve gourmet results every single time. Get ready to roll up your sleeves and create a batch of candy so delicious, your friends and family will think you bought them from a boutique candy shop. Let’s dive into the delicious world of perfect homemade candies!
Why You’ll Fall Head Over Heels for These Homemade Chocolate Turtles
When you take a bite of a freshly made turtle, you immediately understand why this candy has maintained its popularity for over a century. However, making Homemade Chocolate Turtles elevates this classic experience into something truly extraordinary. It’s more than just a recipe; it’s an opportunity to create a moment of pure, decadent bliss. Here are the top reasons why this particular recipe will become a permanent fixture in your dessert arsenal:
Unbeatable Texture and Flavor Control
The secret to exceptional Homemade Chocolate Turtles lies in balancing the three core components. Store-bought versions often skimp on the nuts or use waxy, low-quality chocolate. When you make them yourself, you control the caliber of every layer:
- The Crunch: We start by toasting the pecans. This step is non-negotiable! Toasting awakens the deep, buttery flavor of the pecan halves, providing a satisfying, aromatic contrast to the sweet caramel.
- The Goo: Our caramel recipe, utilizing easy caramel chews and a splash of cream, results in a rich, pliable filling that sets up perfectly but remains soft enough to bite through never overly hard or brittle. This is crucial for achieving that signature ooey-gooey center.
- The Snap: You choose the chocolate! Whether you prefer the creamy sweetness of milk chocolate chips or the deep intensity of dark chocolate (a fantastic choice for counterbalancing the sweet caramel), the ability to use high-quality chocolate ensures a smooth, professional snap when the candy is set.
Unlike other homemade treats, such as complex pies or elaborate cakes, Homemade Chocolate Turtles offer maximum payoff for minimal effort. The assembly process is straightforward, requiring no special baking skills, only patience while the chilling steps occur.
The Joy of Gifting and Sharing
If you’re looking for a homemade gift that truly impresses, these decadent turtles are your answer. Packaged in a decorative tin or cellophane bag, they make magnificent contributions to holiday cookie exchanges, housewarming gifts, or simple thank-you presents. Because they are individual candies and store well, they travel easily and maintain their luxurious appearance. Imagine presenting a box of these rich, glistening Homemade Chocolate Turtles to a host; it instantly communicates effort, care, and quality. They are often served alongside other popular holiday desserts, like our easy Salted Caramel Apple Crumble Bars, making a stunning dessert spread.
Why You Should Try Making DIY Chocolate Turtles Today
Perhaps you’ve always loved turtles but thought they were too complicated to recreate at home. That misconception ends now! This recipe is designed for accessibility, ensuring even novice candy makers can succeed. Beyond the simplicity, there are compelling reasons to make this recipe your next kitchen project.
Superior Freshness and Quality Control
When you buy candy off the shelf, you have no idea how long it has been sitting there. Homemade versions are inherently fresher, and fresh caramel simply tastes better. Furthermore, making DIY chocolate turtles gives you complete control over ingredients. Do you have a nut allergy concern? You can substitute with seeds or simply omit the nut base for a chocolate-caramel cluster. Are you sensitive to artificial flavorings? Use high-grade chocolate with minimal additives.
This commitment to fresh, quality ingredients is what transforms a simple treat into a gourmet experience. By choosing specific high-quality pecan halves and melting real cream into your caramel, you ensure that every bite of these Homemade Chocolate Turtles is bursting with pure, rich flavor.
A Cost-Effective Gourmet Indulgence
Walk into a specialty candy store, and you’ll find that quality chocolate turtles command a high price, often due to the expensive ingredients (pecans and chocolate). By purchasing ingredients in bulk and making a large batch of Homemade Chocolate Turtles yourself, you drastically reduce the cost per piece without sacrificing quality. This is especially beneficial if you plan on making several batches for holiday gifting. Your budget will thank you, and your recipients will be none the wiser that these gourmet candies were made affordably at home.
Therapeutic and Fun Kitchen Project
Candy making can be a wonderful, therapeutic activity. While this recipe involves melting and chilling, the assembly process is straightforward and enjoyable. Arranging the pecan clusters, scooping the gooey caramel, and finally, dipping them into the shiny, melted chocolate it’s a process that is deeply satisfying to watch unfold. It’s a great activity to do with children or friends, turning a simple afternoon into a productive, delicious endeavor. For more fun no-bake projects, you might also enjoy making Homemade Oreo Fudge.
Ingredients and Necessary Utensils for Homemade Chocolate Turtles
To create the perfect batch of Homemade Chocolate Turtles, you need a handful of high-quality ingredients and a few simple tools. We’ve broken down exactly what you need to ensure success.
Essential Ingredients for Perfect Turtles
These quantities yield approximately 24 to 30 medium-sized turtles, depending on how large you make your pecan clusters.
- 1 cup pecan halves: Use high-quality, fresh pecan halves. Toasting them is essential for maximizing flavor.
- 1 cup caramel chews (about 40 pieces) or pre-made caramel sauce: If using soft caramel chews (like Kraft Caramels), they provide a perfectly chewy texture. If using pre-made jarred sauce, ensure it is a thick, high-viscosity sauce labeled for dipping or baking, not ice cream topping.
- 2 tablespoons heavy cream or milk (if using caramel chews): This liquid is vital for creating a smooth, scoopable caramel consistency when melting the chews.
- 1 cup milk chocolate chips (or dark chocolate, depending on preference): We recommend a good quality chip or, even better, chopped melting wafers (couverture chocolate) for the best texture and gloss. Using dark chocolate turtles as a variation cuts the sweetness beautifully.
- 1 teaspoon coconut oil or vegetable shortening (optional, for smoother melting): This addition is a game-changer. It lowers the melting point of the chocolate, resulting in a silkier, glossier coating that sets up nicely without requiring formal tempering.
- Flaky sea salt (optional, for topping): A tiny sprinkle of Maldon or another quality flaky sea salt is essential. The contrast of salty crunch against the sweet caramel is what truly elevates the Homemade Chocolate Turtles to gourmet status.
Tools of the Trade for Candy Making
You don’t need highly specialized equipment to make these delightful Homemade Chocolate Turtles, but having the right tools makes the process infinitely cleaner and easier.
Necessary Utensils for Chocolate Turtles
- Baking Sheets: You will need two large baking sheets to manage the quantity and chilling process effectively.
- Parchment Paper or Silicone Baking Mats: Crucial for easy release! Do not try this directly on aluminum foil or an unlined pan, or your caramel will weld itself to the sheet.
- Microwave-Safe Bowls: Required for melting both the caramel and the chocolate in short, controlled bursts.
- Small Saucepan (Alternative method): If you prefer stovetop melting for the caramel or chocolate (double boiler method).
- Small Spoons or Cookie Scoop: A small cookie scoop (about 1-tablespoon size) is the best tool for portioning uniform dollops of caramel onto the pecan clusters.
- Dipping Forks or Tongs: Specialized candy dipping tools are helpful, but two ordinary dinner forks work perfectly fine for submerging and lifting the chocolate-coated turtles.
- A Reliable Spatula: Necessary for stirring the chocolate and caramel vigorously during melting.
- Oven for Toasting: Essential for activating the flavor in those pecan halves, which makes all the difference in Homemade Chocolate Turtles. If you enjoy baking with pecans, consider trying our Chewy Pecan Pie Cookies for another delicious recipe.
Detailed Recipe Steps: Crafting Perfect Homemade Chocolate Turtles
Making Homemade Chocolate Turtles is broken down into five simple stages: prepping the nuts, crafting the caramel, assembling, melting the chocolate, and coating.
Step 1: Prepare and Toast the Pecan Bases
The foundation of a great turtle is a perfectly toasted, crunchy pecan base.
- Preheat the Oven: Preheat your oven to 350°F (175°C).
- Toast the Pecans: Spread the pecan halves in a single layer on a clean baking sheet. Toast for about 5 to 8 minutes. Watch them constantly! Pecans can go from perfectly toasted to burnt quickly. They are ready when they smell wonderfully fragrant and have darkened slightly.
- Cool Completely: Remove the nuts from the oven and let them cool entirely. Warm nuts will melt the caramel prematurely, making assembly messy.
- Form Clusters: Line one or two large baking sheets with parchment paper or a silicone baking mat. Arrange clusters of three or four toasted pecan halves on the prepared sheets, spreading them slightly outwards. Leave ample space (about 2 inches) between each cluster. This forms the base the “legs” for your delicious Homemade Chocolate Turtles.
Step 2: Achieve Caramel Perfection
This is where the magic (and the goo) happens. If you are using pre-made jarred caramel sauce, you can simply skip the melting process, though homemade caramel gives a superior chew.
- Combine Ingredients: Place the caramel chews (if using) and the heavy cream or milk into a microwave-safe bowl.
- Melt Smoothly: Microwave the mixture in short, 30-second bursts. After each interval, stir thoroughly. The caramel will resist at first, but patience is key. Continue until the caramel is completely smooth, melted, and lump-free (usually 1 to 2 minutes total). Do not overheat the caramel, as it can burn easily and develop a grainy texture.
- Cool Slightly: Remove the caramel from the heat. Allow it to cool for about 5 minutes. This cooling period is essential because it thickens the caramel just enough to prevent it from running off the pecan clusters immediately upon scooping.
Step 3: Assemble the Caramel and Pecans
Time to give your turtles their shell!
- Scoop the Caramel: Using a small spoon or a cookie scoop (the best option for uniformity), place a generous dollop of the warm, slightly thickened caramel directly over the center of each pecan cluster on the baking sheet.
- Create the Shell: The caramel should effectively sit on top of the pecans, binding the cluster together and forming the distinctive, rounded “shell” of the turtle.
- Chill to Set: Once all clusters are topped, place the baking sheets into the refrigerator for approximately 15 to 20 minutes. This chilling step is crucial! The caramel must firm up slightly so that it doesn’t melt or distort when dipped into the warm chocolate.
Step 4: Melt the Chocolate Coating
A flawless chocolate coating is what turns these into true gourmet Homemade Chocolate Turtles.
- Prepare the Chocolate: Place the chocolate chips (milk or dark) and the optional teaspoon of coconut oil or vegetable shortening into a clean, microwave-safe bowl.
- Melt Gently: Microwave the chocolate in 30-second intervals, stirring vigorously after each one. The chocolate should be stirred until it is fully melted and beautifully smooth. Never rush this step. Chocolate retains its shape even when melted, so stirring is necessary to assess consistency and prevent scorching.
- Check for Consistency: The addition of coconut oil makes the chocolate more fluid and easier for dipping, providing that lovely, professional gloss. Ensure the chocolate is warm and runny, but not hot.
Step 5: Coat and Finish Your Homemade Chocolate Turtles
- Dip the Clusters: Retrieve the chilled caramel pecan clusters from the refrigerator.
- The Dipping Technique: Dip each caramel turtle into the melted chocolate. Use two forks or a dipping tool to gently submerge the entire candy. Lift it out, allowing the excess chocolate to drip off the bottom and sides back into the bowl.
- Return to Sheet: Carefully place the fully coated turtle back onto the parchment-lined baking sheet.
- Salt Sprinkle (Optional but Recommended): Immediately sprinkle a tiny pinch of flaky sea salt onto the wet chocolate shell of each turtle. This must be done before the chocolate sets.
- Final Set: Once all Homemade Chocolate Turtles are coated, place the baking sheets back into the refrigerator for a final chill of 15 to 30 minutes, or until the chocolate coating is completely set and hardened.
- Storage: Store the finished turtles in an airtight container at room temperature (if your kitchen is cool) or in the refrigerator for up to one week.
Tips, Troubleshooting, and Delicious Variations
Perfecting Homemade Chocolate Turtles involves understanding a few key principles regarding caramel consistency and chocolate handling. Here are some essential tips and ways to customize your batch.
Customizing Your Chocolate Turtles
While the classic milk chocolate version is beloved, don’t hesitate to experiment!
- Dark Chocolate Turtles: For a more sophisticated, less sweet profile, substitute the milk chocolate with high-quality dark chocolate (60% cocoa or higher). The slight bitterness of the dark chocolate beautifully balances the intense sweetness of the caramel.
- Nut Variations: Not a fan of pecans? You can easily make these with toasted almonds (for almond turtles) or even cashews. Ensure whichever nut you choose is toasted for maximum flavor.
- Spice Infusion: For a holiday twist, stir a small pinch of cinnamon or a drop of vanilla extract into the caramel after it melts.
- Pretzel Turtles: For an extra salty crunch, try adding a few crushed pretzel pieces underneath the caramel dollop!
Troubleshooting Common Candy Mistakes
Even though this recipe for Homemade Chocolate Turtles is straightforward, there are a few common issues that can derail your final product:
Caramel Too Runny?
If your caramel mixture is too thin, it will slide right off the pecan clusters. This happens if the caramel is too hot or if you added too much liquid. If the caramel is runny, simply let it sit at room temperature for another 10 to 15 minutes before scooping. It should be thick enough to hold a semi-rigid dome shape.
Chocolate Seizing During Melting?
Seizing occurs when a tiny bit of water or steam gets into the chocolate, turning it into a grainy, unworkable paste. Always ensure your bowl and spatula are bone dry. When microwaving, use short intervals and stir away from the heat. If your chocolate does seize, you can sometimes save it by stirring in a teaspoon of shortening or coconut oil, or, if needed, a tablespoon of boiling water, stirring rapidly until it (hopefully) smooths out. Otherwise, melt a fresh batch!
Storage and Freshness
The best way to enjoy Homemade Chocolate Turtles is fresh, but they also keep well.
- Room Temperature: If stored in a cool, dry place in an airtight container, they can last up to 5 days. Humidity can cause the chocolate to bloom (develop gray streaks), so this is only advisable in cooler climates.
- Refrigeration: For longer storage (up to 1 week), store them in the refrigerator. Just be aware that chilled chocolate is harder and less fragrant right out of the fridge. Let them sit at room temperature for 10 minutes before serving.
- Freezing: Yes, you can freeze them! Wrap the Homemade Chocolate Turtles individually and place them in an airtight freezer-safe container for up to 3 months. Thaw overnight in the refrigerator before bringing them to room temperature.
Nutritional Values and Ingredient Benefits
While Homemade Chocolate Turtles are certainly an indulgent dessert, they do contain ingredients that offer inherent nutritional value, particularly the pecan halves and, if chosen, dark chocolate.
Focus on Pecans: A Powerhouse Nut
Pecans, the base of our turtles, are not just for crunch; they are rich in heart-healthy fats, including monounsaturated fats. They are an excellent source of dietary fiber, protein, and various micronutrients. Pecans contain high levels of antioxidants, comparable to “superfoods” like blueberries, which help fight free radicals in the body. They also provide essential minerals like zinc, magnesium, and Vitamin E.
Chocolate’s Benefits (Especially Dark Chocolate)
The benefits of chocolate depend heavily on the cocoa content. While milk chocolate provides more calcium, opting for dark chocolate turtles significantly increases the antioxidant profile.
- Flavonoids: Cocoa is packed with flavonoids, which are linked to improved blood flow and reduced risk of heart disease.
- Minerals: Dark chocolate provides iron, magnesium, copper, and manganese.
- Mood Boost: Chocolate contains compounds like tryptophan and phenylethylamine, which can naturally elevate mood and provide a feeling of well-being another excellent reason to treat yourself to a delicious Homemade Chocolate Turtles!
General Nutritional Estimates (Per Serving – 1 Turtle)
Please note that these are estimates based on standard recipe calculations and are provided for general informational purposes. Actual values vary based on the specific brand of chocolate and size of the candy.
| Nutrient | Estimated Value |
|---|---|
| Calories | 180 – 220 kcal |
| Total Fat | 12 – 15 g |
| Saturated Fat | 5 – 7 g |
| Carbohydrates | 18 – 22 g |
| Fiber | 1 – 2 g |
| Protein | 2 – 3 g |
Enjoying a turtle is certainly a treat, but knowing that you’re incorporating healthy nuts and potentially antioxidant-rich dark chocolate makes the indulgence even sweeter.
Frequently Asked Questions (FAQs) about Homemade Chocolate Turtles
Are Homemade Chocolate Turtles hard to make?
No, making Homemade Chocolate Turtles is surprisingly easy. The most critical steps involve gently melting the caramel and chocolate and ensuring you properly chill the clusters so they maintain their shape during coating. This recipe uses simple ingredients and no complicated techniques like tempering, making it highly accessible for home cooks.
How long do Homemade Chocolate Turtles last?
When stored in an airtight container, these homemade candies will last about 5 days at a cool room temperature or up to 7 days in the refrigerator. For longer storage, they can be frozen for up to three months. Always ensure the container is tightly sealed to prevent the chocolate from absorbing moisture or odors.
Can I use store-bought jarred caramel sauce instead of melting caramel chews?
Yes, you absolutely can, but be selective. Use a very thick, high-quality caramel sauce labeled for dipping or baking, as thin ice cream toppings will be too runny and will not set properly. If the jarred sauce seems thin, try heating it briefly and letting it cool significantly to help it thicken before scooping onto the pecan bases.
What is the difference between chocolate turtles and chocolate clusters?
The main difference is the caramel! A chocolate cluster typically involves nuts mixed directly into melted chocolate, often without a gooey center. Homemade Chocolate Turtles, however, are defined by their specific layers: a pecan base, a distinct, chewy caramel layer, and then the chocolate coating that holds the structure together, resembling a turtle shell.
Why do I need to toast the pecan halves for these Homemade Chocolate Turtles?
Toasting the pecans is a critical step that enhances the overall flavor profile of the candy. Heat activates the oils in the nuts, bringing out a deeper, buttery, and slightly smoky flavor. This aromatic depth contrasts beautifully with the sweet caramel and chocolate, transforming the turtle from a simple candy into a gourmet delight.
Conclusion: The Sweet Satisfaction of Homemade Chocolate Turtles
There is a profound satisfaction that comes from creating something truly delicious and beautiful from scratch, and making your own batch of Homemade Chocolate Turtles certainly fits the bill. From the moment the fragrant, toasted pecans hit your palate, followed by the soft, luxurious pull of the homemade caramel, and finally, the snap of rich chocolate, this candy is a textural masterpiece.
We’ve walked through the five key steps, ensuring every component from the crunchy base to the glossy finish is executed flawlessly. Remember the importance of high-quality ingredients, the magic of the chilling process, and the simple elegance of a sprinkle of flaky sea salt. Whether you are packaging these as cherished gifts or hoarding them selfishly in your pantry, these Homemade Chocolate Turtles are guaranteed to be a major hit.
Don’t wait for a special occasion to enjoy this level of gourmet indulgence. Gather your ingredients, set aside an afternoon, and experience the joy of truly superior homemade candy. If you loved making these, be sure to check out some of our other festive recipes like Eggnog Bread for more holiday inspiration. We encourage you to try this recipe for Homemade Chocolate Turtles today and share your creations with us! Leave a comment below and let us know if you opted for milk, dark, or a custom nut blend!