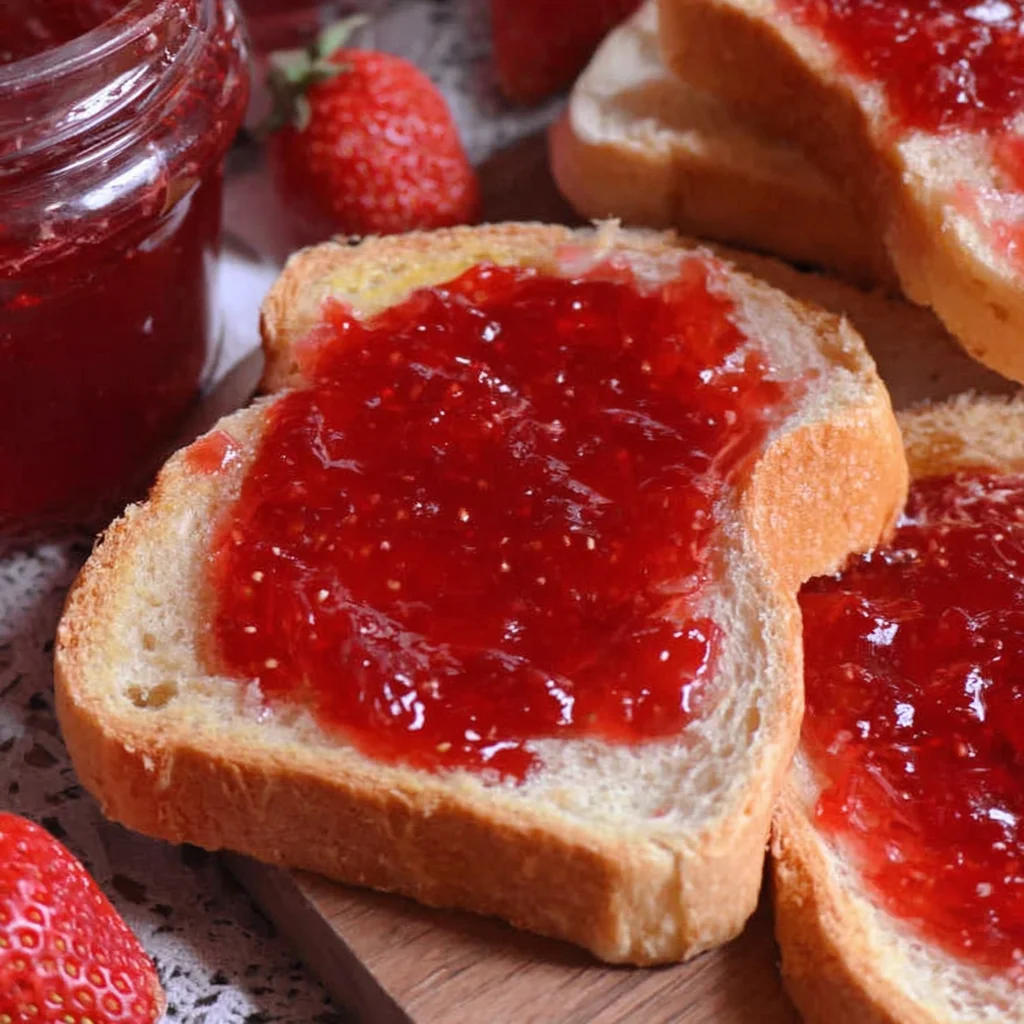
Summer’s bounty is at its peak, and what better way to preserve those sun-kissed strawberries than by making your own homemade strawberry jam? This Homemade Strawberry Jam Recipe isn’t just about preserving the flavor; it’s about capturing the essence of summer, creating a delicious spread for your toast, and sharing a taste of homemade goodness with loved ones. Imagine the rich, vibrant color, the sweet-tart flavor bursting with strawberry essence, and the satisfyingly thick texture that coats your bread perfectly. This isn’t your average store-bought jam; this is a handcrafted treat made with love, showcasing the pure, unadulterated taste of fresh strawberries. Beyond its delectable taste, this recipe is surprisingly simple. With a few readily available ingredients and a little time, you can transform a basket of ripe strawberries into jars of delightful Homemade Strawberry Jam. So, roll up your sleeves, gather your ingredients, and let’s embark on this delicious journey together!
Why You’ll Love This Homemade Strawberry Jam Recipe
This Homemade Strawberry Jam Recipe is more than just a recipe; it’s an experience. The process is incredibly rewarding, connecting you to the food you eat in a way that mass-produced jams simply can’t. Here’s why you’ll fall in love with making your own strawberry jam:
- Unbeatable Flavor: Homemade jam tastes infinitely better than store-bought varieties. You control the sweetness and can adjust it to your preference, resulting in a truly unique and delicious flavor profile. The freshness of the strawberries shines through, creating a vibrant and unforgettable taste experience.
- Superior Quality Ingredients: You choose the freshest, ripest strawberries and know exactly what goes into your jam. No artificial colors, flavors, or preservatives – just pure, natural goodness. You can even experiment with organic strawberries for an extra layer of quality.
- Customization Options: This recipe is a springboard for creativity! Feel free to adjust the sugar level based on your preference, add spices like cinnamon or cardamom for a unique twist, or incorporate other fruits like raspberries or blueberries for a delightful blend of flavors. The possibilities are endless.
- Cost-Effective: While the initial investment might seem slightly higher than purchasing a jar of jam, making your own is surprisingly economical in the long run, especially when you consider the superior quality and larger quantity you’ll produce.
- A Perfect Gift: Homemade jam makes a truly thoughtful and personalized gift for friends and family. Presenting a jar of your homemade strawberry jam is a delightful way to share a piece of your heart and the fruits of your labor.
- A Fun Activity: Jam-making is a wonderful activity to do alone, with family, or with friends. It’s a relaxing and satisfying experience that allows you to connect with your creative side and enjoy the process of transforming simple ingredients into something truly special.
Why You Should Try This Homemade Strawberry Jam Recipe
In a world of processed foods and convenience, taking the time to make something from scratch offers immeasurable benefits. This Homemade Strawberry Jam Recipe is a fantastic opportunity to embrace the joy of homemade cooking and reap its many rewards:
- Preserving Summer’s Flavors: Capture the sweet taste of summer strawberries and enjoy them long after the season has passed. Homemade strawberry jam is a delightful way to preserve the fresh, vibrant taste of summer for months to come.
- Improved Health and Nutrition: By controlling the ingredients, you can reduce or eliminate added sugars and artificial preservatives. This Homemade Strawberry Jam Recipe uses minimal sugar, making it a healthier alternative to store-bought jams.
- Increased Culinary Skills: Jam-making is a fantastic way to learn fundamental cooking skills, such as properly measuring ingredients, understanding cooking times, and mastering the art of achieving the perfect jam consistency.
- Sense of Accomplishment: Making your own jam from scratch is incredibly satisfying. The process is not only rewarding but also instills a sense of accomplishment and pride in creating something delicious and beautiful.
- Reduced Food Waste: Use up those perfectly ripe, but slightly overripe strawberries, preventing food waste and transforming them into a delicious and useful product. This is a great way to minimize waste and maximize your resources.
- Versatile Culinary Ingredient: Homemade strawberry jam is incredibly versatile. It’s perfect for topping toast, biscuits, and pancakes, using in baked goods like muffins and cakes, or as a delicious filling for pastries. The culinary applications are limitless.
Ingredients and Necessary Utensils for Your Homemade Strawberry Jam Recipe
This section details the ingredients and utensils needed for your Homemade Strawberry Jam Recipe. Having everything prepared beforehand will ensure a smooth and efficient jam-making process. This Homemade Strawberry Jam Recipe emphasizes fresh, high-quality ingredients for an optimal taste.
Ingredients:
- 4 cups fresh strawberries: Choose ripe, but not overly soft, strawberries. The riper the strawberry, the more flavorful the jam will be. Wash and hull the strawberries thoroughly before slicing.
- 3 cups granulated sugar: Granulated sugar is the most common type of sugar used for jam making. You can adjust the amount of sugar to your liking, but using less sugar will result in a jam with a more tart flavor.
- 1/4 cup lemon juice: Lemon juice acts as a natural pectin enhancer and helps to brighten the flavor of the strawberries. It also helps to balance the sweetness and adds a lovely zing to the jam.
- 1 (1-inch) piece lemon peel (optional): Finely grated lemon peel adds a subtle zest and aromatic complexity to your Homemade Strawberry Jam. Ensure you only use the zest and avoid the bitter white pith.
Necessary Utensils:
- Large, heavy-bottomed saucepan: A heavy-bottomed saucepan distributes heat evenly, preventing scorching and ensuring even cooking of the jam. Stainless steel or copper saucepans are excellent choices.
- Wooden spoon or spatula: Use a wooden spoon or spatula for stirring the jam, as these materials are less likely to scratch the pan’s surface. A sturdy spatula is also beneficial for scraping down the sides of the saucepan.
- Measuring cups and spoons: Accurate measuring is crucial for successful jam-making. Using standardized measuring tools ensures consistent results.
- Fine grater: If using lemon peel, a fine grater will ensure you only obtain the fragrant zest and avoid the bitter white pith.
- Chilled plate or saucer: This is essential for performing the wrinkle test to determine when the jam has reached the setting point.
- Jam thermometer (optional): A jam thermometer provides a precise measurement of the jam’s temperature, eliminating guesswork when determining the setting point. The ideal temperature is 220°F (104°C).
- Sterilized jars and lids (optional): If canning the jam, you’ll need sterilized jars and lids to ensure proper preservation and prevent spoilage. Proper sterilization is critical for safe canning.
- Canning equipment (optional): If canning, you’ll need a large pot or canner, jar lifter, and other canning accessories to safely process the jars.
Detailed Steps for Making Homemade Strawberry Jam
This detailed step-by-step guide will walk you through the process of making this Homemade Strawberry Jam Recipe. Follow these instructions closely for the best results. Remember to always prioritize safety when working with hot liquids and sharp utensils.
- Prepare the Strawberries: Wash and hull the strawberries thoroughly. Slice them into halves or quarters, depending on their size. Smaller strawberries can be halved, while larger ones may require quartering for even cooking. If using lemon peel, finely grate it using a fine grater and set it aside.
- Combine Ingredients: In your large, heavy-bottomed saucepan, combine the sliced strawberries, granulated sugar, lemon juice, and optional lemon peel. Gently stir the mixture to ensure all ingredients are well incorporated. **Ensure the sugar is evenly distributed among the strawberries.**
- Macerate the Strawberries: Let the mixture stand for at least 30 minutes, or up to an hour. This maceration process allows the strawberries to release their juices and the sugar to begin dissolving. Stir the mixture gently every 15 minutes to ensure even maceration. **This step is crucial for achieving a smooth, flavorful jam.**
- Cook the Jam: Bring the strawberry mixture to a rolling boil over medium-high heat, stirring frequently to prevent sticking. A rolling boil means a vigorous, continuous boil, with large bubbles breaking the surface. Once boiling, reduce the heat to medium-low and continue to boil gently, stirring occasionally. **Continuous stirring is important during the boiling process to avoid burning.**
- Check for Setting Point: The jam is ready when it reaches the setting point. This can be determined using the wrinkle test or a jam thermometer. For the wrinkle test, place a small amount of jam on a chilled plate. Let it cool for a minute, then push the jam with your finger. If the surface wrinkles, it’s ready. Alternatively, use a jam thermometer; the jam should reach 220°F (104°C). **Accurate determination of the setting point is crucial for a properly setting jam.**
- Remove from Heat and Can (Optional): Once the jam reaches the setting point, immediately remove it from the heat. If canning, carefully ladle the hot jam into sterilized jars, leaving about 1/4 inch of headspace. Wipe the rims clean, seal the jars, and process according to your preferred canning method. **Proper canning techniques are essential for preserving the jam.**
- Cool and Store: If not canning, let the jam cool completely in the saucepan before transferring it to sterilized jars or containers. Store in the refrigerator for up to 3 weeks. **Proper cooling and storage are crucial for preserving the jam’s freshness and quality.**
Tips and Variations for Your Homemade Strawberry Jam Recipe
This section explores tips and variations for your Homemade Strawberry Jam Recipe to enhance your jam-making experience and create unique flavor profiles. Mastering the techniques and exploring the variations will ensure that you produce a delicious and high-quality strawberry jam every time. The possibilities are endless!
- Adjusting Sweetness: Reduce the sugar to 2 ½ cups for a slightly tarter jam. Taste the mixture as it cooks and adjust to your preferred sweetness level. Remember that the jam will thicken as it cools, so take this into consideration.
- Adding Spices: Experiment with a pinch of cinnamon, cardamom, or even a star anise for a warm and aromatic twist. These spices complement the sweetness of the strawberries beautifully.
- Using Pectin: If you want a firmer set, you can add commercial liquid or powdered pectin according to the package instructions. This is especially helpful if you’re using less sugar.
- Other Fruits: Combine strawberries with other berries like raspberries, blueberries, or blackberries for a more complex flavor profile. The proportion of strawberries to other fruits depends on your preference.
- Avoiding Common Mistakes: Don’t overcook the jam, or it will become too thick and potentially burn. Always use a heavy-bottomed pan to ensure even heat distribution. Sterilize your jars properly if canning.
- Vegan Option: This recipe is naturally vegan. Ensure that any added pectin is also vegan-friendly.
- Gluten-Free Option: This recipe is naturally gluten-free.
Nutritional Values and Benefits of Homemade Strawberry Jam
This Homemade Strawberry Jam Recipe, while indulgent, also offers some nutritional benefits. The nutritional information provided below is an approximation and may vary depending on the specific ingredients used. This information emphasizes the natural goodness present in fresh strawberries.
Nutritional information (per 100g serving, approximate):
- Calories: Approximately 250-300 (depending on sugar content)
- Protein: Low
- Fat: Low to negligible
- Carbohydrates: High, primarily from sugar and strawberries
Benefits of Strawberries:
- Rich in Vitamin C: Strawberries are an excellent source of Vitamin C, a potent antioxidant that supports the immune system and protects against cell damage.
- Antioxidant Properties: They contain various antioxidants, including anthocyanins (responsible for their red color), which help combat free radicals and reduce the risk of chronic diseases.
- Fiber Content: Strawberries provide dietary fiber, which aids digestion and promotes gut health.
- Manganese: They are a good source of manganese, an essential mineral involved in bone health and metabolism.
FAQs
How long does homemade strawberry jam last?
Can I use frozen strawberries to make jam?
What is the best type of sugar to use for strawberry jam?
How do I know if my jam is ready?
Why is lemon juice added to homemade strawberry jam?
Conclusion
This Homemade Strawberry Jam Recipe is a delightful journey into the world of homemade preserves. It’s a recipe that not only yields a delicious spread but also provides a rewarding and enriching experience. From the vibrant color to the sweet-tart taste, this jam is a testament to the simple pleasures of homemade cooking. We hope this comprehensive guide has inspired you to embark on your jam-making adventure. Now, go ahead and create a batch of this Homemade Strawberry Jam. It’s a perfect way to capture the essence of summer and share a little homemade happiness with those you love!
Don’t forget to share your experience in the comments below! Let us know how your Homemade Strawberry Jam turned out, and feel free to share your own tips and variations. And if you’re looking for more delicious recipes, check out our other articles on pumpkin spice cake and pumpkin chocolate chip cookies. Happy jam-making!
For even more amazing recipe ideas, be sure to follow us on Pinterest! Click here to explore our Pinterest board!
Homemade Strawberry Jam: Easy & Delicious Recipe
Ingredients
Equipment
Method
- Wash and hull the strawberries. Slice into halves or quarters.
- If using lemon peel, finely grate it. Combine strawberries, sugar, lemon juice, and lemon peel (if using) in a large saucepan.
- Let the mixture stand for at least 30 minutes to macerate. Stir occasionally.
- Bring the mixture to a rolling boil over medium-high heat, stirring constantly. Reduce heat to medium-low and simmer, stirring frequently, until the jam reaches setting point (see note below).
- To test for setting point, use the wrinkle test: place a small spoonful on a chilled plate. Let cool slightly, then push the jam with your finger. If the surface wrinkles, it's ready. Alternatively, use a jam thermometer; it should reach 220°F (104°C).
- Remove from heat. If canning, carefully ladle hot jam into sterilized jars, leaving 1/4 inch headspace. Wipe rims, seal, and process according to your preferred canning method.
- If not canning, let cool completely before transferring to sterilized jars or containers. Refrigerate for up to 3 weeks.