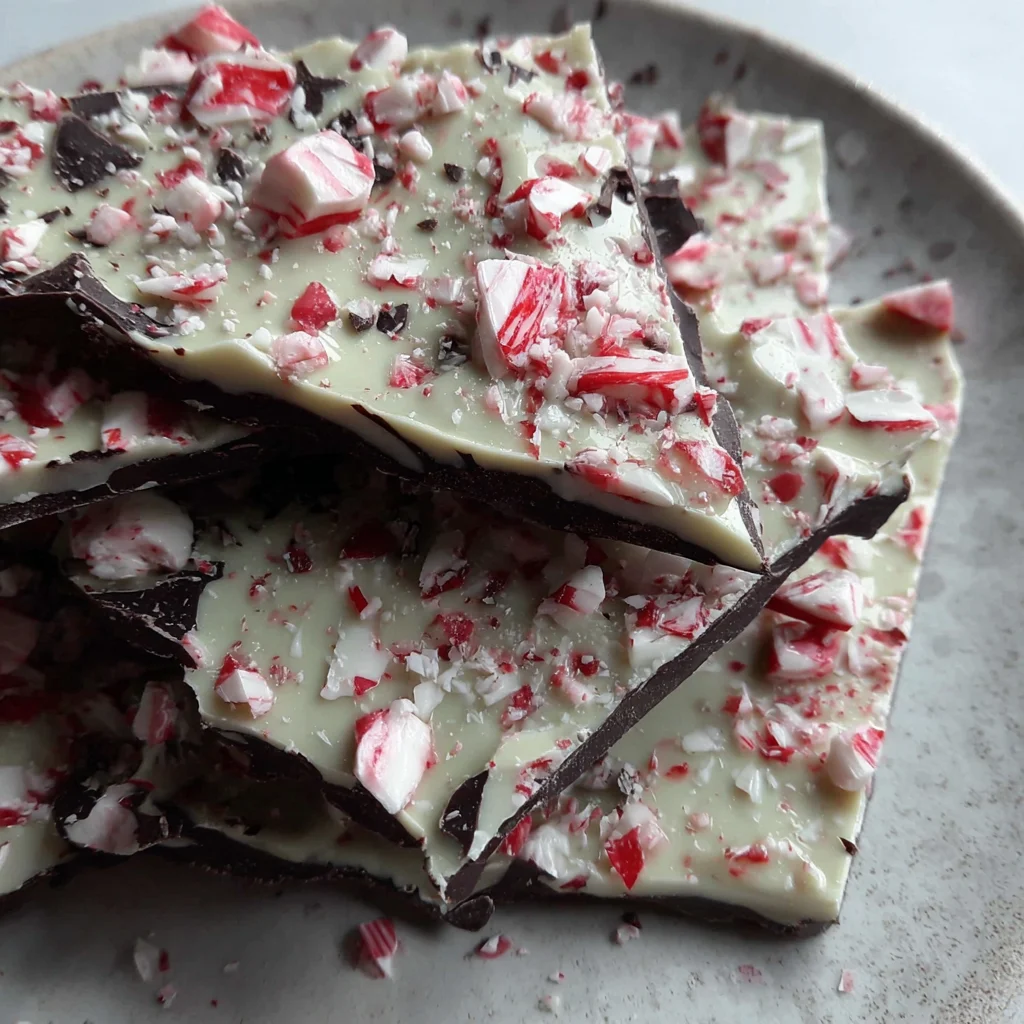
There are certain aromas, certain flavors, and certain textures that instantly transport you to the heart of the holiday season. The invigorating smell of pine, the warm spice of cinnamon, and, perhaps most iconic of all, the dazzling combination of rich dark chocolate and cool, crisp peppermint. This is the magic encapsulated in a single, irresistible confection: Peppermint Bark. This easy-to-make classic holiday treat is not just candy; it’s a staple of festive gatherings, a beautiful homemade gift, and the perfect balance of bittersweet decadence and refreshing crunch.
Our recipe strips away any complexity, offering a straightforward method to create gorgeous, professional-looking, two-layer Peppermint Bark right in your own kitchen. Whether you are a seasoned chocolatier or a beginner baker looking for a simple holiday project, this guide ensures success. We combine a sturdy base of smooth dark chocolate, infused with a hint of cooling mint, topped with a creamy white chocolate layer scattered generously with vibrant, crunchy crushed candy canes. Forget the store-bought versions; homemade Peppermint Bark is superior in flavor, freshness, and festive spirit. Prepare to dazzle your friends and family with this wonderfully simple, yet incredibly elegant, holiday confection that embodies the very essence of Christmas tradition. It is truly the perfect blend of rich chocolate and refreshing peppermint crunch, making it an essential addition to your annual holiday baking roster.
Why You’ll Love This Easy Peppermint Bark Recipe
While the holiday season is filled with elaborate baking projects think layered cakes, fussy cookies, and intricate gingerbread houses this recipe for homemade Peppermint Bark stands out due to its spectacular visual appeal and absolute simplicity. The contrast of the dark and white chocolate, speckled with the ruby red and white shards of crushed candy canes, is pure visual Christmas joy. But beyond the aesthetics, there are practical reasons why this specific recipe will become your go-to holiday staple, easily exceeding the quality of any commercially produced counterpart.
First and foremost is the ease of execution. Unlike recipes that require precise measurements for flour and lengthy chilling times, making Peppermint Bark is primarily about melting and spreading. If you can use a microwave or manage a double boiler, you can master this candy. The total hands-on time is incredibly short typically less than 20 minutes leaving you more time to enjoy the festivities or wrap gifts. This simplicity makes it a fantastic project for involving children, who love the satisfying step of crushing the candy canes and sprinkling them over the warm white chocolate.
Secondly, the sensory experience is unparalleled. The combination of textures is what elevates this simple candy into a culinary delight. You get the initial snap of the chocolate layers, followed by the satisfying, granular crunch of the crushed candy canes. The flavor profile is equally dynamic: the slightly bitter, deep notes of the dark chocolate base are perfectly contrasted by the sweet, creamy notes of the white chocolate, all tied together by the burst of cool, clean peppermint. It’s a flavor profile that is truly addictive and screams ‘holiday cheer.’
Finally, this recipe offers exceptional versatility and shelf life. Once set, Peppermint Bark is incredibly stable, meaning it holds up beautifully when stored or shipped. It’s the ideal candidate for holiday gifting a thoughtful, luxurious, and easy present that everyone appreciates. Broken into irregular, jewel-like shards, it’s stunning when packaged in clear cellophane bags tied with a festive ribbon. It travels well, lasts for weeks in an airtight container, and looks impressive whether served on a platter or tucked into a stocking. This Peppermint Bark recipe delivers maximum impact with minimal effort, making it a guaranteed favorite in your kitchen.
The Timeless Appeal: Why You Should Try Making Peppermint Bark This Year
Why choose this specific confection over the myriad of other sweet treats available during the winter holidays? The answer lies in its ability to embody tradition while remaining effortlessly modern and customizable. Making homemade Peppermint Bark is more than just cooking; it’s participating in a cherished holiday ritual that yields instant, delicious results. This year, ditch the complicated recipes that stress you out and embrace the joyful simplicity of this two-layer chocolate masterpiece.
One primary reason to try this recipe is the cost-effectiveness and quality control. High-end Peppermint Bark from specialty stores can be notoriously expensive. By making it at home, you have complete control over the quality of your ingredients using superior, high-cacao dark chocolate and pure white chocolate melting wafers for a fraction of the cost. This allows you to produce large quantities perfect for neighborhood cookie swaps, office parties, or extensive gifting lists without breaking the bank. Furthermore, when you use quality ingredients, the texture and flavor of the final product are noticeably richer and smoother than mass-produced alternatives.
Another compelling reason is the joy of customization. While the classic dark and white chocolate structure is mandatory for authentic Peppermint Bark, the fun lies in the variations. Want an extra boost of chocolate? Use milk chocolate chips for the base. Prefer a deeper mint flavor? Adjust the peppermint extract. You can experiment with different toppings too, though the crushed candy canes are traditional. This simple recipe acts as a canvas for your holiday creativity, ensuring that your batch is uniquely yours. For those who enjoy baking seasonal favorites, pairing this bark with other treats like a slice of festive Eggnog Bread or some rich Gingerbread Fudge creates a truly decadent holiday basket.
Finally, consider the low-stress factor. Many traditional holiday desserts, such as pie crusts or elaborate frosting work, are prone to mistakes and require specialized skills. Peppermint Bark is foolproof. The layering process is forgiving, and the final look is meant to be rustic and broken the rough edges are part of its charm. This low-stakes preparation is exactly what is needed during the busy holiday season. It requires only setting time in the refrigerator, eliminating the need to monitor an oven, ensuring your kitchen stays cool and your nerves remain calm. If you are looking for a show-stopping dessert that requires minimal effort and guarantees maximum satisfaction, making this glorious homemade Peppermint Bark is the definitive choice this year.
Essential Ingredients and Tools for Perfect Peppermint Bark
Achieving that glossy sheen, crisp snap, and perfect layer separation in your Peppermint Bark hinges on two things: the quality of your ingredients and the readiness of your simple tools. This section details why each component is vital and what equipment you need for success.
The Critical Ingredients List
While the list is short, selecting the right items is essential for texture and flavor.
- 16 oz White Chocolate (High-Quality Melting Wafers or Chips Recommended): This forms the top, dominant layer. Quality is crucial here. Standard white chocolate chips often contain stabilizers that prevent them from melting into a smooth, pourable consistency, resulting in a grainy bark. Opt for white chocolate melting wafers, almond bark, or high-quality couverture chocolate (which uses cocoa butter) for the smoothest, glossiest finish. This ensures your white chocolate layer perfectly holds the crushed candy canes.
- 8 oz Semi-Sweet or Dark Chocolate Chips: This forms the foundational layer. A high-quality dark chocolate (60% cocoa or higher) provides the necessary contrast to the sweetness of the white chocolate and candy canes. Using high-quality semi-sweet chips is generally acceptable here, as this layer is spread thinly and provides structure.
- 1 teaspoon Peppermint Extract (Divided): This is the key flavor element. Be careful not to use oil-based flavorings, as these can cause the chocolate to seize. Pure extract is preferred. Dividing the extract (1/2 teaspoon per layer) ensures both the dark and white chocolate layers carry the refreshing mint flavor, maximizing the impact of the Peppermint Bark.
- Approximately 1 cup Candy Canes, Crushed: The signature topping and crunch factor. You will need about 15-20 standard-sized candy canes to yield one full cup of crushed pieces. The crushing process is detailed below, but aim for a mix of fine dust and small, sharp shards for maximum visual appeal and textural variety.
- 1 tablespoon Shortening (Optional, for Thinning the White Chocolate): This ingredient is optional but highly recommended, especially when working with standard white chocolate chips. White chocolate is denser and thicker than dark chocolate due to its composition. Adding a tablespoon of vegetable shortening (like Crisco) helps lower the viscosity, resulting in a thinner, easier-to-spread layer that won’t require excess heat, which could risk melting the dark chocolate base.
Recommended Tools and Utensils for Recipe Success
You don’t need fancy equipment, but having the right setup guarantees a smooth process for creating beautiful two-layer Peppermint Bark.
- 9×13 Inch Baking Sheet or Standard Cookie Sheet: This dictates the thickness of your bark. A 9×13 pan yields slightly thicker pieces, while a standard cookie sheet (around 10×15 inches) will produce a thinner, crispier bark.
- Parchment Paper or Wax Paper: Absolutely essential. Lining the pan ensures the bark doesn’t stick and, crucially, provides handles to lift the entire hardened slab out easily, minimizing mess and preventing breakage during removal.
- Microwave-Safe Bowls or Double Boiler Setup: You need two separate containers for melting the dark and white chocolate, ensuring no cross-contamination. Using a microwave is the fastest method, but melting chocolate over a double boiler (a heatproof bowl set over a pot of simmering water) offers gentler, more controlled heat, reducing the risk of scorching or seizing the chocolate.
- Rubber Spatula or Offset Spatula: Necessary for stirring the melting chocolate and, more importantly, spreading the chocolate layers evenly across the pan. An offset spatula gives you greater precision for thin, uniform layers.
- Zip-Top Bag and Rolling Pin/Heavy Pot: The best method for crushing the candy canes cleanly and safely.
- A Sharp, Heavy Knife or Chef’s Knife: Essential for cleanly cutting the fully hardened bark into uniform pieces, although many prefer the rustic look achieved by simply breaking the Peppermint Bark by hand.
Detailed Step-by-Step Guide to Crafting Two-Layer Peppermint Bark
Creating professional-quality, stunning Peppermint Bark is easy when you follow these precise steps, focusing on temperature control and timing. Remember, the goal is distinct, separate layers with no blending in between.
1. Preparation: Setting the Stage for Success
Start by preparing your surface and your topping, ensuring everything is ready before the chocolate starts melting.
Line a 9×13 inch baking sheet or a standard cookie sheet with parchment paper or wax paper. Ensure the paper hangs over the sides slightly to create handles. This simple step is vital for easy removal later.
Crush the candy canes. Place the candy canes inside a sturdy zip-top bag. Squeeze out all the excess air and seal tightly. Lay the bag flat on a cutting board and use a rolling pin or the bottom of a heavy pot to break them into small pieces. You want a mixture of fine powder and small, sharp pieces. Set the crushed candy canes aside they must be ready to sprinkle immediately.
2. Melting the Dark Chocolate Layer (The Foundation)
This is the structural base of your Peppermint Bark. The chocolate must be smooth, spreadable, and perfectly tempered (if using high-quality chocolate) or simply melted thoroughly.
In a microwave-safe bowl, melt the semi-sweet or dark chocolate chips. Microwave in 30-second intervals at 50% power, stirring well after each interval. Do not rush this step; overheating chocolate causes it to seize and become grainy. Continue until the chocolate is smooth and almost fully melted. Remove from the microwave when a few small lumps remain and stir until residual heat finishes the melting process.
Stir in 1/2 teaspoon of the peppermint extract into the melted dark chocolate. Ensure the extract is fully incorporated.
Pour the melted dark chocolate onto the prepared baking sheet. Use a rubber or offset spatula to spread the chocolate evenly into a thin layer, aiming for approximately 1/8 to 1/4 inch thick. Work quickly to achieve a smooth, uniform base.
3. Setting the Dark Chocolate Layer
This step is crucial for layer separation. The dark chocolate must be fully firm before the warm white chocolate is added. If the dark chocolate is still soft, the two layers will swirl together, ruining the distinct bark appearance.
Place the baking sheet in the refrigerator for about 15 to 20 minutes, or until the chocolate is completely set and firm to the touch. It should not yield when lightly pressed.
4. Melting the White Chocolate Layer (The Contrast)
While the dark chocolate is chilling, prepare the white chocolate layer. White chocolate is notoriously fickle, so handle it carefully.
In a separate microwave-safe bowl, melt the white chocolate wafers or chips. Use the same slow technique: 30-second intervals at 50% power, stirring well between each one. White chocolate can burn easily, so pay close attention.
If the white chocolate seems too thick or stiff (a common problem with chips), stir in the optional tablespoon of shortening. This will create a smoother, more spreadable consistency, which is vital for quick application over the chilled dark chocolate.
Stir in the remaining 1/2 teaspoon of peppermint extract into the melted white chocolate. Ensure the extract is mixed thoroughly.
5. Combining the Layers and Adding Topping
Speed is essential in this step to prevent the white chocolate’s heat from melting the firm dark chocolate base.
Remove the dark chocolate from the refrigerator. Pour the warm, melted white chocolate directly over the set dark chocolate layer.
Quickly and gently spread the white chocolate layer evenly over the dark chocolate. Do not scrape the spatula against the dark chocolate base; try to use the volume of the white chocolate to gently push and spread it out. Aim for a thickness similar to the bottom layer.
Immediately sprinkle the crushed candy canes evenly and generously over the entire surface of the warm white chocolate. Gently press the pieces down with the back of a spoon or your hand to ensure they adhere firmly to the still-liquid white chocolate.
For more holiday inspiration, especially easy drop cookies, check out our recipe for Christmas Thumbprint Cookies.
6. Final Setting and Breaking the Peppermint Bark
Return the baking sheet to the refrigerator and chill for at least 1 hour, or until both layers are completely hard and firm. The chocolate should have a distinct “snap” when tested.
Once fully set, remove the bark from the refrigerator. Lift the entire slab out of the pan using the parchment paper handles.
Peel off the parchment paper. Place the bark on a cutting board. Use a sharp, heavy knife to cut the bark into uniform squares, or, for the traditional rustic look, simply break the bark into irregular, satisfying pieces by hand. Store the finished Peppermint Bark in an airtight container at room temperature or in the refrigerator for up to 2 weeks.
Tips, Troubleshooting, and Delightful Peppermint Bark Variations
While Peppermint Bark is forgiving, a few expert tips can elevate your results. Knowing how to troubleshoot common chocolate issues and experimenting with variations ensures you nail this recipe every time.
Pro Tips for Perfect Layers
Avoid Seizing: Chocolate seizes (turns into a grainy, unusable paste) when even a tiny drop of water or steam is introduced while melting. If you use a double boiler, ensure the water never touches the bottom of the bowl, and the steam doesn’t escape into the chocolate. If melting in the microwave, ensure your bowls and stirring utensils are completely dry.
Temperature Control is Key: When adding the white chocolate to the dark layer, the white chocolate should be warm, but not piping hot. If it’s too hot, it will instantly soften and swirl the dark layer, resulting in muddy, indistinct layers. If the white chocolate is too cool, it won’t spread easily. Aim for smoothly melted, but slightly cooled, white chocolate.
The Peppermint Crunch: Don’t wait! As soon as the white chocolate is spread, you must apply the crushed candy canes. White chocolate sets rapidly when poured over cold dark chocolate. The few seconds you have after spreading are critical for adherence. If the chocolate sets before you sprinkle, the candy canes will fall right off.
Troubleshooting Common Mistakes
- My Layers Blended: This happened because the dark chocolate layer was not fully set, or the white chocolate was too hot. Ensure the dark chocolate is rock hard (15-20 minutes in the fridge minimum) and let the white chocolate cool for a minute or two after melting before pouring.
- My Chocolate is Grainy/Lumpy: This is seizing, usually caused by moisture or overheating. If the chocolate has seized, sometimes stirring in 1 teaspoon of vegetable oil or shortening (or a tablespoon of very hot water) can rescue it, but this often compromises the final texture. Slow and low heat is the best defense.
- The Bark is Too Soft: Ensure you are using quality chocolate that relies on cocoa butter or stabilizers (wafers) for structure. If it remains soft, it may be too warm where you are storing it, or you may have used too much liquid (like excess extract).
Delicious Peppermint Bark Variations
The beauty of the bark format is its adaptability. Once you master the basic dark/white two-layer process, you can get creative:
Vegan Peppermint Bark: Use high-quality dairy-free dark chocolate chips and vegan white chocolate wafers (usually made with cocoa butter and rice syrup or coconut milk powder). Ensure the candy canes are also certified vegan (some brands use gelatin, though most are vegan). The flavor and crunch remain identical.
Triple Chocolate Bark: Add a thin layer of milk chocolate between the dark and white layers for extra sweetness and depth.
Salty Bark: Before adding the crushed candy canes, sprinkle a very fine dusting of flaky sea salt (like Maldon) over the dark chocolate layer after it sets. This adds a sophisticated salty counterpoint to the sweet mint.
Alternate Toppings: If candy canes are hard to find, use crushed peppermint patties, chopped peppermint Ghirardelli squares, or even green and red sprinkles mixed with white pearl sugar for a festive, crunchy topping. For more holiday inspiration and recipes, feel free to visit my Pinterest page.
Nutritional Insights and Sweet Benefits of Homemade Peppermint Bark
While Peppermint Bark is undeniably a treat designed for festive indulgence, understanding the components of this confection can offer a balanced perspective on its place in your holiday diet. Since this is a homemade recipe, we benefit from knowing exactly what goes into every shard.
Estimated Nutritional Breakdown (Per 1 oz Serving)
It is important to note that exact nutritional values vary significantly based on the brand of chocolate used (specifically the cocoa content and added sugars). However, a standard 1 oz serving (a typical small piece of bark) offers an approximate profile:
| Nutrient | Approximate Value |
|---|---|
| Calories | 150 – 180 kcal |
| Total Fat | 9 – 12 g |
| Saturated Fat | 5 – 7 g |
| Carbohydrates | 18 – 22 g |
| Sugar | 15 – 18 g |
| Protein | 1 – 2 g |
| Fiber | 1 – 2 g (Primarily from Dark Chocolate) |
Disclaimer: These values are estimates based on standard commercial chocolate chips and candy canes. For precise nutritional content, specific ingredient labels must be analyzed.
Benefits Derived from Ingredients
While Peppermint Bark is high in sugar and fat, its primary ingredient high-quality dark chocolate offers some notable benefits:
Dark Chocolate (The Antioxidant Powerhouse): If you use a semi-sweet or dark chocolate that is 70% cacao or higher, you benefit from a high concentration of antioxidants, specifically flavonoids and polyphenols. These compounds are known for their potential to help neutralize free radicals and improve blood flow. Dark chocolate is also a good source of several essential minerals, including iron, magnesium, and copper. When you choose a high-quality dark chocolate base for your Peppermint Bark, you are giving the bark a deeper flavor profile and a subtle nutritional lift.
Peppermint Extract (Mood and Digestion): Peppermint is more than just a flavor; it contains essential oils, notably menthol. Peppermint is renowned for its digestive aid properties, helping to soothe upset stomachs (which might be helpful after a large holiday meal!). Furthermore, the aroma of peppermint has been linked to improved concentration and mood elevation. The crisp, clean scent and taste of the peppermint in the bark provide a refreshing, palate-cleansing effect that balances the richness of the chocolate.
The Moderation Principle: The key to enjoying any holiday confection, including homemade Peppermint Bark, is moderation. Because this candy is so rich and flavorful, a small piece is usually sufficient to satisfy a sweet craving. By making it at home, you avoid many of the unnecessary additives and preservatives found in commercial candy, ensuring that your indulgence is made with the purest ingredients possible. Enjoy the satisfying crunch and the refreshing mint without guilt, savoring it as a special part of your festive celebration.
Frequently Asked Questions about Peppermint Bark
FAQs about Making the Best Peppermint Bark
How do I prevent my Peppermint Bark layers from mixing?
The key is temperature control. The dark chocolate base must be fully set and firm before the white chocolate is poured on top. Chill the dark chocolate layer in the refrigerator for at least 15-20 minutes until it is hard to the touch. Additionally, allow the melted white chocolate to cool for a minute or two before spreading, ensuring it is warm but not hot enough to re-melt the bottom layer.
What is the best way to crush candy canes for Peppermint Bark?
Place the candy canes in a sturdy, sealed zip-top bag and use a rolling pin or the flat bottom of a heavy skillet to crush them. Aim for a variety of textures, from fine powder to small, sharp shards. Ensure the pieces are small enough to adhere to the chocolate but large enough to provide a satisfying, visible crunch.
How long does homemade Peppermint Bark last?
When stored correctly, homemade Peppermint Bark has an excellent shelf life, making it perfect for preparing ahead of time. Store the bark in an airtight container at cool room temperature or in the refrigerator for up to 2 weeks. If you choose to freeze it, wrap it tightly first, and it can last for several months.
Can I use pure white chocolate bars instead of chips or wafers for Peppermint Bark?
Yes, high-quality white chocolate bars (couverture) are often superior to chips because they contain a higher percentage of cocoa butter, ensuring a smoother melt and glossier finish. If using a bar, finely chop it before melting to ensure it melts evenly and quickly. Avoid using cheap white chocolate chips, as they often contain waxes that can result in a grainy texture.
Why did my chocolate seize when I added the peppermint extract?
Chocolate seized because the extract introduced moisture. Always use pure peppermint extract rather than oil-based flavorings, as oil-based compounds can sometimes interact poorly with the chocolate’s fats. Ensure the chocolate is fully melted and smooth before stirring the extract in rapidly. Use only the recommended quantity of extract to minimize the liquid content.
Conclusion: The Sweetest Holiday Tradition is Homemade
The beauty of this simple, elegant, two-layer Peppermint Bark is that it delivers maximum festive flavor and impressive presentation with minimal effort. We’ve walked through the process, emphasizing the importance of quality chocolate and proper cooling techniques to ensure that beautiful, sharp separation between the dark and white layers. By taking the time to slowly melt your chocolate and ensure the base is rock hard before applying the peppermint-infused white chocolate, you guarantee a perfect, professional snap every time.
From the satisfying crunch of the hand-crushed candy canes to the cool, invigorating rush of peppermint oil contrasting with the deep richness of the dark chocolate, this bark is truly the quintessential holiday treat. It transforms simple ingredients into something luxurious, making it ideal for thoughtful homemade gifts or a dazzling addition to your dessert platter. This year, skip the expensive, commercial alternatives and embrace the joy of crafting your own batch of this classic holiday confection. Gather your ingredients, prepare your parchment, and fill your kitchen with the irresistible aroma of chocolate and mint.
Don’t let the holidays pass without experiencing the delight of fresh, homemade Peppermint Bark. Try this recipe today, share the results with your loved ones, and tag us in your beautiful creations! Happy baking, and may your holiday season be filled with rich chocolate and refreshing crunch.
Classic Holiday Peppermint Bark
Ingredients
Equipment
Method
- Line a 9x13 inch baking sheet with parchment paper, ensuring the paper hangs over the edges. Crush the candy canes into small pieces using a zip-top bag and a rolling pin. Set aside.
- In a microwave-safe bowl, melt the semi-sweet or dark chocolate chips. Microwave in 30-second intervals, stirring after each, until smooth. Stir in 1/2 teaspoon of the peppermint extract.
- Pour the melted dark chocolate onto the prepared baking sheet and spread evenly into a thin layer (1/8 to 1/4 inch thick). Place the sheet in the refrigerator for 15 to 20 minutes, or until the layer is completely set and firm.
- While the dark chocolate chills, melt the white chocolate wafers in a separate microwave-safe bowl using 30-second intervals. If the white chocolate is too thick, stir in the optional tablespoon of shortening. Stir in the remaining 1/2 teaspoon of peppermint extract.
- Remove the dark chocolate from the refrigerator. Pour the warm white chocolate directly over the set dark chocolate layer. Quickly and gently spread the white chocolate evenly over the surface.
- Immediately sprinkle the crushed candy canes evenly over the warm white chocolate layer. Gently press them down to ensure they adhere.
- Return the baking sheet to the refrigerator and chill for at least 1 hour, or until both layers are completely hard and firm.
- Lift the entire slab of bark out of the pan using the parchment paper handles. Peel off the paper and break the bark into irregular pieces by hand, or use a sharp knife to cut it into squares.