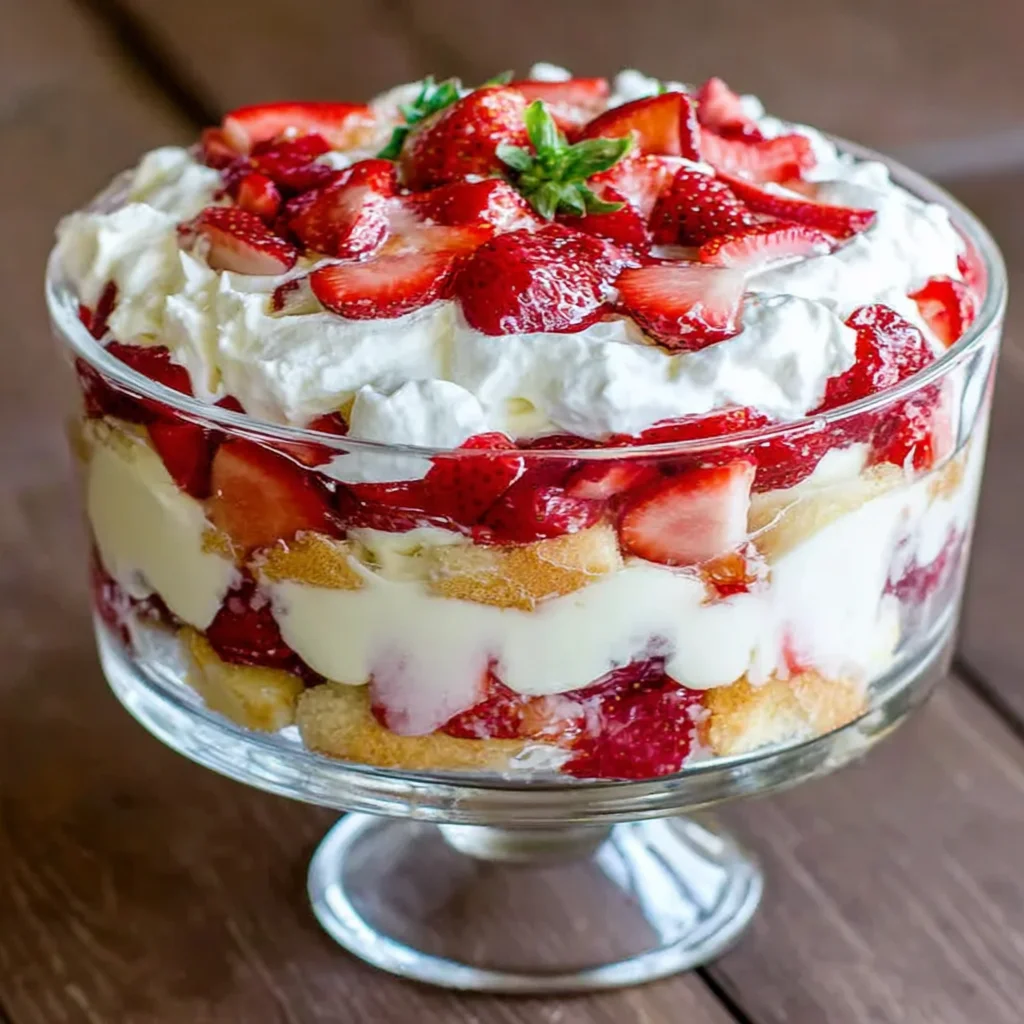
When the weather warms up and the thought of turning on the oven sends shivers down your spine, only one dessert can truly satisfy the craving for creamy comfort and bright, fruity freshness: the majestic, layered Strawberry Cheesecake Trifle. This dessert isn’t just a recipe; it’s a centerpiece. Combining the sweet crunch of fresh strawberries, the rich tang of a classic cheesecake filling, and ultra-moist cake layers soaked in berry syrup, this no-bake wonder is guaranteed to be the star of any gathering, whether it’s a casual Sunday brunch or an elegant holiday fête.
The beauty of the trifle lies in its simplicity and its spectacular presentation. Served in a clear glass dish, the distinct layers tell a story of flavor and texture a truly irresistible sight. Unlike traditional baked cheesecakes that require delicate handling and hours of cooling, this Strawberry Cheesecake Trifle is forgiving, effortless, and actually improves with time as it chills. It’s the quintessential make-ahead dessert that delivers maximum impact with minimum fuss. Dive into this guide, and learn how to master the perfect balance of creamy cheesecake mousse and juicy, macerated strawberries to create a dessert experience your guests will talk about for weeks.
Why You’ll Fall in Love with This Strawberry Cheesecake Trifle (The Taste Factor)
The culinary world is full of complicated desserts, but sometimes, the most profoundly satisfying dishes are the ones built on simple, high-quality ingredients. This Strawberry Cheesecake Trifle epitomizes that philosophy. It’s a nostalgic dessert that marries the familiar comfort of classic pound cake with the sophisticated flavor profile of a rich, airy cheesecake.
Effortless Elegance: A Visual and Culinary Masterpiece
First and foremost, this recipe is a showstopper. The transparent nature of the trifle dish allows the vibrant red of the fresh strawberries and the snowy white of the cheesecake filling to create a breathtaking contrast. It is the definition of effortless elegance. You don’t need expert piping skills or perfect frosting techniques; the layers do all the heavy lifting for the visual appeal.
But the true magic happens when the spoon dips past the airy whipped cream topping and dives deep into the complex layers below. You get:
- The Perfect Cheesecake Filling: Our cheesecake filling is the key differentiator. It’s not a heavy, dense traditional filling. We fold in freshly whipped cream to create a light, stable, and incredibly airy cheesecake mousse. This texture provides a cloud-like contrast to the density of the cake and fruit, preventing the dessert from feeling too heavy. The tang of the softened cream cheese cuts through the sweetness beautifully.
- Moist, Flavor-Soaked Cake: The cake layer (whether you choose traditional pound cake or crisp ladyfingers) acts as a sponge. By layering it directly beneath the macerated strawberries, it absorbs all the rich, natural strawberry syrup. This results in cake pieces that are incredibly moist and intensely flavored far superior to just using plain cake slices.
- The Brightness of Macerated Strawberries: We don’t just dump chopped strawberries in. We take the crucial extra step of macerating them (mixing them with sugar and a hint of lemon). This draws out their natural juices, intensifying their sweetness and creating a lush, ruby-red syrup. This concentrated strawberry flavor ensures that every bite bursts with fresh fruit essence. For more ways to utilize the best of summer fruit, check out our guide on Homemade Strawberry Jam Recipe.
The Unbeatable Texture Contrast
One of the reasons this layered dessert is so addictive is the interplay of textures. The smooth, velvety cheesecake filling meets the soft, saturated cake cubes and the slightly yielding, juicy strawberries. It’s a symphony of creamy, tender, and fresh that standard single-texture desserts simply cannot achieve. This recipe is designed for maximum satisfaction, hitting every sweet, tangy, and textural note perfectly.
Furthermore, because the recipe requires chilling overnight, it’s exceptionally convenient for hosts. Preparing it 24 hours in advance allows you to focus on your main meal, knowing that the spectacular finale is already chilling and improving in the refrigerator. This make-ahead capability is a major win for seamless entertaining.
Why You Should Try This Recipe Today (Hosting and Preparation Benefits)
If you need further convincing to whip up this magnificent Strawberry Cheesecake Trifle, consider the practical advantages. This recipe is perfect for virtually any occasion, from Fourth of July cookouts to birthday parties, or just a sophisticated family dinner. It minimizes stress while maximizing wow factor.
Mastering the No-Bake Cheesecake Trifle Technique
For those intimidated by baking or dessert making in general, the no-bake cheesecake trifle is your new best friend. There are no finicky crusts to worry about, no ovens to preheat, and no worries about sunken centers or cracked surfaces.
The secret lies in proper technique:
- Softening the Cream Cheese: Achieving a lump-free cheesecake base is paramount. Ensure your cream cheese is fully at room temperature. This allows it to whip into a flawless, airy consistency that integrates perfectly with the powdered sugar and whipped cream.
- The Folding Method: When combining the whipped cream with the cream cheese base, the technique of “folding” (using a rubber spatula to gently incorporate the mixtures) is crucial. Vigorously stirring or using the electric mixer at this stage will deflate the air you worked hard to build in the heavy cream, resulting in a dense, heavy filling rather than a light cheesecake mousse.
- The Maceration Process: This step is non-negotiable for an authentic trifle experience. By setting the fruit aside with sugar, you naturally create the moistening syrup required for the cake layers. This syrup is what transforms standard cake into a truly exquisite, flavor-infused base.
Adaptability and Customization
While the classic Strawberry Cheesecake Trifle is unbeatable, this recipe provides a fantastic framework for culinary experimentation. It is incredibly easy to adapt to dietary needs or seasonal availability:
- Seasonal Fruit Swaps: Substitute or add other berries like raspberries, blueberries, or sliced peaches. A “Triple Berry Trifle” using this same cheesecake base is spectacular.
- Cake Alternatives: If you prefer a lighter texture, use Angel Food Cake. For a chocolatey twist, use a quick batch of Easy Chocolate Cake cubes instead of pound cake.
- Gluten-Free Option: Easily swap the pound cake for gluten-free ladyfingers or a certified gluten-free vanilla cake mix, ensuring no one misses out on this delightful dessert.
The Essential Chill Time
The required 6 hours (or, ideally, overnight) of chilling is a feature, not a bug. During this time, the flavors mature, the cake absorbs the strawberry syrup completely, and the cheesecake filling stabilizes, making the final dessert easy to scoop and perfectly set. This pre-planning ability is a host’s dream. You can assemble the entire dish the day before your event, meaning the dessert course is already taken care of when the guests arrive.
Whether you are new to baking or a seasoned chef, this recipe offers a foolproof path to creating an impressive, high-impact dessert that will garner rave reviews every single time. It truly elevates the simple combination of strawberries and cream cheese into a masterful culinary creation.
Ingredients and Necessary Utensils for the Perfect Strawberry Cheesecake Trifle
Success in making this impressive Strawberry Cheesecake Trifle starts with selecting the right ingredients and ensuring your tools are ready. Quality ingredients, especially the fresh fruit, make a dramatic difference in the final flavor profile.
Key Ingredients (The Building Blocks)
Always aim for the highest quality of ingredients, especially the cream cheese, which is the heart of the filling. Remember, all cold ingredients (cream cheese and heavy cream) play specific roles and must be handled correctly.
For the Cake Layer
- 1 (10.75 ounce) Store-Bought Pound Cake or Angel Food Cake: Sliced into 1-inch cubes. Store-bought is perfectly acceptable and saves time. The goal is a dense cake that holds up to moisture.
- Alternatively: 1 package of Crisp Vanilla Ladyfingers (Savoiardi): These provide a slightly lighter, more refined layer. They are typically used when arranging the layers vertically around the edge of the trifle dish for added visual effect.
For the Strawberry Mixture (Maceration is Key)
The strawberries must be ripe, fragrant, and fresh. This layer not only provides flavor but also the necessary moisture for the cake.
- 3 pounds Fresh Strawberries: Hulled and sliced. It seems like a lot, but they compress once macerated. This generous quantity ensures rich, vibrant layers throughout your trifle.
- 1/4 cup Granulated Sugar: (Adjust to taste.) The sugar draws out the natural juices, creating the essential syrup. You may need slightly less if your berries are exceptionally sweet.
- 1 teaspoon Fresh Lemon Juice (Optional): This brightens the overall flavor and cuts through the sweetness, enhancing the natural tartness of the berry.
For the Cheesecake Filling (The Mousse)
The temperature of these ingredients is critical for achieving a light and lump-free cheesecake mousse.
- 2 (8 ounce) packages Cream Cheese: Fully softened to room temperature. This is essential! Cold cream cheese will result in a lumpy filling, no matter how long you beat it. Set it out at least two hours before starting.
- 1 cup Powdered Sugar (Confectioners’ Sugar): Powdered sugar dissolves seamlessly into the cream cheese, preventing a grainy texture and adding sweetness without weighing the filling down.
- 1 teaspoon Pure Vanilla Extract: Use high-quality vanilla for the best flavor depth.
- 3 cups Heavy Whipping Cream: Must be chilled. Cold cream whips up faster and achieves stiffer peaks, which is vital for providing the structure and lightness for the final cheesecake filling.
Recommended Tools and Utensils (Equipment for Trifle Success)
While this is a no-bake recipe, having the right equipment will streamline the preparation and ensure your cheesecake filling achieves the perfect airy texture.
Essential Tools:
- Large, Clear Glass Trifle Dish (4 to 5 quarts capacity): This is the star piece of equipment. Using a clear dish is vital for showcasing the beautiful layers of your Strawberry Cheesecake Trifle. The size ensures you have adequate depth for all the ingredients.
- Electric Mixer (Handheld or Stand Mixer): Absolutely necessary for beating the cream cheese smooth and whipping the heavy cream to stiff peaks. Attempting to whip 3 cups of heavy cream by hand is extremely challenging.
- Two Large Mixing Bowls: One for the cream cheese base and one (preferably metal) for whipping the heavy cream. Using a cold bowl for the cream helps stabilize the whipped cream.
- Rubber Spatula: Essential for gently folding the whipped cream into the cream cheese mixture. This preserves the air in the mousse, keeping the filling light and fluffy a signature of the best cheesecake filling.
- Sharp Knife and Cutting Board: For preparing and hulling the fresh strawberries.
- Measuring Cups and Spoons: For precise ingredient quantities.
To summarize, the core components the moist cake, the intensely flavored macerated strawberries, and the light-as-air cheesecake filling require careful handling and the right equipment to ensure a flawless final product. Preparation is key; gather all your tools and allow your cream cheese to soften completely before you begin.
Looking for a vibrant side dish to pair with this rich dessert? Try making a beautiful Rainbow Fruit Salad, which complements the fresh fruit in the trifle perfectly.
Detailed Recipe Steps: Crafting the Strawberry Cheesecake Trifle
The preparation of this Strawberry Cheesecake Trifle is broken down into three logical and easy-to-follow parts. Remember to follow the instructions for chilling and temperature exactly, as these steps ensure the structural integrity of the layered dessert.
Part 1: Prepare the Strawberry Mixture (Maceration)
This process is the secret to a moist and flavorful trifle. Maceration extracts the berries’ natural juices, creating a deep red syrup that fully saturates the cake.
- Combine Ingredients: In a medium-sized bowl, place the sliced strawberries, the 1/4 cup of granulated sugar, and the optional teaspoon of fresh lemon juice.
- Stir Gently: Use a spoon or rubber spatula to gently stir the mixture. Continue stirring until you notice the sugar starting to dissolve and coating the berries evenly.
- Macerate: Set the bowl aside at room temperature for a minimum of 30 minutes, or up to an hour. This process is critical: it draws out the natural juices from the strawberries, creating a rich syrup that will be essential for moistening the cake layers.
Part 2: Prepare the Cheesecake Filling (The Mousse)
The cheesecake filling is a lightened cream cheese mixture, designed to be fluffy and stable. This step requires precision in mixing.
- Cream the Cream Cheese Base: In a large mixing bowl, use an electric mixer to beat the fully softened cream cheese until it is completely smooth and fluffy. This step requires patience; ensure there are absolutely no lumps remaining before moving on.
- Add Sweetener and Flavor: Add the powdered sugar and the pure vanilla extract to the cream cheese. Beat on medium speed until the mixture is light, creamy, and well combined. Stop the mixer frequently to scrape down the sides and bottom of the bowl, ensuring even mixing. Set this cream cheese base aside.
- Whip the Heavy Cream: In a separate, very cold bowl (preferably a metal bowl that has been chilled for 10 minutes), pour the 3 cups of heavy whipping cream. Beat the cream on high speed. The cream will first form soft peaks, then transition to stiff peaks. Stop immediately once stiff peaks form. Over-beating the cream will result in a grainy texture or, worse, turn the cream into butter.
- Lighten the Cream Cheese: Gently fold approximately one-third of the stiff whipped cream into the cream cheese mixture using a rubber spatula. Use large, sweeping motions to incorporate the mixture and lighten the density of the cream cheese base.
- Final Fold: Fold in the remaining two-thirds of the whipped cream until the mixture is uniform, light, and airy. Do not over-mix, as this will deflate the mousse. The resulting cheesecake filling should be stable enough to hold its shape but airy in texture.
Part 3: Assemble the Trifle (The Layering Magic)
Assembly is the most fun part, as the beautiful layers of your Strawberry Cheesecake Trifle come to life! Ensure your trifle dish is perfectly clean and dry.
Assembly Note: Always assemble in a large, clear glass trifle dish (capacity 4 to 5 quarts) to showcase the layers.
- First Layer (Cake Base): Place half of the cubed pound cake pieces evenly across the bottom of the trifle dish, covering the entire base. If using ladyfingers, arrange them vertically around the interior sides of the dish first, then fill the bottom space with the remaining pieces.
- Second Layer (Strawberry Syrup Soak): Spoon half of the macerated strawberries and, crucially, all of their resulting syrup, evenly over the cake layer. Ensure the syrup is poured over the cake pieces to maximize saturation and moisture.
- Third Layer (Cheesecake Filling): Carefully spoon half of the prepared cheesecake filling mixture over the strawberries. Gently spread it using the back of a spoon or spatula to create a smooth layer, being careful not to push down too hard and disturb the cake layer below.
- Fourth Layer (Repeat Cake): Place the remaining cubed cake pieces over the cheesecake layer.
- Fifth Layer (Repeat Strawberry): Spoon the rest of the strawberries and all remaining syrup over the second cake layer. Reserve a small handful of the most attractive berry slices for the final garnish.
- Sixth Layer (Top Filling): Gently spread the remaining cheesecake filling over the strawberries. Create a smooth top surface, or use a spatula to create light, decorative swirls for visual interest.
Part 4: Chill and Serve
The resting time is not optional; it’s essential for the structural integrity and flavor development of the Strawberry Cheesecake Trifle.
- Cover and Refrigerate: Cover the trifle dish tightly with plastic wrap to prevent the filling from absorbing refrigerator odors.
- Chill Time: Refrigerate for a minimum of 6 hours, or ideally, overnight (12 hours). Chilling allows the flavors to meld, the syrup to fully saturate the cake, and the cheesecake filling to set firmly, creating the perfect consistency for serving.
- Garnish and Serve: Just before serving, garnish the top of the trifle with the reserved, fresh strawberry slices. Serve chilled directly from the trifle dish.
Tips, Troubleshooting, and Delicious Variations
The beauty of the Strawberry Cheesecake Trifle is its versatility. Here are some ways to customize the recipe and ensure flawless execution every time.
Avoiding Common Trifle Mistakes
The primary pitfalls in making a trifle relate to consistency and structure.
- Lumpy Filling Prevention: As stressed earlier, ensure the cream cheese is fully at room temperature. If you find small lumps, beat the mixture longer with the powdered sugar before adding any whipped cream. Once the whipped cream is added, lumps are nearly impossible to remove without deflating the filling.
- Preventing a Soggy Bottom: While we want the cake to be moist, we don’t want it mushy. Do not skip the chilling time! The chill allows the cake to absorb the moisture evenly. Also, make sure you drain off any excess liquid from the strawberries if they have been sitting for more than two hours; only use the amount of syrup necessary to coat the cake layers.
- Stabilizing the Whipped Cream: If you live in a warm environment or need to transport the trifle, you can stabilize the heavy cream before whipping it. Add 1 tablespoon of powdered sugar mixed with 1 teaspoon of cornstarch (or cream of tartar) for every 2 cups of heavy cream. This helps the whipped cream maintain its structure longer, crucial for the height of the layered dessert.
Flavor and Ingredient Variations
Feel free to get creative! This cheesecake base is sturdy enough to support various flavor combinations.
- Lemon Zest Boost: For an even tangier, brighter flavor, add the zest of one whole lemon to the cream cheese mixture along with the vanilla extract.
- Dairy Alternatives: For a plant-based version, replace the cream cheese with vegan cream cheese alternatives (ensure they are softened) and substitute the heavy cream with chilled coconut cream (scoop the thick cream layer from the top of a refrigerated can of full-fat coconut milk).
- Richer Filling: For an indulgent, Italian twist on the cheesecake filling, substitute one of the 8-ounce packages of cream cheese with 8 ounces of chilled mascarpone cheese. Mascarpone adds incredible richness and density.
- Crunch Factor: Some traditional trifle recipes incorporate crushed cookies. Sprinkle a thin layer of crushed vanilla wafers or graham cracker crumbs over the cheesecake layers for a subtle, textural crunch reminiscent of a cheesecake crust.
Serving Suggestions and Presentation
To enhance the presentation of your Strawberry Cheesecake Trifle, consider finishing the top with additional texture and color. A dusting of powdered sugar, a sprinkle of finely chopped pistachios, or a drizzle of a homemade berry reduction can elevate the dish significantly. You can find more inspirational ideas for summer entertaining on our Pinterest Recipes Board.
For a beautiful individual serving, you can assemble the components in clear glass cups or mason jars. This creates mini trifles that are perfect for grab-and-go events and eliminate the need for serving spoons.
Nutritional Values and Benefits of the Strawberry Cheesecake Trifle
While this Strawberry Cheesecake Trifle is undeniably an indulgent dessert, incorporating fresh fruit and essential dairy products means it offers more than just sweet satisfaction. Please note that nutritional information can vary based on the specific brand of pound cake and cream cheese used, and the following is a general estimation.
General Nutritional Overview (Per Serving Estimate)
Assuming this recipe yields 12 generous servings, the estimated nutritional breakdown is:
| Nutrient | Estimated Value (Per Serving) |
|---|---|
| Calories | 450–550 kcal |
| Total Fat | 35–45g |
| Saturated Fat | 20–25g |
| Carbohydrates | 30–40g |
| Protein | 5–7g |
| Sugar | 25–35g |
Disclaimer: This dessert is rich in calories and saturated fats due to the heavy cream and cream cheese. It is best enjoyed in moderation as a special treat.
Ingredient Benefits
The primary health benefits come from the fresh, raw ingredients used in the Strawberry Cheesecake Trifle:
- Strawberries: Fresh strawberries are nutritional powerhouses. They are exceptionally high in Vitamin C, which is vital for immune function and collagen production. They also contain significant amounts of manganese and powerful antioxidants (like ellagitannins and flavonoids) which help combat oxidative stress and inflammation. The sheer volume of fresh fruit in this recipe ensures a good intake of dietary fiber.
- Cream Cheese and Heavy Cream: These dairy products provide essential macronutrients, primarily fats and proteins. They are excellent sources of calcium, crucial for bone health, and Vitamin A, which supports healthy vision and immune function. Using full-fat cream cheese provides necessary dietary fat which aids in the absorption of fat-soluble vitamins.
- Protein Content: The dairy products contribute a decent amount of protein per serving, which aids in satiety and muscle maintenance.
While it’s a dessert, utilizing 3 pounds of fresh strawberries ensures that you are incorporating natural, unprocessed fruit goodness into every bite. The tang provided by the cream cheese also reduces the need for excessive added sugars, helping balance the final profile.
For lighter dessert options or to manage sweetness, you could also consider using Angel Food Cake instead of pound cake, which significantly lowers the fat content of the final layered dessert.
Frequently Asked Questions (FAQs) About Strawberry Cheesecake Trifle
Expert Answers to Your Top Questions about making the perfect Strawberry Cheesecake Trifle.
How far in advance can I make a Strawberry Cheesecake Trifle?
The Strawberry Cheesecake Trifle is an ideal make-ahead dessert. You should assemble the trifle at least 6 hours before serving, but ideally, 12 to 24 hours in advance. This extended chilling time allows the cake layers to fully absorb the strawberry syrup, ensuring peak moisture and flavor melding. Do not assemble more than 48 hours in advance, as the cake may begin to break down too much.
Can I use frozen strawberries instead of fresh ones in this trifle recipe?
While fresh strawberries are highly recommended for texture and flavor, you can use frozen strawberries in a pinch. If using frozen, thaw them completely first and drain off any excess liquid before maceration. Be aware that thawed frozen strawberries will release more water, so you may need to reduce the amount of sugar slightly and ensure the cake layers are positioned to absorb the extra moisture.
What can I use if I don’t have a large glass trifle dish?
If you do not own a trifle dish, any large, clear glass bowl or even a deep glass punch bowl will work. The key is to use a clear container so the beautiful layers of the Strawberry Cheesecake Trifle are visible. You could also create smaller, individual trifles using mason jars or clear wine glasses for an elegant presentation.
Why did my cheesecake filling turn out runny or dense?
A runny filling usually occurs if the heavy cream was not whipped to stiff peaks, or if the cream cheese was too cold when beaten, leading to insufficient mixing. A dense filling often results from over-mixing the lightened whipped cream into the cream cheese base, which causes the air to deflate. Always use the gentle ‘folding’ technique when combining the two components to maintain the airy texture required for a successful cheesecake filling.
Can I use pudding mix instead of the homemade cheesecake filling?
While some quick trifle recipes utilize instant vanilla or cheesecake pudding mix, this recipe’s core appeal lies in the luxurious, scratch-made cheesecake filling. Pudding tends to be heavier and lacks the tangy complexity of cream cheese blended with fresh whipped cream. For the true, irresistible taste of a Strawberry Cheesecake Trifle, sticking to the homemade filling is highly recommended, as it elevates the dessert significantly.
Conclusion: The Effortless Zenith of Dessert Perfection
The Strawberry Cheesecake Trifle stands as a testament to the fact that the best desserts are often the ones that are visually stunning, yet surprisingly simple to create. This recipe, with its careful layering of moist, syrup-soaked cake, bright, macerated strawberries, and a luxurious, lightened cheesecake mousse, offers a perfect symphony of textures and flavors.
It’s the ultimate dessert for high-stress entertaining because its preparation is spread out, requiring no oven time and benefiting immensely from overnight chilling. You provide the elegance, and the refrigerator provides the time and flavor infusion. By mastering the crucial steps softening the cream cheese, whipping the cream to stiff peaks, and ensuring the strawberries are properly macerated you will achieve a flawless, crowd-pleasing dessert every single time.
We invite you to make this Strawberry Cheesecake Trifle your signature summer dish. It’s more than just cheesecake; it’s a refreshing celebration of fresh fruit and creamy indulgence, presented in the most spectacular fashion. Give this recipe a try this weekend, and let the layers of deliciousness speak for themselves. Don’t forget to leave a comment below to share your favorite variations or tips for perfecting your no-bake cheesecake masterpiece!
No-Bake Strawberry Cheesecake Trifle
Ingredients
Equipment
Method
- In a medium bowl, combine the sliced strawberries, the 1/4 cup of granulated sugar, and the optional lemon juice.
- Gently stir the mixture until the sugar is dissolved and coats the berries evenly. Set the bowl aside at room temperature for at least 30 minutes. This process, called maceration, will draw out the natural juices from the strawberries, creating a rich syrup that will moisten the cake layers.
- In a large mixing bowl, using an electric mixer, beat the softened cream cheese until it is completely smooth and fluffy, ensuring there are absolutely no lumps remaining.
- Add the powdered sugar and vanilla extract to the cream cheese. Beat on medium speed until the mixture is light and well combined, scraping down the sides of the bowl as needed. Set this cream cheese base aside.
- In a separate, very cold bowl (preferably a metal bowl), pour the 3 cups of heavy whipping cream. Beat the cream on high speed until stiff peaks form. Be careful not to over-beat or the cream will turn to butter.
- Gently fold approximately one-third of the whipped cream into the cream cheese mixture using a rubber spatula to lighten it. Once incorporated, fold in the remaining two-thirds of the whipped cream until the mixture is uniform, light, and airy. Do not over-mix, as this will deflate the mousse.
- First Layer (Cake Base): Place half of the cubed pound cake pieces evenly across the bottom of the large, clear glass trifle dish. (If using ladyfingers, arrange them vertically around the sides of the dish, then fill the bottom space.)
- Second Layer (Strawberry Syrup): Spoon half of the macerated strawberries and their resulting syrup evenly over the cake layer. Ensure the syrup soaks into the cake pieces.
- Third Layer (Cheesecake Filling): Carefully spread half of the prepared cheesecake filling mixture over the strawberries, gently using the back of a spoon or spatula to smooth the surface without disturbing the cake below.
- Fourth, Fifth, and Sixth Layers: Repeat the layers: Place the remaining cubed cake pieces over the cheesecake layer. Spoon the rest of the strawberries and syrup over the second cake layer (reserve a small handful of the most attractive berry slices for the final garnish). Gently spread the remaining cheesecake filling on top.
- Cover the trifle dish tightly with plastic wrap. Refrigerate for a minimum of 6 hours, or ideally overnight. Chilling allows the flavors to meld, the syrup to fully saturate the cake, and the cheesecake filling to set firmly.
- Just before serving, garnish the top of the trifle with the reserved strawberry slices or a few dollops of extra whipped cream.