There’s a comfort that comes with biting into a perfectly baked peanut butter cookie. It’s a nostalgic experience, but often, homemade versions fall flat literally. They can be too dry, too crumbly, or disappointingly crunchy. If you have been on an endless quest for a cookie that truly lives up to the name a cookie with a crisp, defined edge and a wonderfully soft, chewy peanut butter cookies center then your search ends here. This recipe is meticulously engineered to deliver that sought-after texture every single time.
We’re talking about the iconic treat you grew up with, elevated to baking perfection. These aren’t just any peanut butter cookies; these are the best chewy peanut butter cookies you will ever pull from your oven. The secret lies in the precise balance of sugars (more brown, less white), the specific type of peanut butter used, and the crucial chilling time that locks in moisture and prevents unwanted spreading. Get ready to ditch those overly complicated recipes and embrace the simplicity and reliability of this classic technique. Whether you are baking for a school lunch, a bake sale, or simply fulfilling a late-night craving, these cookies will become your new benchmark for excellence.
The magic happens when the dark brown sugar and the specific blend of fats interact during baking, giving these cookies their signature pliability. You will see the edges turn golden while the center remains slightly pale and tender. This delicate state is the hallmark of the perfect Chewy Peanut Butter Cookies. Trust the process, respect the baking time, and prepare to be amazed by the depth of flavor and irresistible texture that results.
Why You’ll Love These Irresistible Chewy Peanut Butter Cookies
When you commit to baking a batch of cookies, you want results that are worth the effort, and these Chewy Peanut Butter Cookies truly deliver on all fronts. This recipe is a standout for several specific reasons that focus on flavor, texture, and ease of execution.
Unmatched Texture: The Key to Chewiness
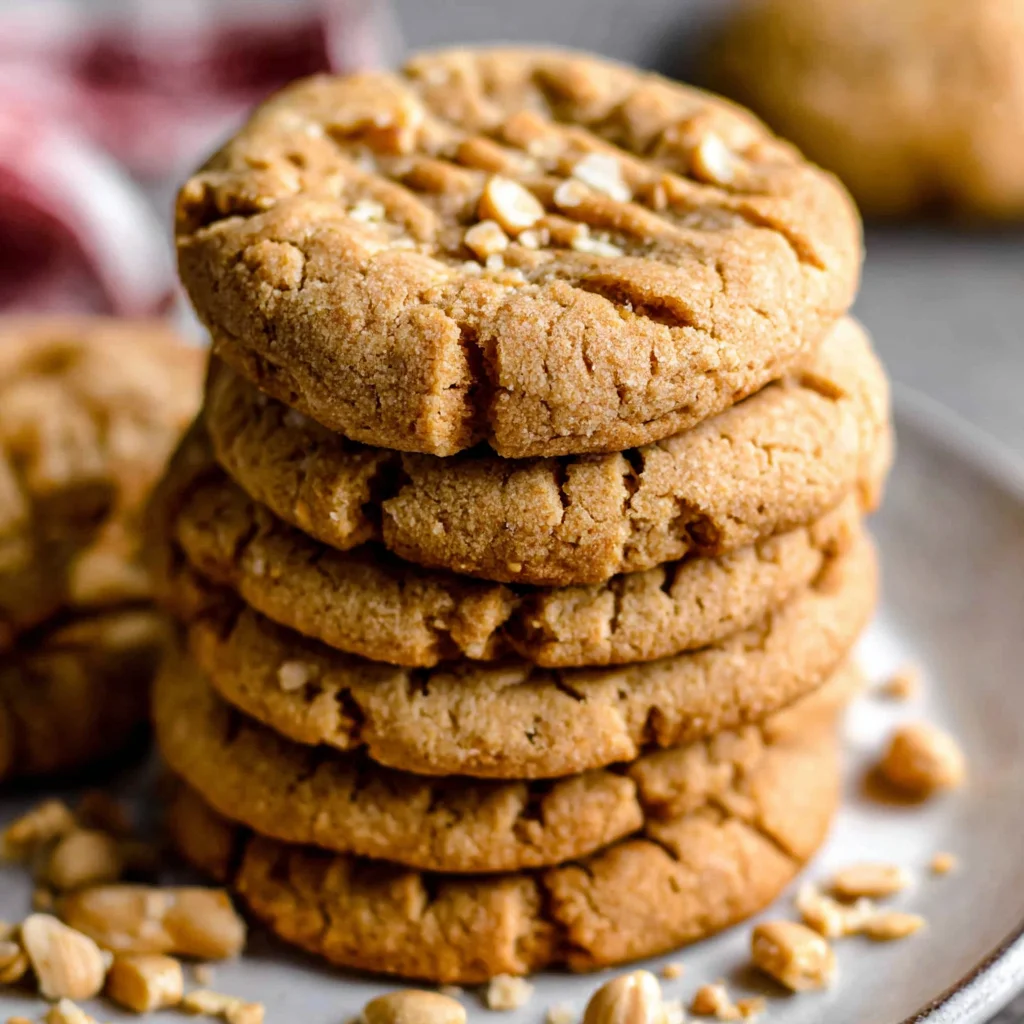
The primary reason you will fall head-over-heels for this recipe is the texture. We achieve a perfect trifecta: a slightly crispy rim, a defined, crumbly exterior where the fork marks sit, and an incredibly soft, moist, and chewy interior. This contrast makes every bite satisfying. Unlike recipes that rely too heavily on granulated sugar (which encourages spreading and crispness), we prioritize brown sugar. Brown sugar contains molasses, which adds moisture, acidity, and that fantastic bendy quality crucial for truly soft and chewy peanut butter cookies. We also ensure the butter and peanut butter are creamed properly this aeration step incorporates tiny pockets of air, resulting in a lighter crumb texture that remains substantial yet tender.
Deep, Authentic Peanut Butter Flavor
While many cookie recipes use peanut butter merely as an accent, this recipe places the beloved flavor front and center. By using a full cup of creamy, stabilized peanut butter, we ensure the robust, nutty essence shines through. The combination of sweet sugars enhances the savory notes of the roasted peanuts without masking them. If you love that dense, melt-in-your-mouth quality that only a great peanut butter dessert offers, these are the cookies for you. For those who want to level up the peanut butter experience, consider adding a sprinkle of flaky sea salt just before baking, which truly makes the flavor pop.
Reliable and Beginner-Friendly Baking
Even if you consider yourself a novice baker, this recipe for Chewy Peanut Butter Cookies is surprisingly forgiving, provided you follow the crucial steps especially step 3 (creaming) and step 8 (baking time). The dough comes together quickly and easily in a stand mixer, and the chilling step, while optional, drastically improves the final shape, making the baking process virtually foolproof. We eliminate the guesswork, giving you clear markers for when the dry ingredients are fully incorporated and exactly when the cookies should come out of the oven.
The consistency of this cookie dough is ideal for handling. It’s not overly sticky or dry, making it easy to scoop and perfect for creating that classic criss-cross pattern. This pattern isn’t just aesthetic; it’s a necessary function of traditional peanut butter cookies, ensuring they flatten evenly and bake thoroughly without being dense in the center. Once you master this method, you will find yourself making these soft, chewy peanut butter cookies again and again, establishing this recipe as a permanent fixture in your baking rotation.
Why You Should Try This Recipe for the Best Peanut Butter Cookies Today
Beyond the delightful taste and texture, there are practical reasons why this specific recipe should jump to the top of your baking list. In a world saturated with cookie recipes, consistency and quality are paramount, and these Chewy Peanut Butter Cookies offer both, alongside a perfect balance of ingredients that guarantees success.
Nostalgia Meets Perfection
Peanut butter cookies are deeply nostalgic for many people, often evoking memories of childhood kitchens and comforting afternoons. This recipe doesn’t just replicate those flavors; it perfects them. We avoid the common pitfalls cookies that are too flat, too gritty, or cookies that crack excessively and dry out. Instead, we achieve that ideal slightly puffy height and deep golden color, signifying the perfect internal moisture content. If you are looking to recapture the joy of that classic cookie experience, refined for an adult palate, this is your ticket.
Ingredient Stability and Guaranteed Results
We specifically call for stabilized, creamy peanut butter (like Jif or Skippy) for a very important reason. Natural peanut butter, where the oil separates, contains excess liquid fats that disrupt the delicate balance between the butter and the sugars. This often leads to excessive spreading and a greasy, thin cookie. By using classic creamy peanut butter, we control the fat content, ensuring the dough maintains its structure throughout the creaming process and during baking. This attention to detail in ingredient selection is what guarantees that ideal chewy peanut butter cookies texture and prevents disappointing flat discs.
The Perfect Treat for Sharing and Storing
These cookies are robust enough to travel well, making them fantastic for gifting or bringing to gatherings. Because they are designed to be chewy, they also resist drying out as quickly as crunchier varieties. Stored properly in an airtight container, they maintain their softness and incredible flavor for days, meaning you can enjoy your efforts long after the oven turns off. If you are preparing for a holiday or a big event, the dough also freezes beautifully, allowing you to scoop and chill batches ahead of time. This flexibility is a huge advantage for busy bakers.
Furthermore, mastering these Chewy Peanut Butter Cookies opens the door to numerous customizations. Once you have this foundational recipe down, you can experiment with mix-ins, from mini chocolate chips (a natural pairing!) to chopped pecans or even a surprise dollop of jam in the center. For a quick variation, be sure to check out our recipe for Peanut Butter Chocolate Chip Cookies, which utilizes a similar base with the added indulgence of rich cocoa flavor.
Ingredients and Essential Tools for Chewy Peanut Butter Cookies Success
Achieving the perfect soft and chewy peanut butter cookies requires precise measurements and the right type of ingredients. We break down exactly what you need and why each component is crucial to the final result.
The Essential Ingredients List
The quality of your ingredients directly impacts the final texture and flavor. Invest in fresh, high-quality components for the best possible outcome.
Dry Ingredients: The Structure
- 2 ¼ cups All-Purpose Flour: Use standard AP flour, measured correctly. Too much flour leads to a dry, dense cookie. Too little leads to excessive spread.
- 1 teaspoon Baking Soda: This is our primary leavening agent. It reacts with the acidic brown sugar and moisture to provide the necessary lift and soft puffiness characteristic of good Chewy Peanut Butter Cookies.
- ½ teaspoon Salt: Essential for balancing the intense sweetness and enhancing the savory depth of the peanut butter. Do not omit or reduce this amount.
Wet Ingredients: The Flavor and Texture Base
- ½ cup (1 stick) Unsalted Butter: Must be softened to true room temperature. If it’s too cold, it won’t cream properly with the sugar. If it’s melted or oily, the dough will be greasy.
- 1 cup Creamy Peanut Butter: CRITICAL NOTE: Use stabilized, commercial peanut butter (like Jif, Skippy, Peter Pan). Natural peanut butter (where the oil separates) contains too much liquid fat and will ruin the cookie structure, making them flat and crumbly instead of chewy.
- 1 cup Light Brown Sugar, firmly packed: The star ingredient for chewiness! The molasses in brown sugar traps moisture and makes the cookie soft and bendy even after cooling.
- ½ cup Granulated Sugar: Provides structure, aids in spreading, and contributes to the crisp exterior edge. The ratio (2:1 brown to white) is key to achieving maximum chewiness in these Chewy Peanut Butter Cookies.
- 1 large Egg: Acts as a binder and adds moisture and richness. Ensure it is also at room temperature for better emulsion with the creamed fats.
- 1 tablespoon Vanilla Extract: A surprisingly large amount, but necessary. Vanilla deepens the overall flavor profile and marries the sweetness of the sugars with the nuttiness of the peanut butter.
Recommended Tools for Baking Perfection
While you can mix this dough by hand, using the right tools will guarantee a superior texture, especially during the crucial creaming stage.
Essential Kitchen Equipment:
- Stand Mixer (with Paddle Attachment) or Hand Mixer: Absolutely essential for Step 3. The creaming process requires sustained, powerful mixing that is difficult to replicate manually. The paddle attachment ensures even incorporation without overdeveloping the gluten later.
- Large Mixing Bowl: If using a hand mixer, ensure your bowl is large enough to contain the ingredients during the creaming stage, preventing spills.
- Medium Bowl: For whisking the dry ingredients.
- Rubber Spatula: Necessary for scraping down the sides of the bowl during mixing. This prevents pockets of unmixed butter or sugar, ensuring homogenous dough.
- Standard Cookie Scoop (1.5 tablespoons): Using a scoop is the best way to guarantee uniform cookie size. Uniform cookies bake evenly, ensuring all your Chewy Peanut Butter Cookies reach perfection at the same time.
- Parchment Paper or Silicone Baking Mats: Non-negotiable for non-stick baking and easy cleanup. Silicone mats also provide a small amount of insulation, helping the cookie bases stay soft.
- Two Large Baking Sheets: Using two sheets prevents overcrowding the oven, which can lead to uneven temperature distribution and inconsistent baking.
- Wire Cooling Rack: Crucial for allowing air circulation, stopping the cooking process immediately, and preventing soggy bottoms.
By preparing all these ingredients and tools beforehand, you ensure a stress-free baking session, allowing you to focus entirely on perfecting the technique required for amazing Chewy Peanut Butter Cookies.
Detailed Step-by-Step Instructions for Making Chewy Peanut Butter Cookies
Follow these steps closely to guarantee that signature chewy texture and classic flavor. Remember, the key to success lies in proper technique, especially in the mixing and baking stages.
Step 1: Prepare the Oven and Baking Sheets (The Setup)
Preheat your oven to 375°F (190°C). High heat helps the edges set quickly while the center remains soft. Line two large baking sheets with parchment paper or silicone baking mats. This foundational step is critical; baking directly on greased metal can sometimes cause the cookie to spread too rapidly.
Step 2: Combine the Dry Ingredients (Precision Mixing)
In a medium bowl, whisk together the all-purpose flour, baking soda, and salt. Whisk for at least 30 seconds. This seems simple, but proper aeration and even distribution of the baking soda are necessary to ensure every cookie rises evenly and has that perfect internal structure. Set this mixture aside.
Step 3: Cream the Fats and Sugars (The Chewy Foundation)
This is arguably the most crucial step for achieving perfect Chewy Peanut Butter Cookies. In the bowl of a stand mixer fitted with the paddle attachment, or using a large bowl and a hand mixer, combine the softened butter, creamy peanut butter, light brown sugar, and granulated sugar. Beat on medium speed for 2 to 3 minutes until the mixture is light, fluffy, and visibly increased in volume. This process, known as creaming, incorporates air, which helps keep the final cookie texture tender. Throughout this process, make sure to scrape down the sides and bottom of the bowl frequently to guarantee uniform mixing.
Step 4: Add the Wet Ingredients (Emulsification)
Crack the large egg into the creamed mixture and add the vanilla extract. Beat again on medium speed until the egg is just incorporated about 30 seconds. Do not overmix here; we only want to blend the egg enough to emulsify it into the fats. Overmixing now can begin to break down the air pockets we just created.
Step 5: Incorporate the Dry Ingredients (Preventing Toughness)
Reduce the mixer speed to low. Gradually add the reserved flour mixture (from Step 2) into the wet ingredients. Mix only until the flour streaks have mostly disappeared and a thick dough forms. Stop the mixer immediately once the dough comes together. Overmixing the flour activates too much gluten, which results in a tough, cake-like cookie, not the desired soft and chewy peanut butter cookies we are aiming for. The goal is barely combined.
Step 6: Scoop and Chill (The Secret to Texture and Shape)
Use a standard cookie scoop (about 1.5 tablespoons) to scoop uniform balls of dough. Place the balls onto the prepared baking sheets. For maximum chewiness and to ensure minimal spreading, place the scooped dough balls in the refrigerator for 15 to 30 minutes before baking. This chilling time allows the fats to solidify, which controls the spread in the hot oven, guaranteeing a thicker, softer cookie. If you’re preparing a large batch, you can find great organizational tips by looking at our guide on Classic Peanut Butter Cookies.
Step 7: Create the Criss-Cross Pattern (The Signature Finish)
Before placing the cookies in the oven, take a fork and gently flatten each cookie dough ball, pressing down in one direction. Then, press again perpendicular to the first mark (creating the iconic peanut butter cookie criss-cross pattern). This step is vital: it helps the dense dough flatten evenly and ensures thorough cooking without leaving a raw center.
Step 8: Bake the Cookies (Perfect Timing)
Place the baking sheets into the preheated oven. Bake for 8 to 11 minutes. The critical indicator of doneness is appearance: The cookies are done when the edges are set and lightly golden brown, but the centers still look slightly soft and puffy. If the centers look completely dry or cracked, you have overbaked them. Do not overbake, as this is the primary reason cookies become dry instead of chewy. If using two sheets, rotate them front-to-back and top-to-bottom halfway through the baking time for even results. Rotate your baking inspiration by checking out our festive Christmas Gooey Butter Cookies recipe.
Step 9: Cool Completely (Set for Success)
Remove the cookies from the oven and allow them to cool on the baking sheets for 5 minutes. This crucial resting time allows the soft centers to finish setting up and solidify slightly. If you try to move them immediately, they will crumble. After 5 minutes, carefully transfer the cookies to a wire rack to cool completely. Store airtight at room temperature. They maintain their delicious, soft, chewy peanut butter cookies texture for several days.
Chewy Peanut Butter Cookies: Tips, Troubleshooting, and Variations
While this recipe is straightforward, a few expert tips and simple modifications can take your homemade Chewy Peanut Butter Cookies from great to truly exceptional. Addressing common baking issues and offering variations ensures you can tailor the recipe to any preference.
Troubleshooting Common Cookie Problems
My Cookies Spread Too Much!
Excessive spreading is the number one complaint when baking peanut butter cookies. There are a few culprits:
- Skipping the Chill: If the butter and peanut butter are too warm when they hit the oven, they melt too fast. Always chill the scooped dough (Step 6) for at least 15 minutes.
- Using Natural Peanut Butter: As noted, natural peanut butter contains separating oil which acts as excess fat, causing spreading. Stick to stabilized brands like Jif or Skippy for predictable results.
- Greasy Dough: Ensure your butter was softened, not melted. If the kitchen is very hot, chilling the dough for longer (up to an hour) may be necessary.
My Cookies Are Dry and Crumbly (Not Chewy)
If your cookies resemble sand, it’s usually due to too much flour or overbaking.
- Measure Flour Correctly: Always spoon flour into the measuring cup and level it off. Never scoop directly from the bag, as this compacts the flour and adds up to 25% more than needed.
- Don’t Overbake: The cookies should look slightly underdone and puffy in the center when removed from the oven. They will continue to set on the hot baking sheet. If you wait for the center to look fully baked, they are already dry.
Delicious Variations to Try
Once you’ve mastered the core recipe for Chewy Peanut Butter Cookies, feel free to experiment with flavor combinations:
- Chocolate Chip Peanut Butter Cookies: Stir in ½ cup of semi-sweet chocolate chips or mini chocolate chips in Step 5. Peanut butter and chocolate are a classic pairing!
- Peanut Butter M&M Cookies: Add ½ cup of M&M’s for color and crunch. These are great for parties or holidays.
- Stuffed Peanut Butter Cookies: Press a small piece of a mini peanut butter cup or a square of chocolate into the center of the dough ball before chilling and sealing the dough around it.
- Crunchy Cookie Version: If you prefer some crunch, use crunchy peanut butter instead of creamy. Be aware this might slightly affect the spread, so chilling is even more crucial.
Dietary Adaptations (For Specific Needs)
While the classic recipe is perfect, small tweaks can accommodate different dietary requirements:
- Gluten-Free Chewy Peanut Butter Cookies: Substitute the all-purpose flour with a 1:1 gluten-free baking blend (such as Bob’s Red Mill or King Arthur GF blend). Be careful not to overmix, as GF flours can sometimes result in a gritty texture if handled too much.
- Dairy-Free/Vegan Version: Swap the unsalted butter for a high-quality vegan butter stick (ensure it has a high-fat content, like Miyoko’s or Earth Balance sticks). Substitute the egg with a flax egg (1 tablespoon ground flaxseed + 3 tablespoons water, rested for 5 minutes).
For more baking inspiration and fun twists on classic recipes, make sure to follow our boards and collections. We frequently share great dessert ideas that pair perfectly with these homemade treats. Click here to follow our Pinterest for daily baking inspiration!
Nutritional Values and The Benefits of Peanut Butter in Baking
While these Chewy Peanut Butter Cookies are undeniably a treat, it is useful to understand the contribution of the key ingredients, particularly peanut butter, which is more than just a flavor enhancer; it’s a powerhouse ingredient.
A Look at the Nutritional Profile (Per Cookie Estimate)
The precise nutritional content will vary based on the specific brands of butter and peanut butter used, as well as the exact size of your scoop. However, based on a standard 1.5-tablespoon scoop size yielding approximately 24 cookies, here is a general estimated breakdown:
- Calories: 150 – 180 kcal
- Total Fat: 8g – 10g
- Saturated Fat: 3g – 4g
- Carbohydrates: 18g – 22g
- Sugars: 10g – 14g
- Protein: 3g – 4g
These cookies offer a moderate serving of carbohydrates and fats, making them an excellent fuel source or a satisfying dessert. Given the high protein content compared to a standard chocolate chip cookie, they offer a bit more satiety.
The Benefits of Peanut Butter
Peanut butter provides several positive attributes to the cookies, both structurally and nutritionally:
- High in Protein: Peanut butter is a concentrated source of plant-based protein. This protein helps provide structure in the cookie dough, and nutritionally, it makes the treat more filling than desserts based purely on sugar and flour.
- Healthy Fats: Peanuts contain monounsaturated and polyunsaturated fats (the “healthy” fats), which are beneficial for heart health when consumed in moderation. These fats also contribute significantly to the desired soft and moist texture of the Chewy Peanut Butter Cookies, preventing them from becoming stale too quickly.
- Vitamins and Minerals: Peanut butter contains important micronutrients, including Vitamin E (an antioxidant), Magnesium (important for muscle function), and Niacin (Vitamin B3).
- Structure and Density: In baking, peanut butter provides both fat and bulk. Unlike plain butter, the protein and fiber components in peanut butter lend a dense, slightly crumbly yet incredibly chewy quality that is unique to this cookie variety. It helps hold the brown sugar molasses in place, ensuring that signature pliability.
While these Chewy Peanut Butter Cookies are an indulgence, they are a better choice than many highly processed snack foods. Enjoy them mindfully, perhaps paired with a glass of cold milk or a robust cup of coffee, appreciating the balance between sweet flavor and nutritional contribution.
FAQs About Chewy Peanut Butter Cookies
Why do I need to use stabilized (non-natural) peanut butter for Chewy Peanut Butter Cookies?
Stabilized peanut butter (like Jif or Skippy) contains emulsifiers that prevent oil separation. Natural peanut butter has too much liquid oil, which can disrupt the fat-to-flour ratio in the dough, leading to excessive spreading and thin, crunchy cookies rather than soft, chewy peanut butter cookies.
How can I ensure my peanut butter cookies stay chewy for several days?
The key to extended chewiness is using more brown sugar than granulated sugar, as brown sugar retains moisture due to its molasses content. Additionally, be sure to store your cooled Chewy Peanut Butter Cookies in an airtight container at room temperature immediately after the cooling process is complete.
What is the secret to getting the perfect criss-cross pattern on the dough?
The criss-cross pattern is created by gently pressing a fork onto the dough ball, first in one direction, and then rotating 90 degrees and pressing again. Because peanut butter cookie dough is dense, this pattern helps flatten the dough evenly and signals to the dough that it should spread, ensuring the cookies bake thoroughly without having raw, dense centers.
Can I freeze the dough for Chewy Peanut Butter Cookies?
Yes, the dough freezes exceptionally well. Scoop the dough balls, create the criss-cross pattern, and flash freeze them on a baking sheet until solid. Transfer the frozen dough balls to a freezer-safe bag or container. When ready to bake, place them directly on a baking sheet and add 2–4 minutes to the original baking time.
How do I prevent my Chewy Peanut Butter Cookies from becoming tough?
Toughness is caused by overdeveloping gluten. The essential prevention method is to mix the flour into the wet ingredients only until barely combined stop the mixer as soon as the last streaks of flour disappear. Also, avoid using cold eggs or butter, which require longer mixing times to incorporate.
Conclusion: The Final Word on Chewy Peanut Butter Cookies
The journey to the perfect cookie is often marked by trial and error, but with this precise guide, you are guaranteed to achieve baking success. These Chewy Peanut Butter Cookies stand above the rest they are the ideal blend of salty and sweet, dense and tender. By focusing on the quality of ingredients, adhering to the proper creaming technique, and respecting that short, vital chilling period, you unlock the secret to a professional-grade chewy texture that defines perfection in a peanut butter treat.
We’ve emphasized the importance of balancing the high amount of brown sugar for moisture and the controlled use of baking soda for the perfect lift. Remember the key takeaways: softened butter is non-negotiable, non-natural creamy peanut butter is mandatory, and do not overbake! The moment those edges turn golden and the centers look just slightly soft, pull them out. That small window of time is the difference between a dry, average cookie and the soft, chewy peanut butter cookies you’ve been dreaming of.
Now that you have the ultimate recipe and all the necessary troubleshooting tips, it’s time to preheat the oven and bring this delicious classic to life. Whether you share them with friends, pack them in lunchboxes, or savor them one by one with a glass of milk, these cookies promise comfort and satisfaction in every bite. If you enjoyed this guide and found these Chewy Peanut Butter Cookies as perfect as we do, please share this recipe on social media and leave a comment below letting us know how your batch turned out!
CHEWY PEANUT BUTTER COOKIES
Ingredients
Equipment
Method
- Preheat your oven to 375°F (190°C). Line two large baking sheets with parchment paper or silicone baking mats. Setting up your workspace beforehand ensures a smooth baking process.
- In a medium bowl, whisk together the all-purpose flour, baking soda, and salt. Whisk for about 30 seconds to ensure the leavening agent (baking soda) and salt are evenly distributed throughout the flour. Set this bowl aside.
- In the bowl of a stand mixer fitted with the paddle attachment, or using a large bowl and a hand mixer, beat the softened butter, creamy peanut butter, light brown sugar, and granulated sugar together. Beat on medium speed for 2 to 3 minutes until the mixture is light, fluffy, and well-combined. Scrape down the sides of the bowl frequently during this step to ensure uniform mixing.
- Crack the large egg into the creamed mixture and add the vanilla extract. Beat again on medium speed until the egg is just incorporated. Be careful not to overmix at this stage.
- Reduce the mixer speed to low. Gradually add the reserved flour mixture into the wet ingredients, mixing only until the flour streaks have mostly disappeared and a thick dough forms. Stop the mixer immediately once the dough comes together. Overmixing the flour will develop too much gluten, resulting in a tougher, less chewy cookie.
- Use a standard cookie scoop (about 1.5 tablespoons) to scoop uniform balls of dough. Place the balls onto the prepared baking sheets. For chewier cookies that spread less, place the scooped dough balls in the refrigerator for 15 to 30 minutes before baking.
- Before baking, use a fork to flatten each cookie dough ball slightly, pressing down in one direction, and then pressing again perpendicular to the first mark (creating the classic peanut butter cookie criss-cross pattern). This pattern helps the cookie flatten evenly and ensures thorough cooking.
- Place the baking sheets into the preheated oven. Bake for 8 to 11 minutes. The cookies are done when the edges are set and lightly golden brown, but the centers still look slightly soft and puffy. Do not overbake, as they will become dry instead of chewy. If using two sheets, rotate them halfway through the baking time.
- Remove the cookies from the oven and allow them to cool on the baking sheets for 5 minutes. This crucial resting time allows the soft centers to finish setting up. After 5 minutes, carefully transfer the cookies to a wire rack to cool completely. Store airtight at room temperature.