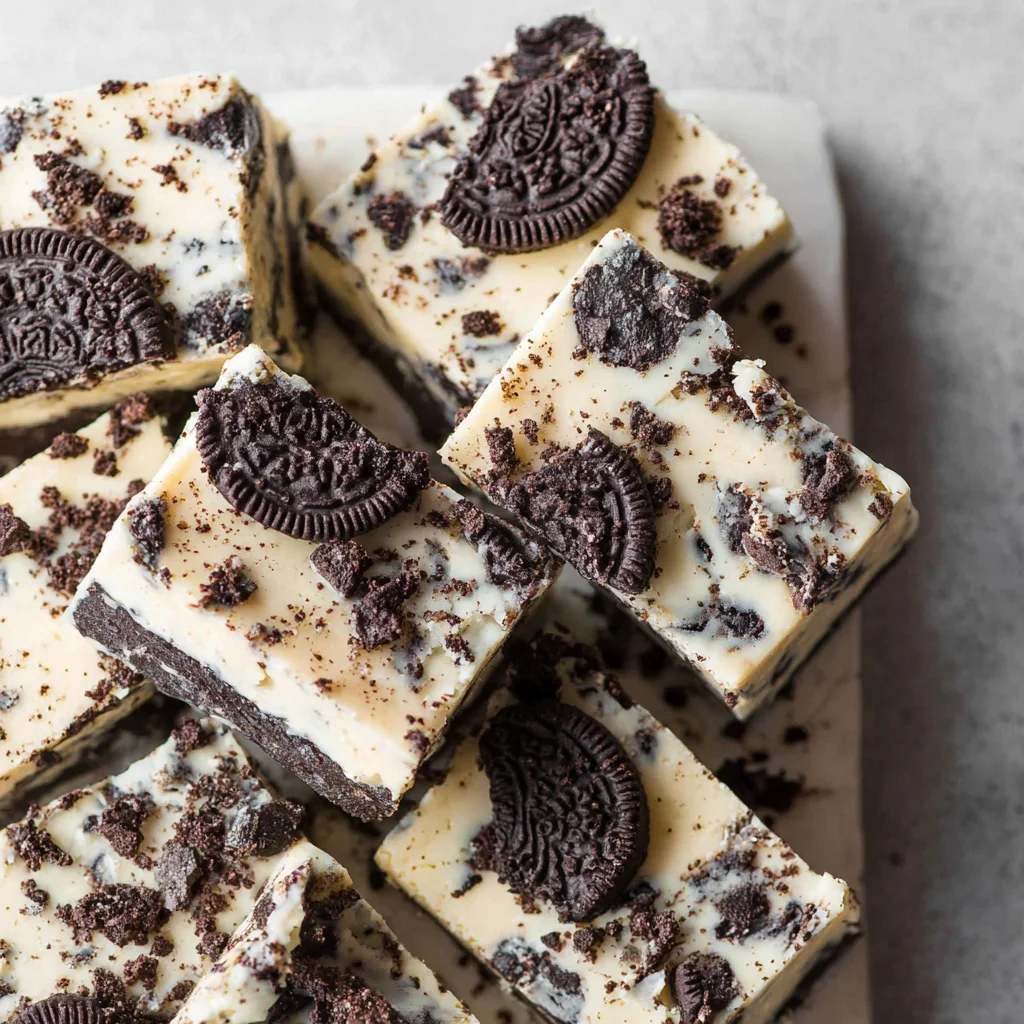
Dive into a world of decadent indulgence with this irresistible Oreo Fudge recipe! This no-bake dessert is incredibly easy to make, requiring minimal cooking skills and time, yet delivers a flavor explosion that will leave you wanting more. Imagine the rich, creamy texture of chocolate fudge perfectly complemented by the unmistakable crunch of Oreo cookies. This simple recipe is perfect for satisfying your sweet tooth, impressing guests at your next gathering, or simply enjoying a little self-care treat. Forget complicated baking techniques and lengthy preparation times; this Oreo Fudge is your shortcut to dessert heaven, guaranteed to become a new family favorite. Get ready to experience the ultimate combination of chocolate, creamy sweetness, and that iconic Oreo crunch in every bite!
Why You’ll Love This Oreo Fudge Recipe
This Oreo Fudge recipe is more than just a dessert; it’s an experience. There are so many reasons why you’ll fall head over heels for this delectable treat:
- Simplicity: No oven required! This is a true no-bake recipe, making it perfect for hot summer days or anyone who prefers to avoid the oven. The entire process is straightforward and easy to follow, even for beginner bakers.
- Speed: From start to finish, you can whip up this Oreo Fudge in under 30 minutes. That’s quicker than ordering takeout!
- Deliciousness: The combination of creamy chocolate fudge and crunchy Oreos is a match made in dessert heaven. The flavors are perfectly balanced, creating a truly unforgettable taste.
- Customizability: Feel free to personalize this recipe! Add different types of cookies, nuts, or even a sprinkle of sea salt for an extra touch of sophistication. The possibilities are endless.
- Impressive Presentation: Despite its simplicity, this Oreo Fudge looks stunning. The glossy chocolate topping and scattered Oreo crumbs create an elegant and irresistible appearance that’s perfect for any occasion.
- Perfect for Sharing (or Not!): This recipe makes a generous amount of fudge, perfect for sharing with friends and family. However, we won’t judge if you decide to keep it all to yourself!
This Oreo Fudge recipe is a true crowd-pleaser, guaranteed to impress even the most discerning dessert lovers. Its ease of preparation makes it ideal for busy weeknights or spontaneous dessert cravings, while its rich, decadent flavor and beautiful presentation make it perfect for special occasions. It’s the perfect blend of convenience, deliciousness, and visual appeal, making it a recipe you’ll want to keep coming back to again and again. Prepare for compliments galore!
Why You Should Try This Oreo Fudge Recipe
Beyond the deliciousness and simplicity, there are several compelling reasons to give this Oreo Fudge recipe a try:
- Stress-Free Baking: No more oven preheating or worrying about baking times. This recipe is ideal for those who want a delicious dessert without the stress of traditional baking.
- Budget-Friendly: The ingredients are readily available and inexpensive, making this a cost-effective dessert option.
- Versatile Treat: Perfect for potlucks, holiday gatherings, birthday parties, or a simple after-dinner treat. This Oreo Fudge is adaptable to any occasion.
- Kid-Friendly Fun: Get the kids involved! Crushing the Oreos and sprinkling the topping can be a fun and engaging activity for little helpers.
- Dietary Adaptations (See below): While the original recipe uses traditional ingredients, you can explore variations to cater to different dietary needs and preferences, making it inclusive for a wider range of people.
- A Recipe to Remember: This Oreo Fudge is a recipe you’ll want to keep in your repertoire. It’s a reliable dessert that always delivers delicious results and brings smiles to everyone’s faces.
This Oreo Fudge recipe isn’t just about making a dessert; it’s about creating memories. Whether you’re baking with loved ones or enjoying a quiet moment with a sweet treat, this recipe is sure to become a cherished part of your culinary adventures. So, ditch the baking stress and embrace the simplicity of this irresistible fudge. It’s an investment in deliciousness and happiness that’s well worth the effort (or lack thereof!).
Ingredients and Necessary Utensils for the Best Oreo Fudge
Gathering the right ingredients and tools is crucial for achieving that perfect, creamy Oreo Fudge. Here’s a detailed list to ensure your baking success:
Ingredients:
- Oreo Cookies: 1 (14 ounce) package of Oreo cookies. The classic chocolate flavor is perfect, but feel free to experiment with other Oreo varieties!
- Sweetened Condensed Milk: 1 (14 ounce) can. This provides the creamy sweetness that is essential to a good fudge.
- Semi-Sweet Chocolate Chips: 1 (12 ounce) package. Choose a good quality chocolate for the best flavor. Milk chocolate or dark chocolate could be substituted, depending on your preference.
- Unsalted Butter: ½ cup (1 stick). Unsalted butter gives you more control over the sweetness and allows you to adjust it to your liking.
- Vanilla Extract: 1 teaspoon. A touch of vanilla enhances the overall flavor profile. Other extracts like peppermint or almond could be interesting additions.
Utensils:
- 8×8 inch Baking Pan: This size pan is ideal for this recipe, providing a nice thickness to the fudge. A 9×9 inch pan could also work, but the fudge will be slightly thinner.
- Parchment Paper: Line your baking pan with parchment paper to prevent sticking and make removing the fudge much easier. Leave an overhang on the sides for easy lifting.
- Medium Saucepan: A medium-sized saucepan is perfect for melting the chocolate and butter gently over low heat.
- Rubber Spatula or Wooden Spoon: For stirring the ingredients smoothly and preventing scratching your saucepan.
- Measuring Cups and Spoons: Accurate measurements are key to achieving the perfect consistency.
- Food Processor or Ziploc Bag: To crush the Oreo cookies finely. A food processor is quicker and yields more even crumbs. A sturdy ziploc bag and a rolling pin also work well.
- Cutting Board and Knife: For cutting the fudge into squares once it’s chilled.
Having these ingredients and utensils ready before you begin will ensure a smooth and efficient Oreo Fudge making experience. Investing in good quality tools will make the process even more enjoyable.
Detailed Recipe Steps for Irresistible Oreo Fudge
Follow these steps to create your perfect batch of Oreo Fudge:
- Prepare the Pan: Line your 8×8 inch baking pan with parchment paper, leaving at least 2 inches of overhang on each side. **This is crucial for easy removal later.**
- Crush the Oreos: Finely crush the Oreos using a food processor or by placing them in a sturdy ziploc bag and crushing them with a rolling pin. **Reserve about ¼ cup of crushed Oreos for topping.**
- Melt the Chocolate and Butter: In your medium saucepan, combine the chocolate chips and butter. **Melt over low heat, stirring frequently.** Do not let the mixture boil. Once melted and smooth, remove from the heat.
- Combine Wet Ingredients: Stir in the sweetened condensed milk and vanilla extract until everything is completely incorporated and the mixture is smooth and creamy. **Take your time to ensure there are no lumps.**
- Fold in the Oreos: Gently fold in the crushed Oreos (excluding the reserved ¼ cup) until they are evenly distributed throughout the fudge mixture. **Be careful not to overmix, as this can make the fudge tough.**
- Pour and Spread: Pour the fudge mixture into your prepared baking pan and spread it evenly using your spatula. **Ensure an even layer for consistent texture and appearance.**
- Sprinkle the Topping: Sprinkle the reserved crushed Oreos over the top of the fudge. **Press them gently into the surface for a nice finish.**
- Chill and Set: Refrigerate the fudge for at least 2 hours, or until it is completely firm. **The longer it chills, the firmer it will become.**
- Cut and Serve: Once the fudge is firm, lift it out of the pan using the parchment paper overhang. Cut it into squares and serve. **Enjoy your delicious homemade Oreo Fudge!**
Remember, patience is key! Allowing the fudge to chill completely is essential for achieving the desired texture. Don’t rush the process; take your time, and you’ll be rewarded with perfectly set and incredibly delicious Oreo Fudge.
Tips and Variations for Your Oreo Fudge Creation
Experiment and customize your Oreo Fudge to create your own unique masterpiece:
- Chocolate Variations: Try using dark chocolate, milk chocolate, or even white chocolate chips for a different flavor profile. You could also use a combination of chocolate types.
- Cookie Alternatives: Experiment with other cookies! Crushed graham crackers, digestive biscuits, or even chocolate sandwich cookies can be delicious alternatives to Oreos.
- Add-ins: Get creative with add-ins! Consider adding chopped nuts (pecans, walnuts, or almonds), pretzels, sprinkles, sea salt, or even mini marshmallows for an extra layer of texture and flavor.
- Vegan Version: Use vegan butter and vegan chocolate chips to create a delicious vegan version of this recipe. Ensure your sweetened condensed milk is also vegan-friendly.
- Gluten-Free Option: Use gluten-free Oreos or a gluten-free cookie alternative to make this fudge gluten-free. Always double-check the ingredients of any store-bought products to ensure they are gluten-free.
- Avoid Overmixing: Overmixing can make the fudge tough. Gently fold in the ingredients until just combined.
- Proper Chilling: Allow the fudge to chill completely for the best texture. Impatience can lead to a softer, less firm fudge.
Don’t be afraid to experiment and find your perfect Oreo Fudge combination. This recipe is a fantastic base for your culinary creativity. The possibilities are endless! Share your variations and creations with us!
Nutritional Values and Benefits of Oreo Fudge
While Oreo Fudge is undeniably indulgent, let’s examine its nutritional aspects:
Note: The exact nutritional information will vary slightly depending on the specific brands of ingredients used. The following is an approximation based on commonly available ingredients.
A single serving (approximately 1/16 of the recipe) will likely contain approximately:
- Calories: 250-300
- Protein: 3-4 grams
- Fat: 15-18 grams
- Carbohydrates: 25-30 grams
Benefits of Ingredients:
- Chocolate: Provides antioxidants and may have mood-boosting properties. Choose dark chocolate for a higher concentration of antioxidants.
- Milk: (From the sweetened condensed milk) A source of calcium, important for bone health.
- Butter: Contains fat-soluble vitamins, but should be consumed in moderation.
Oreo Fudge should be enjoyed as an occasional treat rather than a regular part of a balanced diet. It’s high in sugar and fat, so moderation is key. Be mindful of portion sizes to enjoy this delicious dessert without exceeding your daily nutritional goals. Balance is the key to a healthy and happy lifestyle.
FAQs about Oreo Fudge
Can I use different types of Oreos in this recipe?
How long can I store the Oreo Fudge?
Can I make this Oreo Fudge ahead of time?
What if my Oreo Fudge is too soft?
Is this Oreo Fudge recipe gluten-free?
Conclusion: Indulge in the Perfect Oreo Fudge
This Oreo Fudge recipe is a guaranteed winner! Its simplicity, deliciousness, and ease of customization make it perfect for any occasion. We’ve covered everything from ingredient details and step-by-step instructions to helpful tips and variations, ensuring you create the most amazing Oreo Fudge. Don’t forget to share your creations with us in the comments below! Show us your fudge masterpieces, tag us on social media, and let us know what variations you tried. For more delicious dessert recipes, check out our other amazing recipes at recipesebook.com and don’t forget to pin this recipe for later – you’ll want to make it again and again! And for even more fall inspiration, check out our easy Apple Crisp recipe.
No-Bake Oreo Fudge
Ingredients
Equipment
Method
- Line an 8x8 inch baking pan with parchment paper, leaving an overhang on the sides for easy removal.
- In a medium saucepan over low heat, melt the chocolate chips and butter together, stirring frequently until smooth and creamy.
- Remove the saucepan from the heat and stir in the sweetened condensed milk and vanilla extract until well combined.
- Gently fold in the crushed Oreos until evenly distributed throughout the mixture.
- Pour the fudge mixture into the prepared baking pan and spread evenly. Sprinkle the reserved crushed Oreos on top.
- Refrigerate for at least 2 hours, or until the fudge is firm.
- Lift the fudge out of the pan using the parchment paper overhang. Cut into squares and serve.