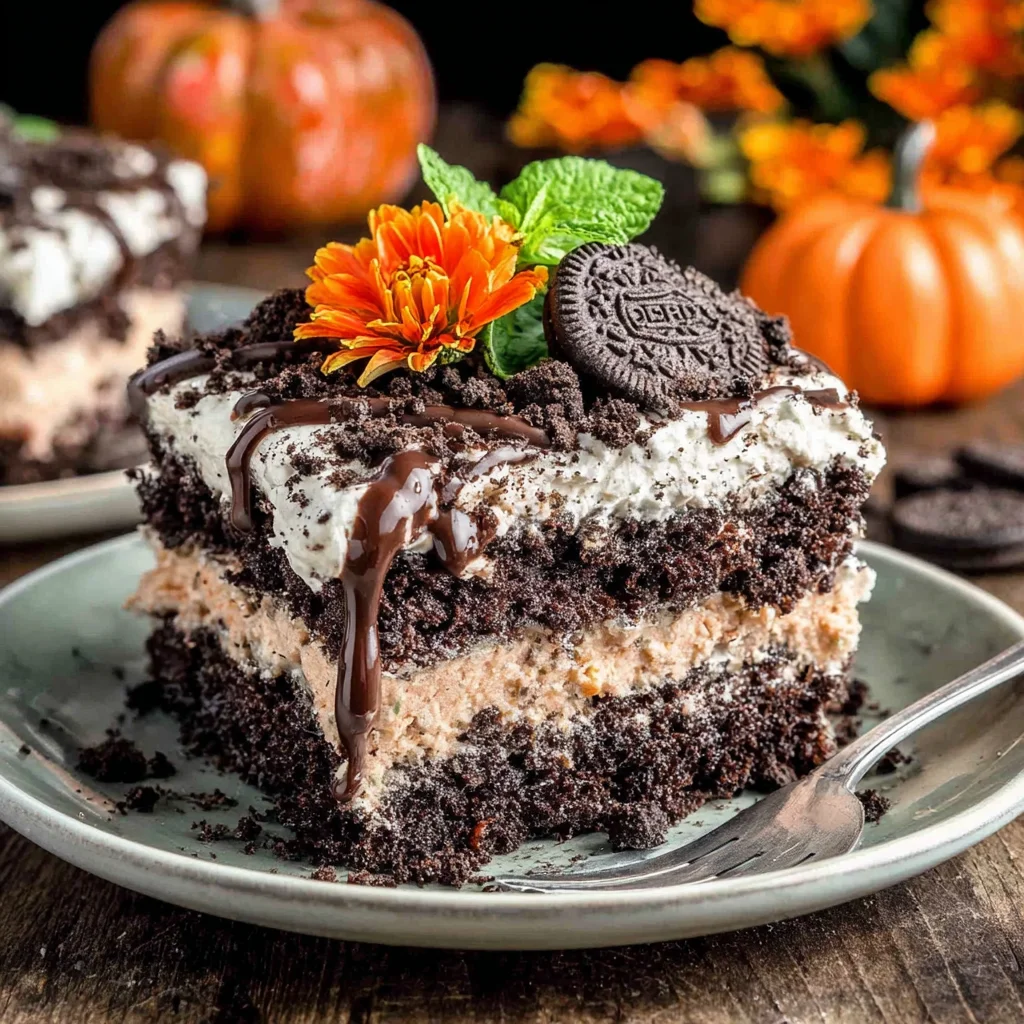
Get ready to dig into a frightfully fun dessert this Halloween! This Halloween Dirt Cake recipe is not only incredibly easy to make, but it’s also guaranteed to be a crowd-pleaser for both kids and adults. Forget about complicated baking; this no-bake dessert requires minimal effort but delivers maximum deliciousness. Imagine layers of rich chocolate cookies, creamy cream cheese frosting, and decadent chocolate pudding, all topped with gummy worms and creepy crawlies. It’s the perfect spooky centerpiece for your Halloween gathering, guaranteed to be the talk of the party. This Halloween Dirt Cake is so simple, even the little monsters in your house can help with the assembly – making it a fun family activity. So, ditch the stress and embrace the spooky fun with this easy-to-make, visually stunning, and undeniably tasty Halloween treat. Let’s get started on creating this deliciously frightful masterpiece!
Why You’ll Love This Halloween Dirt Cake Recipe
There are so many reasons why this Halloween Dirt Cake recipe will become your go-to Halloween dessert. First and foremost, it’s incredibly easy. No oven is required, saving you time and energy, and making it perfect for busy schedules. Secondly, it’s incredibly versatile. You can easily customize it to match your personal preferences and dietary needs. Want to add different candies? Go for it! Prefer a different type of cookie? Absolutely! The possibilities are endless. Thirdly, this Halloween Dirt Cake is undeniably delicious. The combination of chocolate cookies, creamy cream cheese, and rich chocolate pudding is a match made in dessert heaven. It’s the perfect balance of sweet and creamy, satisfying any sweet tooth’s cravings.
Beyond the taste, this recipe is also a showstopper. The layered effect, combined with the gummy worms and plastic spiders, creates a visually appealing dessert that’s perfect for any Halloween party or gathering. It’s a guaranteed conversation starter and a delightful treat that everyone will remember. Plus, the preparation is incredibly fun, especially if you involve the kids! It’s a great way to spend quality time together while creating a spooky masterpiece. Finally, it’s affordable. The ingredients are readily available and inexpensive, making this a budget-friendly option for your Halloween festivities. So, get ready to impress your guests and enjoy a delicious dessert without the fuss!
Why You Should Try This Halloween Dirt Cake
This Halloween Dirt Cake recipe isn’t just another dessert; it’s an experience. It’s the perfect blend of simplicity and sophistication, offering a delicious treat without requiring hours in the kitchen. Think about it: a no-bake recipe that’s incredibly customizable, visually stunning, and budget-friendly? It’s a recipe that ticks all the boxes for a successful Halloween celebration. Beyond the practical advantages, this Halloween Dirt Cake offers a unique opportunity to create lasting memories. Get the kids involved in the decorating process; let them unleash their creativity with gummy worms and spiders. This shared experience enhances the enjoyment of the final product, transforming a simple dessert into a cherished Halloween tradition.
Moreover, this recipe is a fantastic alternative to traditional Halloween sweets. It offers a richer, more sophisticated flavor profile than many store-bought candies, providing a delicious and satisfying experience. The visual appeal alone is worth trying this recipe. The layered “dirt,” the creepy crawlies, and the overall presentation will elevate your Halloween spread to a new level of spooktacular charm. It’s a recipe that invites creativity and personal expression, allowing you to tailor it to your specific tastes and preferences. Don’t just settle for ordinary Halloween treats; try this Halloween Dirt Cake and experience the difference! It’s a recipe you’ll want to make year after year. It’s a recipe that will become a new favorite among your family and friends.
Ingredients and Necessary Utensils for Your Halloween Dirt Cake
- Chocolate Sandwich Cookies: 1 package (16 ounces). Choose your favorite brand! Oreos are a classic choice, but any chocolate sandwich cookie will work perfectly.
- Unsalted Butter: 1/2 cup (1 stick), softened. Make sure your butter is softened to room temperature for easy mixing.
- Cream Cheese: 8 ounces, softened. Similar to the butter, softened cream cheese is essential for a smooth and creamy frosting.
- Powdered Sugar: 1 cup. This adds sweetness and helps create a smooth frosting.
- Vanilla Extract: 1 teaspoon. A touch of vanilla enhances the flavor of the cream cheese frosting.
- Cold Heavy Cream: 1 cup. Cold heavy cream is crucial for whipping into stiff peaks for the frosting.
- Chocolate Pudding: 1 cup (instant mix is fine). Use your favorite brand of instant chocolate pudding.
- Milk: 1/4 cup. Milk is needed to prepare the chocolate pudding according to package directions.
- Gummy Worms: For decorating the “dirt”. Choose your favorite gummy worms or other Halloween-themed candies.
- Plastic Spiders: For added spooky effect. These add a fun, creepy touch to your dessert.
- Chocolate Shavings (optional): For extra chocolatey goodness. These are a delicious finishing touch.
Recommended Tools & Utensils
- Food Processor or Ziploc Bag & Rolling Pin: To easily crush the chocolate sandwich cookies into fine crumbs.
- Mixing Bowls (at least 3): For preparing the cookie crumbs, cream cheese frosting, and chocolate pudding.
- Electric Mixer (handheld or stand mixer): Makes whipping the cream cheese frosting and heavy cream a breeze. You can do this by hand, but it will require more effort.
- Rubber Spatula or Spoon: For mixing and scraping down the sides of the bowls.
- Measuring Cups and Spoons: For accurate ingredient measurements.
- 9×13 inch Baking Dish: To assemble the Halloween Dirt Cake.
- Serving Spoon: To serve the delicious cake.
Detailed Recipe Steps for Your Spooky Halloween Dirt Cake
- Crush the Cookies: Place the chocolate sandwich cookies in a food processor and pulse until finely crushed. Alternatively, place the cookies in a large Ziploc bag and crush them using a rolling pin. **Ensure the cookies are finely crushed for a smooth texture.**
- Prepare the Cookie Base: In a large bowl, combine the crushed cookies and softened butter. Mix well until evenly combined. **The mixture should resemble wet sand.**
- Press into the Dish: Transfer the cookie mixture into a 9×13 inch baking dish. Use the back of a spoon or your hands to firmly press the mixture into the bottom of the dish, creating an even layer. **This will be the base of your Halloween Dirt Cake.**
- Make the Cream Cheese Frosting: In a separate bowl, beat the softened cream cheese and powdered sugar together until smooth and creamy. Add the vanilla extract and mix well. **Ensure there are no lumps in the cream cheese mixture.**
- Whip the Heavy Cream: In a clean bowl, whip the cold heavy cream using an electric mixer until stiff peaks form. **Make sure your bowl and beaters are completely clean and dry for best results.**
- Combine Frosting and Cream: Gently fold the whipped heavy cream into the cream cheese mixture until just combined. **Be careful not to overmix, as this can deflate the whipped cream.**
- Spread the Frosting: Spread the cream cheese frosting evenly over the cookie base in the baking dish. **This layer should be smooth and even.**
- Prepare the Chocolate Pudding: In a separate bowl, prepare the chocolate pudding according to the package directions, using the specified amount of milk. **Let the pudding sit for a few minutes to thicken slightly.**
- Spread the Pudding: Spread the chocolate pudding evenly over the cream cheese frosting layer. **This will be the “dirt” layer.**
- Decorate: Decorate your Halloween Dirt Cake with gummy worms, plastic spiders, and chocolate shavings (if desired). **Get creative and have fun with this step!**
- Chill and Serve: Refrigerate the Halloween Dirt Cake for at least 30 minutes to allow the layers to set. Serve chilled and enjoy!
Tips and Variations for Your Halloween Dirt Cake
This Halloween Dirt Cake recipe is highly customizable! Here are some tips and variations to make it your own:
- Cookie Variations: Experiment with different chocolate sandwich cookies, or even use crushed graham crackers for a unique twist.
- Frosting Variations: Try using a different type of frosting, such as chocolate frosting or peanut butter frosting.
- Pudding Variations: Use different pudding flavors, such as vanilla or caramel, for a unique flavor profile. You could even use a combination of flavors!
- Dietary Adaptations: For a vegan version, use vegan butter, vegan cream cheese, and a vegan chocolate pudding mix. For gluten-free, use gluten-free chocolate sandwich cookies or graham cracker crumbs.
- Add-ins: Get creative with add-ins! Crushed Oreos, chocolate chips, sprinkles, or even chopped nuts would add extra texture and flavor.
- Presentation: You can serve this Halloween Dirt Cake in individual cups or glasses for a fun and easy-to-serve option.
- Avoid Overmixing: Overmixing the cream cheese frosting and whipped cream can result in a deflated and less fluffy texture. Gently fold the ingredients together until just combined.
- Chill Properly: Allowing the cake to chill for at least 30 minutes ensures that the layers set properly and prevents the cake from becoming too messy.
Nutritional Values and Benefits of Your Halloween Dirt Cake
While this Halloween Dirt Cake is undeniably indulgent, let’s take a look at the nutritional aspects and benefits of some of its ingredients:
Note: The exact nutritional values will vary depending on the specific brands and types of ingredients used. This is an approximate estimation.
A single serving (assuming 12 servings) of this Halloween Dirt Cake might contain approximately:
- Calories: Around 300-350 calories
- Fat: 15-20 grams
- Carbohydrates: 35-40 grams
- Protein: 3-5 grams
Benefits of Ingredients:
- Dairy Products (Cream Cheese & Heavy Cream): Good sources of calcium and protein. Calcium is essential for healthy bones and teeth.
- Chocolate: Contains antioxidants that may offer various health benefits, such as improved heart health. (Note: This benefit is more significant with dark chocolate, but the small amount in this recipe still offers some benefits).
- Cookies: Provide carbohydrates for energy. (However, it’s important to consume in moderation.)
FAQs
How far in advance can I make this Halloween Dirt Cake?
Can I freeze this Halloween Dirt Cake?
What are some other Halloween-themed decorations I can use?
Is this Halloween Dirt Cake recipe suitable for kids to help make?
Can I make this Halloween Dirt Cake without an electric mixer?
Conclusion: Your Spooktacular Halloween Dessert Awaits!
This Halloween Dirt Cake recipe is the perfect combination of ease, deliciousness, and spooky fun. It’s a no-bake dessert that’s guaranteed to impress your guests, and it’s easy enough for even the youngest members of your family to help create. Remember to customize it to your liking, add your favorite candies, and unleash your creativity with the decorations. Don’t forget to share your amazing creations with us! Share your pictures and feedback in the comments below. Happy Halloween, and happy baking (or rather, happy assembling!). For more delicious Halloween recipes, check out this amazing Slab Pumpkin Pie Bars recipe and this equally delightful Creamy Butternut Squash Soup from our friends at RecipesEbook.com. And don’t forget to pin this recipe to your Pinterest board for later! Pinterest
Spooky Halloween Dirt Cake
Ingredients
Equipment
Method
- Crush chocolate sandwich cookies into fine crumbs using a food processor or by placing them in a ziplock bag and crushing with a rolling pin.
- In a medium bowl, cream together the softened butter and cream cheese until smooth.
- Beat in the powdered sugar and vanilla extract until light and fluffy.
- In a separate bowl, whip the cold heavy cream until stiff peaks form. Gently fold the whipped cream into the cream cheese mixture.
- In another bowl, prepare the chocolate pudding according to package directions using the cold milk.
- Layer the crushed cookies, cream cheese frosting, and chocolate pudding in a 9x13 inch baking dish, starting with a layer of cookies. Repeat layers until the dish is full, ending with a layer of cookies.
- Decorate with gummy worms, plastic spiders, and chocolate shavings (optional). Refrigerate for at least 2 hours before serving.