Get ready to unleash your inner ghoul with these frightfully fun Halloween Dirt Cups! This easy-to-make dessert is perfect for Halloween parties, school events, or a simple spooky treat for the whole family. Forget about complicated baking – these no-bake Halloween Dirt Cups are quick, affordable, and guaranteed to be a hit with both kids and adults. Imagine layers of rich chocolate cookie “dirt,” creamy “worm castings,” and a sweet chocolate pudding base, topped with delightfully creepy gummy worms and plastic spiders. It’s a spooky masterpiece that’s as delicious as it is fun to create! The best part? These Halloween Dirt Cups are surprisingly adaptable – you can easily adjust the ingredients to suit your preferences and dietary needs, making them a truly versatile treat. So gather your ingredients, put on your Halloween playlist, and let’s create some seriously spooky deliciousness!
Why You’ll Love This Halloween Dirt Cups Recipe
This Halloween Dirt Cups recipe is a game-changer for anyone looking for a simple yet impressive Halloween dessert. It’s the perfect solution for those who aren’t confident bakers or short on time. No oven required! The no-bake aspect makes it incredibly convenient, allowing you to focus on other Halloween preparations. But convenience doesn’t mean compromising on taste. The combination of crushed chocolate cookies, creamy filling, and rich chocolate pudding creates a flavor profile that’s irresistible. It’s the ultimate combination of textures: the crunchy cookie crumbs, the smooth and creamy filling, and the slightly jiggly pudding create a delightful sensory experience in every bite. Moreover, this recipe is incredibly versatile. You can customize it to your heart’s content, adding your favorite Halloween candies, sprinkles, or even a drizzle of chocolate sauce. Whether you’re hosting a large Halloween party or just looking for a fun family dessert, these Halloween Dirt Cups are a guaranteed crowd-pleaser. They’re equally suitable for sophisticated gatherings or casual get-togethers, proving their versatility and making them a truly standout Halloween dessert.
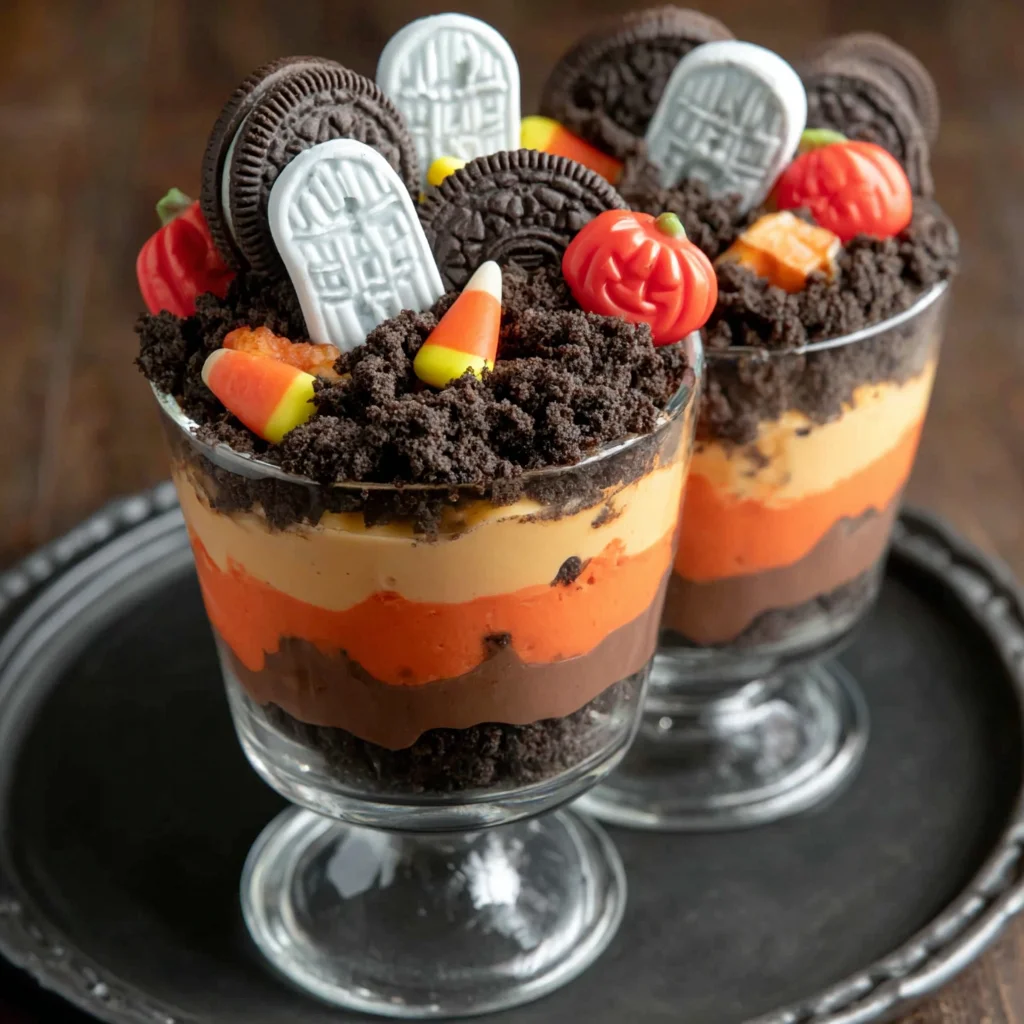
Beyond its ease and deliciousness, this recipe shines for its visual appeal. The layered design allows for creative decoration, transforming a simple dessert into a spooky work of art. The “dirt” layer, created from crushed chocolate sandwich cookies, provides a perfect foundation for the creamy filling and chocolate pudding. The addition of gummy worms and plastic spiders truly elevates the presentation, turning these cups into a delightfully creepy centerpiece on your Halloween spread. It’s a conversation starter, a photo opportunity, and a delicious treat all rolled into one. And let’s be honest, who doesn’t love a dessert that’s as fun to look at as it is to eat? You’ll find yourself spending as much time admiring your creations as you do enjoying them. This recipe isn’t just about making a dessert; it’s about creating a fun and memorable Halloween experience.
Why You Should Try This Halloween Dirt Cups Recipe
Beyond the ease and deliciousness, there are many reasons why you should absolutely try this Halloween Dirt Cups recipe. First and foremost, it’s a guaranteed crowd-pleaser. The combination of textures and flavors appeals to a wide range of palates, ensuring that everyone at your Halloween gathering will find something to love. Imagine the smiles on your guests’ faces when they see these cute and creepy treats. It’s a fun and interactive dessert that gets everyone involved in the Halloween spirit. The simple preparation method ensures minimal mess and stress, allowing you to enjoy the Halloween festivities without being stuck in the kitchen. This is especially helpful if you’re hosting a party and need to juggle multiple tasks. In addition, this recipe is budget-friendly. The ingredients are readily available and relatively inexpensive, making it a practical choice for those looking to save money on their Halloween celebrations.
Furthermore, the recipe offers tremendous opportunities for personalization. Feel free to experiment with different types of cookies, fillings, and decorations to create a truly unique dessert. You can tailor it to match your specific Halloween theme or even get the kids involved in the decorating process for a fun family activity. The adaptability of this recipe is a key selling point, making it perfect for those with dietary restrictions. With a few simple substitutions, you can create vegan, gluten-free, or other variations to accommodate everyone’s needs. Beyond the practical aspects, making these Halloween Dirt Cups is a delightful experience. The process is simple, fun, and allows you to unleash your creativity. It’s a chance to get hands-on with the cooking process, creating a personalized touch that adds to the overall enjoyment of the dessert. So, try this recipe and experience the joy of creating a delicious and visually stunning Halloween treat that will be remembered long after the festivities have ended.
Ingredients and Necessary Utensils for Halloween Dirt Cups
This section details the ingredients and utensils needed to make these spooktacular Halloween Dirt Cups. Precise measurements are essential for a perfect outcome. We’ll also delve into the best tools to streamline the process and achieve optimal results.
- Main Ingredients:
- 1 package (16 ounces) chocolate sandwich cookies: Look for your favorite brand – the richer the chocolate flavor, the better! Keywords: chocolate sandwich cookies, Oreo cookies, chocolate cookies, cookie crumbs
- 1 (8 ounce) package cream cheese: Make sure it’s softened to room temperature for easy mixing. Keywords: cream cheese, Philadelphia cream cheese, softened cream cheese
- 1/2 cup powdered sugar: This adds sweetness and helps create a smooth, creamy texture. Keywords: powdered sugar, confectioners’ sugar, icing sugar
- 1 teaspoon vanilla extract: Enhances the overall flavor profile. Pure vanilla extract is recommended. Keywords: vanilla extract, pure vanilla extract, vanilla
- 1 cup cold heavy cream: Essential for achieving stiff peaks when whipped. Ensure it’s very cold from the refrigerator. Keywords: heavy cream, whipping cream, cold heavy cream
- 1/2 cup chocolate pudding: Instant pudding is convenient, but homemade pudding can add an extra layer of homemade goodness. Keywords: chocolate pudding, instant pudding, chocolate instant pudding
- Gummy worms: The quintessential Halloween decoration! Choose your favorite brand and size. Keywords: gummy worms, Halloween candy, gummy candies
- Plastic spiders (optional): Adds extra spookiness and visual appeal. Keywords: plastic spiders, Halloween decorations, spider decorations
- Mini chocolate chips (optional): A fun addition for extra texture and flavor. Keywords: mini chocolate chips, chocolate chips, chocolate
- Utensils and Equipment:
- Large zip-top bag: For crushing the cookies easily. Keywords: ziplock bag, freezer bag, plastic bag
- Rolling pin or heavy pan: To crush the cookies into crumbs. Keywords: rolling pin, heavy pan, baking tools
- Medium bowl: For mixing the cream cheese mixture. Keywords: mixing bowl, glass bowl, ceramic bowl
- Electric mixer: Makes the process much quicker and easier. A hand mixer or stand mixer will work. Keywords: electric mixer, hand mixer, stand mixer
- Separate bowl: For whipping the heavy cream. Keywords: mixing bowl, glass bowl, stainless steel bowl
- Small cups or dessert glasses: To hold the Halloween Dirt Cups. Keywords: dessert cups, parfait glasses, clear cups
- Spoon or spatula: For layering the ingredients. Keywords: spoon, spatula, serving spoon
- Measuring cups and spoons: For precise measurements. Keywords: measuring cups, measuring spoons, kitchen tools
Detailed Recipe Steps for Halloween Dirt Cups
Now, let’s create some spooky deliciousness! Follow these steps to assemble your Halloween Dirt Cups. Remember, the key is to have fun and get creative with your decorations!
- Crush the Cookies: Place the chocolate sandwich cookies in a large zip-top bag. Using a rolling pin or the bottom of a heavy pan, crush the cookies until they resemble coarse crumbs. **Don’t over-crush them; you want some slightly larger pieces for texture.** Set aside.
- Make the “Dirt”: In a medium bowl, beat the softened cream cheese with an electric mixer until it’s completely smooth and fluffy. **Ensure your cream cheese is softened to room temperature; this will prevent lumps.** Add the powdered sugar and vanilla extract, beating until thoroughly combined. The mixture should be light and airy.
- Whip the Cream: In a separate bowl, beat the cold heavy cream with an electric mixer until stiff peaks form. **Cold heavy cream is crucial for achieving stiff peaks; make sure it’s chilled well before whipping.** Gently fold the whipped cream into the cream cheese mixture. Be careful not to overmix; you want to retain the airy texture of the whipped cream.
- Assemble the Cups: Layer the crushed cookies in small cups or dessert glasses. **Start with a layer of about 1/4 cup of crushed cookies.** This forms your “dirt” base. Top with a layer of the cream cheese mixture. Use about 2 tablespoons per cup. This will be your “worm castings”.
- Add the Pudding: Spoon the chocolate pudding over the cream cheese layer. **Use about 1-2 tablespoons per cup**, depending on the size of your cups. This adds a rich, chocolatey layer.
- Decorate: This is where the fun begins! Add gummy worms, plastic spiders, and mini chocolate chips (if using) to your Halloween Dirt Cups. Arrange them to resemble creepy crawlies and “dirt” embellishments. Get creative! **Feel free to use other Halloween candies or sprinkles to personalize your creations.**
- Chill: Refrigerate the Halloween Dirt Cups for at least 30 minutes to allow the flavors to meld and the dessert to chill. This enhances the overall taste and texture. **Chilling for a longer time, up to a couple of hours, is even better.**
Tips and Variations for Halloween Dirt Cups
Let’s explore some creative variations and tips to perfect your Halloween Dirt Cups. This section provides helpful advice to prevent common mistakes and allows you to personalize your recipe.
- Ingredient Alternatives:
- Cookies: Experiment with different chocolate cookies, or even use crushed graham crackers for a different flavor profile. For gluten-free versions, use gluten-free chocolate sandwich cookies.
- Cream Cheese: Vegan cream cheese alternatives are readily available and work well in this recipe.
- Pudding: Try other flavors of pudding like vanilla or caramel for a different twist.
- Decorations: Use any Halloween-themed candies, sprinkles, or even miniature chocolate skulls for an extra spooky touch.
- Avoiding Common Mistakes:
- Over-crushing cookies: Aim for a coarse crumb; overly fine crumbs can make the texture too dense.
- Cream cheese temperature: Softened cream cheese is essential for smooth mixing; avoid using cold cream cheese.
- Overmixing whipped cream: Gently fold in the whipped cream to maintain its airy texture.
- Layering: Don’t overfill the cups; leave some space at the top for decorations.
Nutritional Values and Health Benefits of Halloween Dirt Cups
While Halloween Dirt Cups are primarily a fun and festive treat, it’s important to be mindful of their nutritional content. A detailed nutritional breakdown is difficult to provide without exact brand specifications for ingredients. However, let’s explore the general nutritional profile and health benefits of the key components:
Chocolate Sandwich Cookies: These contribute carbohydrates and some fats (mostly saturated), along with some small amounts of vitamins and minerals depending on the brand. Moderation is key.
Cream Cheese: Provides a source of protein and fat. Choose low-fat or reduced-fat cream cheese options for a healthier choice. Contains calcium.
Powdered Sugar: Primarily carbohydrates; opt for moderation due to its high sugar content.
Vanilla Extract: Offers negligible nutritional value, but pure vanilla extract adds flavor without artificial ingredients.
Heavy Cream: A source of fat, mainly saturated fat. Use sparingly, or opt for lower-fat alternatives.
Chocolate Pudding: Contains carbohydrates, sugar, and some small amounts of vitamins and minerals. Opt for pudding with less added sugar.
Overall: Halloween Dirt Cups are best enjoyed in moderation, as they are high in sugar, fat, and carbohydrates. They should be considered an occasional treat rather than a regular part of a healthy diet.
FAQs about Halloween Dirt Cups
How long do Halloween Dirt Cups last in the refrigerator?
Can I make Halloween Dirt Cups ahead of time?
Are Halloween Dirt Cups gluten-free?
What are some alternative toppings for Halloween Dirt Cups?
Can I freeze Halloween Dirt Cups?
Conclusion: Embrace the Spooky Deliciousness of Halloween Dirt Cups
These Halloween Dirt Cups are more than just a dessert; they are a fun and engaging activity perfect for the Halloween season. The ease of preparation, the customizable nature, and the delightful results make this recipe a winner. From the crunchy cookie “dirt” to the creamy filling and the spooky decorations, every element contributes to a truly unforgettable treat. So, gather your ingredients, invite your friends and family, and embark on this delicious Halloween adventure! Don’t forget to share your creations with us in the comments below – we’d love to see your spooky masterpieces! And if you’re looking for more delicious Halloween treats or other recipe inspiration, be sure to check out our other recipes on our blog. You can also check out our amazing Pinterest page for some more yummy ideas! Happy haunting, and happy baking!
Spooktacular Halloween Dirt Cups
Ingredients
Equipment
Method
- Crush the chocolate sandwich cookies: Place cookies in a zip-top bag and crush using a rolling pin or the bottom of a heavy pan until coarsely crumbed.
- Make the creamy filling: Beat softened cream cheese with an electric mixer until smooth. Add powdered sugar and vanilla, beating until combined.
- Whip the cream: In a separate bowl, beat cold heavy cream with an electric mixer until stiff peaks form.
- Fold whipped cream into the cream cheese mixture gently until combined.
- Assemble the cups: Layer crushed cookies in small cups or dessert glasses. Top with a layer of the cream cheese mixture.
- Add chocolate pudding: Spoon chocolate pudding over the cream cheese layer.
- Decorate: Add gummy worms, plastic spiders, and mini chocolate chips (if using).
- Chill: Refrigerate for at least 30 minutes before serving.