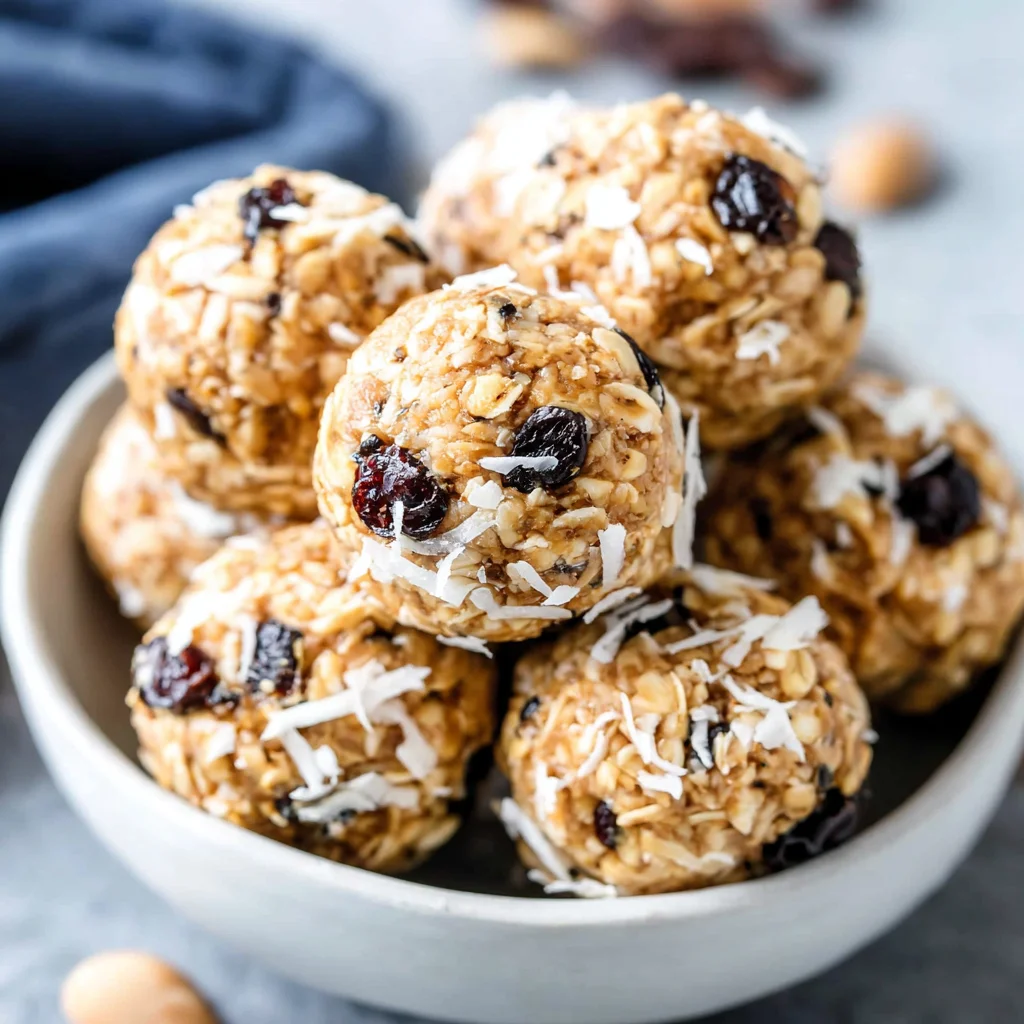
If you’re constantly searching for a healthy, satisfying, and delicious snack that requires zero oven time, look no further. These Peanut Butter Coconut Protein Balls are truly a game-changer for meal prep, busy mornings, or that inevitable afternoon slump. Combining the rich, comforting flavor of peanut butter with sweet, tropical coconut and a powerful boost of protein, this recipe delivers maximum taste with minimal effort.
In the world of homemade energy bites, this particular combination stands out. Forget highly processed snack bars filled with unrecognizable ingredients; we’re using simple, wholesome components you likely already have in your pantry. Ready in just 15 minutes of prep time, these high-protein balls are customizable, freezer-friendly, and perfect for fueling your body the smart way. Whether you need a pre-workout boost, a clean dessert alternative, or just a quick grab-and-go option for the whole family, learning how to make these incredible Peanut Butter Coconut Protein Balls will revolutionize your healthy snacking routine. We will guide you through every step, ensuring you achieve perfect consistency and flavor every time.
Why You’ll Love These High-Protein Balls (Taste, Texture, and Convenience)
The allure of the Peanut Butter Coconut Protein Balls isn’t just in their nutritional profile; it’s deeply rooted in their incredible flavor and user-friendly preparation. This is one of those recipes that truly delivers on all fronts: texture, taste, and unparalleled convenience. Let’s dive into why this recipe deserves a permanent spot in your weekly rotation.
Perfectly Balanced Flavor Profile
The marriage of creamy peanut butter and sweet coconut is classic for a reason. The deep, savory notes of the peanut butter are perfectly complemented by the slightly crunchy texture and distinct tropical sweetness of the shredded coconut. Unlike some protein snacks that can taste chalky or overly artificial, the combination of honey (or maple syrup) and pure vanilla extract ensures a balanced sweetness that feels like a decadent dessert, even though it’s fueling your body with healthy ingredients. The use of creamy, natural-style peanut butter ensures a richness that binds the other ingredients beautifully, creating a satisfying richness in every bite.
The Magic of No-Bake Preparation
One of the biggest time-savers here is the “no-bake” factor. With a prep time of just 15 minutes, you can have an entire batch ready and chilling before the oven even has a chance to preheat. This makes these Peanut Butter Coconut Protein Balls an ideal recipe for summer months when you want to keep the kitchen cool, or for busy weekday evenings when time is precious. The simplicity of simply combining ingredients, mixing, and rolling eliminates all the hassle associated with traditional baking, such as measuring flour precisely or worrying about oven temperatures.
Incredible Meal Prep Potential
If you are serious about sticking to your nutrition goals, effective meal prep is key. These high-protein balls are tailor-made for batch cooking. The recipe yields approximately 18 to 20 balls, making it easy to prepare a week’s worth of snacks in one go. Once rolled and coated, they store brilliantly in the refrigerator for up to 10 days, or in the freezer for up to three months. This means you always have a healthy, portion-controlled snack ready to go no excuses! They are perfect for dropping into lunchboxes, stashing in a gym bag, or grabbing immediately after a challenging workout.
Kid-Friendly and Customizable
Getting kids to eat healthy snacks can be a challenge, but these irresistible bites rarely face resistance. Their dessert-like flavor makes them appealing, and the fun, manageable size is perfect for little hands. Furthermore, the ingredients are easily customizable to suit different taste preferences (more on variations later!), allowing you to switch up the coatings or add small mix-ins like mini chocolate chips or ground flaxseed. This versatility ensures that you never get bored with your daily dose of energy.
Why You Should Try This Easy Snack Recipe Right Now
Beyond the delightful taste and convenience, adopting this recipe for Peanut Butter Coconut Protein Balls into your lifestyle offers tangible benefits for your health and overall energy management. In today’s fast-paced environment, having reliable, nutrient-dense options is essential for maintaining consistent energy levels and avoiding poor food choices.
Superior Fuel for Workouts and Recovery
For fitness enthusiasts, the combination of fats, carbohydrates, and high-quality protein makes these balls an excellent functional food. The protein powder aids in muscle repair and satiety, while the oats provide complex carbohydrates for sustained energy release. The healthy fats from the peanut butter (see our guide on classic peanut butter cookies for more peanut butter inspiration) help stabilize blood sugar and keep you feeling full longer. Consuming a protein-rich snack shortly after a workout helps kickstart the recovery process, and these Peanut Butter Coconut Protein Balls deliver those necessary macros in a compact, portable form.
Control Over Ingredients and Nutrition
One of the main advantages of making your own snacks is complete control over what goes into your body. Many store-bought protein or granola bars are packed with hidden sugars, artificial preservatives, and binding agents. By using this recipe, you choose the type of protein powder, the quality of the peanut butter, and the amount of liquid sweetener. You can opt for organic ingredients, manage sodium intake, and ensure that every ingredient serves a nutritional purpose. This level of transparency is invaluable for anyone managing specific dietary needs or simply prioritizing clean eating.
A Natural Energy Boost Without the Crash
Unlike snacks relying heavily on simple sugars, which often lead to a rapid energy spike followed by a dramatic crash, these Homemade Protein Bites provide sustained fuel. The inclusion of rolled oats is critical here, as they are a source of beta-glucans, a soluble fiber that slows digestion and stabilizes glucose release. This steady stream of energy is perfect for powering through a long workday, tackling household chores, or sustaining concentration during study sessions.
Supporting a Gluten-Free and Dairy-Free Lifestyle
Depending on the ingredients chosen, this recipe is incredibly adaptable to common dietary restrictions. If you use certified gluten-free rolled oats, the balls become suitable for those with celiac disease or gluten sensitivity. If you opt for plant-based protein powder and ensure your liquid sweetener (like maple syrup or agave) and peanut butter are vegan, these can easily become a dairy-free and vegan snack. This makes the recipe universally appealing and inclusive for sharing with friends and family who may have varying dietary needs.
Ingredients and Utensils: Mastering the Base for No-Bake Energy Bites
Success in making perfect Peanut Butter Coconut Protein Balls starts with high-quality ingredients and the right tools. Because this is a no-bake recipe, the consistency of your ingredients especially the peanut butter and protein powder is paramount to achieving that perfectly pliable, rollable dough.
The Essential Ingredients List
Below is a detailed breakdown of the components needed for your delicious protein ball base and optional coating. Remember that exact consistency will depend on the brand of protein powder and peanut butter you use, so treat the measurements as a starting point, especially concerning the milk.
For the Protein Ball Base
- 1 cup Creamy Peanut Butter (Natural style works best, stirred well): Using natural peanut butter (the kind that separates) is highly recommended. It tends to be runnier and less stabilized than conventional peanut butter, which helps bind the dry ingredients without requiring excess liquid. Crucial Tip: Stir it thoroughly before measuring to ensure you incorporate the oil that has separated, providing necessary moisture. If you only have stabilized peanut butter, you might need to add slightly more milk or sweetener.
- 1/2 cup Old-Fashioned Rolled Oats (Uncooked): Do not use quick oats, as they absorb liquid too rapidly and may result in a sticky, pasty texture. Rolled oats (sometimes called large flake oats) provide the necessary structure and chewy texture. They are the backbone of these “No-Bake Energy Bites.”
- 1/2 cup Vanilla Protein Powder (Whey, Casein, or Plant-Based): The type of protein powder matters. Whey protein often absorbs less liquid than casein or plant-based proteins. If using plant-based powder (like pea or soy), be prepared to add the full 2 tablespoons of milk, as these powders tend to be much thirstier. Vanilla flavor is traditional, but chocolate or unflavored powders can also be used.
- 1/4 cup Unsweetened Shredded Coconut (Mixed into the batter): This is mixed directly into the dough to add texture and permeate the coconut flavor throughout the ball, not just on the exterior. Using unsweetened coconut reduces the overall sugar content.
- 1/4 cup Liquid Sweetener (Such as Honey, Maple Syrup, or Agave Nectar): This ingredient serves two primary functions: sweetening the mix and acting as the main sticky binder. Honey provides a classic, rich flavor, while maple syrup or agave make this recipe completely vegan.
- 1 teaspoon Pure Vanilla Extract: A crucial ingredient for enhancing the overall flavor and ensuring that sweet, delicious, dessert-like taste.
- 1 to 2 tablespoons Milk (Any variety, used only if the mixture is too dry): This is your contingency ingredient. Start with 1 tablespoon only if the dough is crumbling. Use whatever milk you have dairy, almond, oat, or soy all work equally well.
For Coating (Optional, but highly recommended)
- 1/2 cup Extra Unsweetened Shredded Coconut: This creates a beautiful, textural exterior that highlights the coconut flavor and prevents the balls from sticking together during storage.
Recommended Tools and Utensils for Success
While this recipe is incredibly simple, having the right gear ensures the process is smooth, quick, and mess-free. You don’t need specialized equipment, but these items make a difference when preparing a large batch of Peanut Butter Coconut Protein Balls.
For handling the sticky dough and ensuring uniform sizing, these tools are highly recommended:
- Large, Sturdy Mixing Bowl: You need ample room to combine the dense ingredients. A bowl with high sides helps contain the protein powder during initial mixing.
- Sturdy Spoon or Spatula: The dough will become very thick. A heavy wooden spoon or a rigid silicone spatula is essential for mixing. A stand mixer fitted with a paddle attachment works perfectly for larger batches and minimizes physical effort.
- Small Cookie Scoop or Measuring Spoon (1-tablespoon size): To ensure consistent portion sizes. Uniformity in size helps with nutritional tracking and makes the final product look professional. If you often make similar snacks, like these 3-ingredient peanut butter balls, a scoop is a must-have tool.
- Shallow Plate or Baking Sheet: Needed for holding the extra shredded coconut coating.
- Parchment Paper or Wax Paper: Highly recommended for lining the baking sheet where you place the finished balls. This prevents sticking, especially during the final setting period.
- Airtight Storage Container: Essential for chilling the dough and storing the final Coconut Peanut Butter Snacks.
Investing in these simple tools will guarantee that your experience making Peanut Butter Coconut Protein Balls is efficient and enjoyable from start to finish. Remember, the key to the best no-bake snacks is consistency, and proper measuring tools are vital.
Detailed Recipe Steps: Creating the Perfect Peanut Butter Coconut Protein Balls
Follow these steps closely to ensure your dough reaches the perfect consistency pliable, cohesive, and easy to roll. The timing is split between 15 minutes of active prep and 30 minutes of mandatory chilling time.
Step 1: Combine the Dry Ingredients
The first step focuses on integrating the dry, powdery elements to avoid clumping later.
- In a large mixing bowl, measure the 1/2 cup of Old-Fashioned Rolled Oats and the 1/2 cup of Vanilla Protein Powder.
- Use a whisk or a fork to thoroughly mix these two ingredients together. Tip: Whisking ensures that the protein powder is evenly distributed throughout the oats, preventing pockets of dry, concentrated powder in the finished balls.
Step 2: Add the Wet Ingredients and Flavor
Next, introduce the main binders and flavor enhancers.
- To the dry mixture, add the full cup of Creamy Peanut Butter (ensure it has been well-stirred if using natural style).
- Pour in the 1/4 cup of Liquid Sweetener (Honey, Maple Syrup, or Agave Nectar).
- Add the 1 teaspoon of Pure Vanilla Extract.
Step 3: Mix the Dough into a Cohesive Mass
This is where the strength of your mixing utensil and possibly your arms comes into play, as the dough will become very dense.
- Begin mixing using a sturdy spoon or spatula. Start slowly to integrate the dry powder into the wet ingredients, preventing the protein powder from puffing out of the bowl.
- Continue mixing until all ingredients are combined. This requires persistence; it may look crumbly at first, but keep working it. Goal: Mix until a uniform, thick dough forms and no streaks of dry powder or unmixed peanut butter remain.
Step 4: Test and Adjust Consistency – Incorporating Internal Coconut
The consistency of your dough is the single most critical factor for successful Peanut Butter Coconut Protein Balls.
- After the primary mixing, add the 1/4 cup of Shredded Coconut (the amount designated for the base). Mix thoroughly.
- The Pliability Test: Now, test the dough. Pinch a small amount between your fingers. It should hold together easily. If the mixture is too thick, crumbly, or difficult to press, you need to add moisture.
- Add the milk, one tablespoon at a time, mixing well after each addition. Do not overdo the milk; stop as soon as the dough reaches a pliable, moldable consistency. It should be sticky, but not so sticky that it glues itself to your hands.
- Practical Tip: If you accidentally add too much liquid, you can counterbalance by adding a tiny splash more protein powder (1/2 teaspoon at a time) or a tablespoon of ground flaxseed meal, which absorbs moisture quickly.
Step 5: Chill the Dough (The Non-Negotiable Step)
Do not skip or rush the chilling phase! This step is essential for easy rolling and firm texture.
- Cover the mixing bowl tightly with plastic wrap, or transfer the dough into a sealable container.
- Place the dough into the refrigerator and allow it to chill for a minimum of 30 minutes. Why Chilling Works: Chilling solidifies the fats in the peanut butter and the liquid sweetener, making the dough much firmer, less sticky, and significantly easier to roll into neat, uniform balls without falling apart or making a huge mess.
Step 6: Prepare the Coating
While the dough is firming up in the fridge, set up your rolling station.
- Pour the additional 1/2 cup of Shredded Coconut (the coating amount) onto a shallow plate, a wide bowl, or a small baking sheet.
Step 7: Roll the Balls
Once chilled, the dough is ready to be portioned and shaped.
- Remove the chilled dough from the refrigerator. If it is too hard (which happens if chilled overnight), let it sit on the counter for 5 minutes.
- Use a small cookie scoop or a measuring tablespoon to measure out equal portions of the dough. This ensures consistency.
- Roll each portion gently between the palms of your hands to form smooth, round balls, approximately one inch in diameter. Rolling Trick: Roll quickly, as the heat from your hands will rapidly soften the dough.
Step 8: Coat and Finish the Protein Balls
Add the final layer of texture and flavor.
- Immediately roll each protein ball gently through the plate of extra shredded coconut until the exterior is fully coated. Press lightly to help the coconut adhere.
- Place the finished coated balls onto a clean plate or a baking sheet lined with parchment paper.
Step 9: Store and Set
A final brief chill ensures optimal texture for consumption.
- For the best texture and firmness, place the finished Peanut Butter Coconut Protein Balls back into the refrigerator for an additional 10 to 15 minutes to allow the coconut coating and the exterior to fully set before serving.
- Store in an airtight container as directed below.
Tips, Variations, and Troubleshooting for Coconut Peanut Butter Snacks
One of the best features of this recipe for Peanut Butter Coconut Protein Balls is how flexible and forgiving it is. You can easily adapt the flavor profile and texture to suit your personal preferences or dietary restrictions.
Ingredient Alternatives and Dietary Swaps
You can easily modify this recipe for different dietary needs:
- For Vegan/Dairy-Free: Ensure you use maple syrup or agave nectar instead of honey, choose a plant-based protein powder (like soy, pea, or brown rice), and use plant-based milk (like almond or oat).
- Gluten-Free: Always use certified gluten-free rolled oats. All other ingredients are typically naturally gluten-free.
- Nut-Free Options: If avoiding peanuts, swap the peanut butter for sunflower seed butter (SunButter) or almond butter. Note that sun butter often yields a slightly wetter dough and may require an extra teaspoon of dry ingredients.
- Flavor Boosters:
- Chocolate Swirl: Melt 1/4 cup of dark chocolate chips and drizzle it over the finished protein balls before the final chill.
- Spice Integration: Add 1/2 teaspoon of cinnamon or a pinch of nutmeg to the dry ingredients for a warmer flavor profile.
- For a Crunchier Bite: Replace 1/4 cup of the oats with chopped nuts (like almonds or pecans) or add mini chocolate chips directly into the dough during Step 4.
- Hidden Fiber: Mix in 1 tablespoon of chia seeds or ground flaxseed meal. These ingredients are great for thickening the dough and boosting the nutritional profile, much like in our recipe for easy no-bake peanut butter pie.
Troubleshooting Common Consistency Mistakes
The texture of these no-bake snacks is highly sensitive to the exact ingredients you use. Here’s how to fix the most common issues:
- Problem: The Dough is Too Dry and Crumbly.
- Cause: Using too much protein powder, using a very dry type of protein powder (like casein or certain plant blends), or using overly stiff, stabilized peanut butter.
- Fix: Slowly add more binding liquid. Add an extra teaspoon of liquid sweetener (honey/maple syrup) or a tablespoon of milk, mixing thoroughly until it comes together.
- Problem: The Dough is Too Sticky and Won’t Hold its Shape.
- Cause: Too much natural oil in the peanut butter, too much liquid sweetener, or the dough is too warm.
- Fix: If the dough is warm, chill it immediately for at least 30 minutes. If it’s still too sticky, add 1 tablespoon of an absorbent dry ingredient: extra rolled oats (finely ground in a food processor is best), protein powder, or coconut flour.
- Problem: The Coating Won’t Stick.
- Cause: The protein balls were rolled after they had been chilled for too long and are now too firm, or the exterior has dried out.
- Fix: Allow the balls to warm up slightly (2-3 minutes) so the exterior is tacky again. Alternatively, gently dampen your palms with water or milk before rolling the ball, then immediately roll in the coconut coating.
Storage and Freshness Advice
Proper storage is key to maximizing the life of your Peanut Butter Coconut Protein Balls:
- Refrigerator Storage: Store the balls in an airtight container. If you stack them, consider separating the layers with parchment paper to prevent sticking. They will stay fresh and firm in the fridge for up to 10 days.
- Freezer Storage (Recommended): These freeze exceptionally well. Place the finished balls in a single layer on a parchment-lined tray and freeze for 1 hour. Once solid, transfer them to a heavy-duty freezer bag or airtight container. They keep well for up to 3 months. Thaw them overnight in the refrigerator or grab one directly from the freezer; they usually thaw within 10–15 minutes at room temperature.
Nutritional Values and Benefits: Fueling Your Body with Peanut Butter Coconut Protein Balls
Understanding the nutritional breakdown of these Peanut Butter Coconut Protein Balls highlights why they are such a superior choice compared to conventional packaged snacks. While exact nutritional values depend heavily on the specific brand of peanut butter and protein powder used, we can estimate the powerful macro and micro benefits these bites offer.
Estimated Nutritional Breakdown (Per Ball, based on 20 balls)
These figures are approximations and assume the use of standard whey protein powder and natural peanut butter sweetened with honey:
- Calories: Approximately 140–160 kcal
- Protein: 7–9 grams (Excellent for satiety and muscle maintenance)
- Fats: 9–11 grams (Mostly healthy unsaturated fats from peanuts)
- Carbohydrates: 10–12 grams (Including fiber and natural sugars)
- Fiber: 2–3 grams
The Power of the Ingredients
Protein Powder: The Muscle Maker
The core benefit of these snacks is the concentrated protein dose. Protein is crucial for repairing tissues, producing enzymes, and supporting immune function. By integrating high-quality protein powder, we transform a simple oat and peanut butter ball into a functional recovery snack. Whether you choose whey (fast-digesting) or casein (slow-digesting), you are ensuring your body gets the amino acids needed throughout the day.
Peanut Butter: Healthy Fats and Satiety
Peanut butter, when chosen wisely (natural style, low sugar), is a fantastic source of monounsaturated and polyunsaturated fats the “good” fats that are essential for heart health. These fats, combined with the fiber in the oats, dramatically increase satiety (the feeling of fullness), making it easier to manage cravings and caloric intake throughout the day. Peanut butter also provides essential nutrients like Niacin (Vitamin B3) and Vitamin E.
Rolled Oats: Sustained Energy and Fiber
Rolled oats are a complex carbohydrate, meaning they break down slowly and provide a steady, lasting source of energy. This prevents the energy crash associated with refined sugar snacks. Furthermore, oats are packed with soluble fiber (beta-glucan), which is well-known for its ability to help lower bad cholesterol (LDL) and promote healthy digestion.
Coconut: MCTs and Texture
Shredded coconut not only brings fantastic flavor but also provides dietary fiber and healthy fats, including Medium-Chain Triglycerides (MCTs). Some studies suggest MCTs are metabolized differently than other fats and can offer a quick source of energy, often utilized by those following ketogenic or low-carb lifestyles. The fiber in the coconut also contributes to gut health and ensures the final protein ball has a satisfying, robust texture.
By opting for these Peanut Butter Coconut Protein Balls, you are choosing a snack that is dense in nutrients, provides sustained energy, and tastes fantastic a true triple threat in the healthy eating arsenal.
FAQs About Peanut Butter Coconut Protein Balls
How long do Peanut Butter Coconut Protein Balls last in the fridge?
When stored in an airtight container in the refrigerator, these Peanut Butter Coconut Protein Balls will stay fresh and firm for up to 10 days. The high fat content from the peanut butter and the chilling process help maintain their structure and flavor.
Can I use crunchy peanut butter instead of creamy for these energy bites?
Yes, you absolutely can use crunchy peanut butter. While creamy peanut butter results in a smoother dough, crunchy peanut butter will add an extra layer of texture and nuttiness to your Peanut Butter Coconut Protein Balls. Ensure the crunchy peanut butter is well-stirred if it is the natural, separating kind.
Are these protein balls suitable for freezing?
Yes, these Peanut Butter Coconut Protein Balls freeze exceptionally well. Arrange them on a baking sheet to freeze individually, then transfer them to an airtight freezer bag or container. They can be frozen for up to 3 months and are great for long-term meal prepping.
What can I use instead of protein powder to make these no-bake balls?
If you prefer not to use protein powder, you can replace it with powdered milk (for a protein boost) or substitute it with an equal amount of finely ground oats (oat flour). You may need to adjust the liquid slightly, as these substitutes may absorb moisture differently than specialized protein powders.
Why do I need to chill the dough before rolling?
Chilling the dough is critical because it solidifies the fats in the peanut butter and the sticky liquid sweetener. This process makes the mixture much firmer and less tacky, allowing you to easily roll the Peanut Butter Coconut Protein Balls into neat, uniform shapes without the dough sticking excessively to your hands.
Conclusion: Your New Favorite Energy Snack
The journey to finding the perfect balance between delicious indulgence and healthy fuel often ends with the creation of simple, homemade snacks. These Peanut Butter Coconut Protein Balls are the embodiment of that balance offering rich flavor, satisfying texture, and a significant boost of protein and fiber, all without the need for baking or complicated techniques.
From busy parents looking for quick after-school snacks to dedicated fitness enthusiasts needing reliable pre- or post-workout fuel, this recipe caters to everyone. We’ve covered everything from ingredient selection (the importance of natural peanut butter and the right oats) to troubleshooting common consistency issues (the fix for overly sticky or crumbly dough). By following the detailed instructions, especially the mandatory 30-minute chill time, you are guaranteed a batch of beautifully firm and flavorful protein balls.
Remember that the beauty of these Coconut Peanut Butter Snacks lies in their adaptability. Feel free to experiment with different nut butters, protein powder flavors, or exciting mix-ins like dried fruit or chocolate chips. Once you master the base recipe, the possibilities for creating your customized high-protein balls are endless. They provide an incredible return on investment for just 15 minutes of active kitchen time.
We encourage you to whip up a batch of these marvelous Peanut Butter Coconut Protein Balls this week. They will quickly become your go-to solution for clean, convenient energy. Share your creations, tell us about your favorite flavor variations in the comments below, and happy rolling!
Peanut Butter Coconut Protein Balls (No-Bake)
Ingredients
Equipment
Method
- In a large mixing bowl, measure and combine the Rolled Oats and the Vanilla Protein Powder. Use a whisk or a spoon to thoroughly mix these two ingredients together to ensure the protein powder is evenly distributed.
- To the dry ingredients, add the full cup of Creamy Peanut Butter, the measured Liquid Sweetener (Honey or Maple Syrup), and the Vanilla Extract.
- Using a sturdy spoon, spatula, or a stand mixer fitted with a paddle attachment, mix all ingredients until a uniform, thick dough forms. Begin mixing slowly to prevent the protein powder from escaping the bowl. Continue mixing until no streaks of peanut butter or dry powder remain.
- Add the 1/4 cup of Shredded Coconut (the amount designated for the base). If the mixture still feels crumbly or is difficult to stick together, add the milk, one tablespoon at a time, until the dough reaches a pliable consistency that can be easily rolled without falling apart.
- Cover the mixing bowl tightly with plastic wrap or transfer the dough to a sealable container. Place the dough into the refrigerator and allow it to chill for a minimum of 30 minutes. Chilling the mixture makes the dough firmer and significantly easier to roll into neat, uniform balls.
- While the dough is chilling, pour the additional 1/2 cup of Shredded Coconut (for rolling) onto a shallow plate or baking sheet.
- Remove the chilled dough from the refrigerator. Use a small cookie scoop or a measuring tablespoon to measure out equal portions of the dough. Roll each portion between the palms of your hands to form smooth, round balls approximately one inch in diameter.
- Immediately roll each protein ball gently through the plate of extra shredded coconut until the exterior is fully coated. Place the finished coated balls onto a clean plate or a baking sheet lined with parchment paper. For best results, place the finished balls back into the refrigerator for an additional 10 to 15 minutes to allow them to fully set before serving.