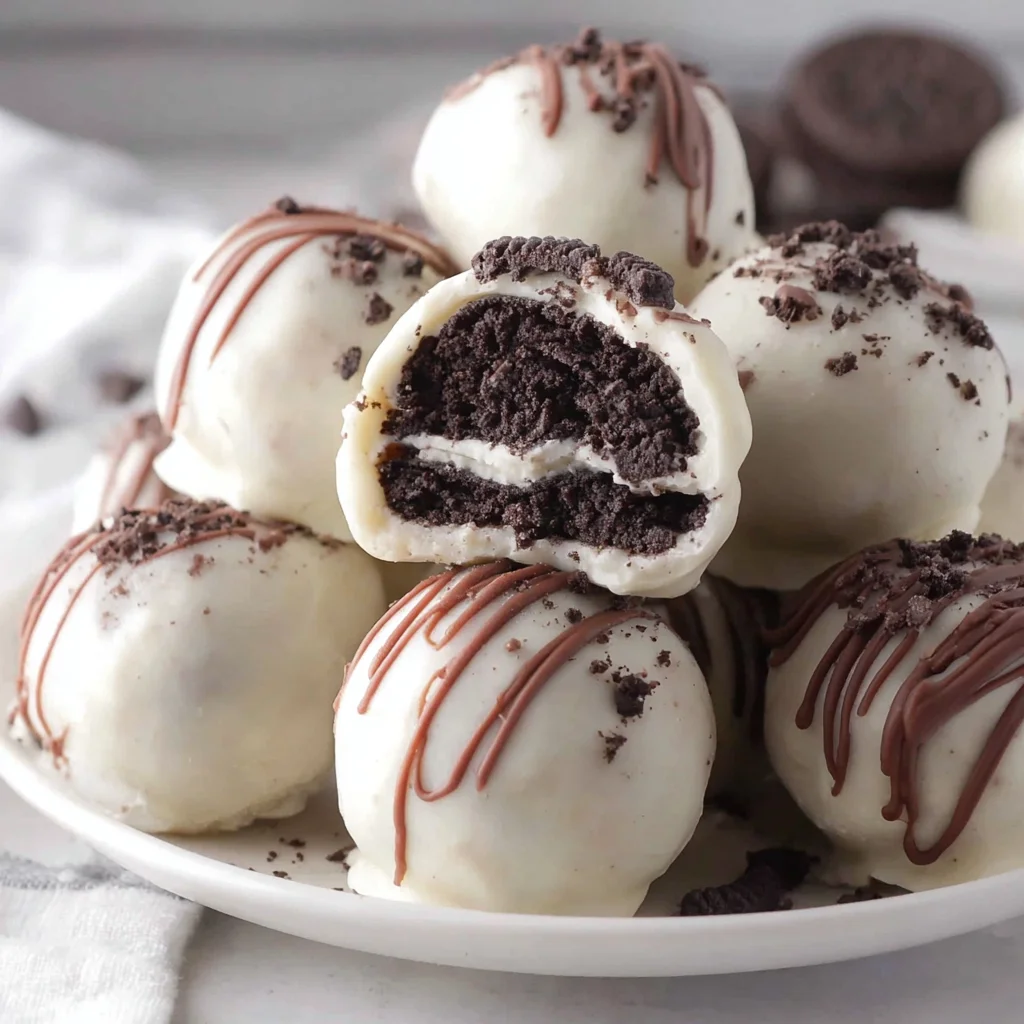
Welcome to the simplest, most decadent dessert you will ever make! If you are looking for a show-stopping treat that requires zero oven time and minimal ingredients, you have found your holy grail. These phenomenal Oreo Cake Balls often known as Oreo Truffles are made with just three core ingredients: Oreos, cream cheese, and chocolate. The result? A creamy, rich, dense, and delightful bite-sized treat encased in a perfect chocolate shell.
Forget complicated baking techniques. This recipe for Oreo Cake Balls is so straightforward, it’s perfect for beginner bakers, busy parents, or anyone needing a quick dessert fix. Whether you are preparing for a holiday party, need a simple gift idea, or just crave something incredibly indulgent, these no-bake wonders deliver maximum flavor with minimum fuss. We are going to dive into the exact ratios, techniques, and tips you need to achieve flawlessly smooth and perfectly shaped Oreo Cake Balls every single time. Get ready to transform that classic black-and-white cookie into a gourmet chocolate masterpiece!
Why You’ll Love These Creamy Oreo Cake Balls: The Perfect No-Bake Treat
In a world of complicated desserts, the Oreo Cake Ball stands out as a beacon of simplicity and pure indulgence. There are countless reasons why this recipe earns a permanent spot in kitchens across the globe, but they primarily boil down to texture, ease, and nostalgic flavor.
Unbeatable Texture and Flavor Fusion
What makes a great dessert? Often, it’s the contrast of textures. These Oreo Cake Balls are a textural triumph. The center is a moist, dense, and fudgy mixture, thanks to the combination of finely crushed Oreo cookies (including the cream filling!) and rich cream cheese. This soft center provides a deeply satisfying contrast to the snappy, smooth exterior of the hardened chocolate coating. Every bite delivers a blast of classic Oreo flavor elevated by the tangy note of the cream cheese, which perfectly balances the sweetness.
Three Ingredients, Endless Possibilities
The core recipe requires only three ingredients, making it incredibly accessible and affordable. You don’t need specialized flour, leavening agents, or dozens of spices. This simplicity means you can always have the ingredients on hand for an impromptu dessert session. Furthermore, the base mixture is an excellent canvas for customization. A standard Oreo Cake Ball is delicious, but adding a splash of peppermint extract for the holidays, or using white chocolate for a different aesthetic, opens up endless creative avenues. Unlike baking, where precise measurements are crucial, the truffles are forgiving, allowing for flexibility and fun in the kitchen.
They are Truly No-Bake
The term “no-bake” is a huge selling point, particularly during warmer months or when oven space is limited during holiday preparation. Achieving perfect desserts without turning on the oven is a massive time and energy saver. The chilling and freezing steps in this recipe are passive time, meaning you are free to tackle other tasks while the Oreo Cake Balls firm up. This also makes it a remarkably kid-friendly recipe. Crushing cookies in a food processor or a sturdy Ziploc bag is a delightful activity for children, transforming dessert preparation into family fun. If you are looking for other easy no-bake options, consider making Oreo Fudge another incredible time-saver!
The rich, intense chocolate flavor and the satisfying density of these treats make them infinitely better than a standard frosted cupcake. They are concentrated bites of deliciousness that are impossible to stop eating. Once you master the technique for dipping these homemade treats, you will understand why Oreo Cake Balls become a perennial favorite in any household.
Why You Should Try Making These Easy Homemade Oreo Cake Balls
If the irresistible taste and simplicity haven’t convinced you yet, consider the versatility and positive impact these delectable treats can have on your next gathering or holiday table. Making your own Oreo Cake Balls isn’t just about creating a dessert; it’s about providing a convenient, beautiful, and highly shareable moment of joy.
Perfect for Gifting and Parties
Due to their uniform shape, stable structure, and impressive shelf life (when properly stored in the refrigerator), Oreo Cake Balls are ideal for gifting. Arrange a dozen in a festive box or bag, and you have a stunning, homemade present that looks professionally crafted. For parties, they offer unparalleled convenience. Since they are bite-sized, guests don’t need plates or forks. They are easy to serve, minimize mess, and are designed for grazing. Unlike a large cake that requires slicing, these individual treats allow guests to grab and enjoy immediately, ensuring minimal interruption to the festivities.
They Require Zero Specialty Skills
Many dessert recipes require careful ingredient activation (like yeast or baking soda), measuring dry ingredients precisely, and understanding complex techniques like folding or beating egg whites. Not so with Oreo Cake Balls. If you can operate a food processor and roll a ball of dough, you can master this recipe. The main goal is just combining the crushed cookies and softened cream cheese until homogenous. This low-stress approach makes it a fantastic gateway recipe for new cooks.
While many holiday recipes, like Easy Pumpkin Bread, require careful oven monitoring, these truffles are set entirely by refrigeration. This frees up your oven for larger, more demanding dishes, a huge plus during busy holiday seasons like Thanksgiving or Christmas.
Customization and Aesthetic Appeal
The visual impact of Oreo Cake Balls is surprisingly high for such an easy recipe. Once dipped, they create a smooth, glossy presentation. You can easily elevate them further:
- Drizzles: Use contrasting melting chocolate (white chocolate over dark, or vice versa) for elegant stripes.
- Toppings: Sprinkle immediately with sea salt, chopped nuts, holiday sprinkles, or our favorite reserved Oreo crumbs.
- Coloring: White melting chocolate can be easily colored using oil-based food coloring, allowing you to match the treats to any theme (pink for Valentine’s Day, red and green for Christmas).
These attributes ensure that your homemade treats won’t just taste good; they’ll look absolutely stunning on any dessert platter. If you want a variety of simple yet elegant cream cheese-based holiday treats, consider adding Cream Cheese Mints to your repertoire alongside these delightful Oreo Cake Balls.
Ingredients and Necessary Utensils: Mastering the Art of the Oreo Truffle
The magic of these Oreo Cake Balls lies in the synergy of minimal, high-quality ingredients. Pay close attention to the specific types and states of the ingredients, as these details significantly impact the final texture of the dough and the smoothness of the coating.
Core Ingredients for Fudgy Oreo Cake Balls
For the Cake Balls (The Truffle Base):
- 1 (14.3 ounce) package Oreo sandwich cookies (regular, not double-stuffed): This is crucial. The regular package provides the perfect ratio of cookie to filling required for structural integrity. Double-stuffed Oreos contain too much filling, which can lead to a sticky, overly greasy dough that is difficult to roll. You need the fine, dry crumb of the cookie wafers to absorb the moisture from the cream cheese.
- 1 (8 ounce) package full-fat cream cheese, softened to room temperature: Room temperature is non-negotiable! Cold cream cheese will not blend smoothly with the crushed cookies, resulting in a lumpy, uneven mixture. Allow it to sit on the counter for at least an hour before starting. Always use full-fat cream cheese for the best flavor and texture; low-fat varieties often contain more water, which can make the dough too soft and challenging to handle.
For the Coating (The Chocolate Shell):
- 2 packages (12 ounces each) melting chocolate wafers (total 24 ounces), such as Ghirardelli or Wilton, OR 24 ounces high-quality chocolate chips: Using actual melting wafers (sometimes called candy melts or dipping chocolate) is highly recommended. These products contain stabilizers (like palm kernel oil) that ensure a smooth, glossy finish without the need for traditional tempering. If you opt for standard chocolate chips, choose a high-quality brand like Ghirardelli or Guittard.
- 1 teaspoon vegetable shortening or coconut oil (optional, but highly recommended): This addition is a professional trick used when melting chocolate chips. Adding a small amount of fat helps reduce the viscosity of the melted chocolate, making the coating thinner, smoother, and easier to tap off excess. This results in a cleaner, less bulky finished Oreo Cake Ball.
- Optional toppings: Sprinkles (matching your occasion), crushed Oreos (using the crumbs reserved from Step 1), or contrasting colored melting chocolate for drizzling.
Essential Tools for Perfecting Your Oreo Cake Balls
While you don’t need an industrial kitchen, certain tools will significantly simplify the process and improve the final result of your homemade truffles.
- Food Processor: This is the star of the show. A good food processor turns a package of Oreos into fine, uniform crumbs in under 30 seconds. This uniformity is essential for achieving a smooth, non-gritty truffle base. While you can crush them by hand, the food processor ensures maximum fineness.
- Mixing Appliance (Food Processor or Stand Mixer): For combining the cream cheese and crumbs, a strong appliance is best. If you start and finish the mixture in the food processor, you minimize cleanup. Alternatively, a stand mixer with a paddle attachment works excellently for combining the thick dough.
- Parchment Paper or Wax Paper: Absolutely necessary for lining the baking sheets. This prevents the chilled dough from sticking and, more importantly, provides a non-stick surface for the chocolate-dipped balls to set without tearing the coating.
- Small Cookie Scoop (1 tablespoon size): Using a scoop ensures every single Oreo Cake Ball is uniform in size. Uniformity is key for consistent chilling, dipping, and presentation.
- Dipping Tools:
- Toothpicks: Great for smaller batches, but they leave a small hole (which can be hidden by decoration).
- Dipping Fork or Chocolate Dipping Tool: These specialized tools have thin tines, allowing the chocolate to drip freely and minimizing the amount of residual chocolate at the base of the truffle.
- Microwave-Safe Bowls or Double Boiler Setup: Needed for smoothly melting the chocolate without scorching.
Detailed Step-by-Step Instructions for Creating Flawless Oreo Cake Balls
Follow these precise steps to ensure your Oreo Cake Balls are perfectly shaped, smoothly coated, and utterly delicious.
Step 1: Prepare the Oreo Base (Achieving the Perfect Crumb)
- Process the Cookies: Place the entire package of Oreo cookies, including the creamy filling, into the bowl of a high-powered food processor.
- Achieve Fine Crumb Status: Process the cookies on high speed until they are finely ground into a uniform, almost powdery crumb. You should not see large chunks of cookie remaining. A fine crumb is essential; chunky pieces will make the final cake ball crumbly and prevent a smooth dough mixture.
- Manual Method (If no processor): If you are crushing manually, place cookies in a heavy-duty Ziploc bag and use a rolling pin. Be thorough roll until the texture resembles fine dirt or sand.
- Reserve Crumbs (Decoration): If you plan to decorate your Oreo Cake Balls with crushed Oreos, scoop out approximately 1/4 cup of the crumbs now and set them aside.
Step 2: Mix and Chill the Dough (The Key to Handling)
- Combine Ingredients: Add the full package of softened, room-temperature cream cheese directly into the bowl with the remaining crushed Oreo crumbs.
- Form the Dough: Mix thoroughly. If using a food processor, pulse until the mixture comes together and looks like a thick, dark, uniform dough. If using a stand mixer or spatula, scrape down the sides frequently. Mix until there are absolutely no visible streaks of white cream cheese remaining. The final mixture should be firm, moist, and easy to gather into a ball.
- Crucial Chilling Phase: Cover the bowl tightly with plastic wrap. Transfer the dough to the refrigerator and chill for a minimum of 30 minutes, or up to 1 hour. This chilling process is vital it firms up the fat in the cream cheese, preventing the dough from becoming a sticky, unmanageable mess when rolling.
Step 3: Shape and Quick-Freeze for Structural Integrity
- Prep the Surface: Line two large baking sheets with parchment paper or wax paper.
- Roll Uniform Balls: Use a 1-tablespoon scoop to portion the chilled dough. Roll each portion firmly between your palms to create smooth, dense Oreo Cake Balls. Place them onto the prepared baking sheets. A dense roll prevents them from falling apart when dipped.
- The Quick Freeze: Once all balls are shaped, transfer the baking sheets to the freezer for 15 to 20 minutes. This quick freeze is the dipping secret. It ensures the balls are cold enough to withstand the warmth of the melted chocolate, preventing the chocolate from melting the truffle base, which causes crumbling or uneven coating.
Step 4: Melt the Chocolate Coating (Achieving Smoothness)
- Prepare Chocolate: Place the melting wafers (or chocolate chips) into a deep, narrow, microwave-safe bowl. A deep bowl is better than a wide one for complete immersion of the balls. Add the 1 teaspoon of vegetable shortening or coconut oil, if using.
- Microwave with Care: Microwave on 50% power in 30-second intervals. After each interval, stir thoroughly, even if the chocolate looks mostly solid residual heat continues the melting process. Stop heating the moment the chocolate is smooth and entirely liquid, usually taking 1.5 to 2 minutes. Never overheat the chocolate, as this causes it to seize (thicken and become grainy).
- Alternative Melting (Double Boiler): If you prefer more control, melt the chocolate in a heatproof bowl set over a pot of simmering water (a double boiler). Ensure the bottom of the bowl does not touch the water. Stir continuously until smooth. For additional guidance on achieving the perfect glossy coat, check out our tips on Pinterest.
Step 5: Dip and Coat the Oreo Cake Balls (The Finishing Touch)
- Work Quickly: Remove the baking sheet of chilled Oreo Cake Balls from the freezer. Work with 6-8 balls at a time, keeping the rest frozen.
- Dipping Technique: Insert a toothpick slightly into the center of a cake ball, or place the ball onto a dipping fork. Immerse the ball completely into the melted chocolate.
- Tap Off Excess: Lift the ball out of the chocolate and gently tap the fork (or toothpick) against the rim of the bowl. Allow all excess chocolate to drip back into the bowl. This ensures a thin, professional-looking coat.
- Placement and Decorating: Carefully slide the coated ball off the fork or toothpick onto the parchment-lined baking sheet. If using sprinkles or crushed Oreo crumbs, apply them immediately before the chocolate begins to set.
- Repeat: Continue this process until all your delicious Oreo Cake Balls are coated.
Step 6: Set and Serve (Storage Tips)
- Setting Time: Allow the coated truffles to set completely. This can take 1 to 2 hours at cool room temperature. The chocolate coating should look matte and be firm to the touch.
- Quick Set: For faster results, transfer the baking sheets to the refrigerator for about 30 minutes.
- Serving: Oreo Cake Balls are best served chilled or slightly cool.
- Storage: Store the finished treats in an airtight container in the refrigerator for up to 1 week. They can also be frozen for up to 3 months just thaw them in the refrigerator overnight before serving.
Tips and Variations: Elevating Your Oreo Cake Balls
While the classic Oreo Cake Balls recipe is perfect as written, there are numerous ways to customize these treats, adapt them for different dietary needs, and troubleshoot common kitchen mishaps.
Troubleshooting Common Dipping Mistakes
- Problem: The chocolate is too thick/gloopy.
- Solution: If you are using melting wafers, they might have cooled too much. If using chocolate chips, it might lack enough fat. Stir in 1/2 teaspoon of shortening or coconut oil (never water!) and microwave for 10-15 seconds to smooth it out.
- Problem: The cake balls keep crumbling when dipped.
- Solution: The balls are not cold enough! They must be firm, straight from the freezer. Also, ensure your dough wasn’t too crumbly initially (meaning the Oreos weren’t ground fine enough).
- Problem: The chocolate coating looks dull (not glossy).
- Solution: This usually means the chocolate was overheated, or water got into the mixture (causing it to seize). Ensure your tools are completely dry. Using high-quality melting wafers (like Ghirardelli) is the best way to guarantee a beautiful, glossy shine without complex tempering.
Creative Flavor and Ingredient Variations
Once you master the base recipe, the possibilities for adapting your Oreo Cake Balls are nearly limitless:
- Seasonal Flavors:
- Peppermint Truffles: Add 1 teaspoon of pure peppermint extract to the cream cheese mixture and dip in dark chocolate. Top with crushed candy canes.
- Pumpkin Spice: Use pumpkin spice Oreos (seasonal) or add a pinch of cinnamon and nutmeg to the cookie mixture.
- Lemon Zing: Use Golden Oreos and add a teaspoon of lemon zest to the cream cheese.
- Different Coatings:
- White Chocolate: Dip in white chocolate and decorate with colorful sprinkles.
- Caramel Swirl: Dip in milk chocolate and drizzle with softened caramel sauce just before the chocolate sets.
- Cookie Swaps:
- Nilla Wafers: Substitute Oreos with vanilla wafers for a lighter, butterier flavor profile.
- Graham Crackers: Use crushed graham crackers and add a dash of cinnamon for a “cheesecake crust” effect.
Dietary Adaptations (Vegan and Gluten-Free Oreo Cake Balls)
The beauty of this recipe is how easily it adapts to modern dietary needs:
- Gluten-Free: Many brands now offer excellent gluten-free cream-filled chocolate sandwich cookies that mimic the original Oreo flavor and texture perfectly. Simply swap the standard Oreos for the GF version. The rest of the recipe remains the same.
- Vegan: This requires two simple swaps. First, use certified vegan sandwich cookies (Original Oreos are often accidentally vegan, but check labels for confirmation, especially in different regions). Second, swap the dairy cream cheese for a high-quality, firm vegan cream cheese alternative (such as Miyoko’s or Kite Hill). Ensure the vegan chocolate coating you select is dairy-free. These vegan Oreo Cake Balls maintain the rich texture and flavor profile of the original.
Nutritional Values and Benefits: Understanding Your Indulgence
Let’s be clear: Oreo Cake Balls are a quintessential indulgence, designed for enjoyment and satisfying that deep chocolate craving. They are packed with flavor and dense texture, meaning a little bit goes a long way. Understanding the components allows you to appreciate the energy source this decadent treat provides.
Estimated Nutritional Breakdown (Per 1.5-Ounce Cake Ball)
Since this recipe is based on pre-packaged ingredients, exact values can vary based on the specific brand of Oreos and chocolate used. However, a typical 1-tablespoon sized Oreo Cake Ball (approximately 1.5 ounces finished weight) provides the following estimated values:
| Nutrient | Estimated Value (Per Ball) |
|---|---|
| Calories | 120 – 150 kcal |
| Total Fat | 7g – 10g |
| Saturated Fat | 4g – 6g |
| Carbohydrates | 14g – 18g |
| Sugars | 12g – 16g |
| Protein | 1g – 2g |
These treats are calorie-dense due to the combination of high-fat cream cheese, sugar from the cookies, and the solid fat content of the chocolate coating. They are best enjoyed in moderation as a treat rather than a dietary staple.
The “Benefits” of Ingredients
While we won’t claim these truffles are health food, the primary ingredients do offer some unexpected components:
- Cream Cheese (Dairy Component): Full-fat cream cheese contributes essential richness and satiety. It also provides a small amount of calcium, which is important for bone health. Its acidic tang cuts through the sweetness of the Oreos and chocolate, preventing the treat from tasting overwhelmingly sugary.
- Chocolate Coating (High-Quality Wafers): Quality dark chocolate contains cocoa solids, which are rich in flavonoids powerful antioxidants. While the high sugar and fat content offset the benefit, consuming high-quality chocolate does provide a small boost of these beneficial compounds. More importantly, chocolate contains tryptophan, which is known to boost serotonin levels, providing a psychological benefit often referred to as “comfort food.”
- Oreos (The Base): The Oreos themselves are primarily carbohydrates and fats, providing a quick source of energy. Their main contribution, however, is nostalgic value and incomparable flavor that everyone recognizes and loves.
The true benefit of these Oreo Cake Balls lies in their ease of preparation and the joy they bring. They allow you to create something delightful and shareable without culinary stress, making them perfect for creating positive memories around food.
FAQs About Oreo Cake Balls and Truffles
We’ve gathered the most common questions people ask when making these classic Oreo Cake Balls to ensure your success.
How long do Oreo Cake Balls need to chill?
The dough needs to chill for at least 30 minutes in the refrigerator before rolling to ensure it’s firm and easy to handle. Once rolled, the balls require a quick 15-20 minute freeze before dipping. This deep chill is vital as it prevents the truffle base from softening and collapsing when it hits the warm melted chocolate coating.
What is the difference between Oreo Cake Balls and Oreo Truffles?
The terms are generally used interchangeably. Both describe the no-bake dessert made from crushed Oreo cookies and cream cheese, dipped in chocolate. Traditionally, a truffle is a chocolate ganache center, but these are often called truffles because of their dense, fudgy, and decadent texture that mimics a classic confection.
Can I use low-fat cream cheese?
While technically possible, it is highly discouraged. Low-fat or reduced-fat cream cheese contains more moisture and less fat than the full-fat variety. This extra water content can result in a dough that is sticky, overly soft, and prone to crumbling or sweating. For the best texture and easiest rolling, always opt for full-fat cream cheese when making Oreo Cake Balls.
How should I store finished Oreo Cake Balls?
Because they contain cream cheese, Oreo Cake Balls must be stored in an airtight container in the refrigerator. They will remain fresh and delicious for up to 7 days. They also freeze exceptionally well; wrap them tightly or place them in a freezer-safe container, and they can last for up to 3 months. Thaw them slightly before serving for the best texture.
What should I do if my chocolate seizes?
Chocolate seizes when a small amount of water or steam gets introduced, causing it to immediately clump and turn gritty. If this happens, you can sometimes save it by vigorously stirring in a tablespoon of neutral oil (like vegetable shortening or coconut oil) or adding a teaspoon of hot, boiling water though success is not guaranteed. The best prevention is using high-quality melting wafers or ensuring all your tools are bone dry before melting.
Conclusion: Your New Favorite No-Bake Dessert
You have now unlocked the secrets to creating the most sought-after no-bake treat the classic and highly addictive Oreo Cake Balls. This simple combination of crushed Oreos, softened cream cheese, and a rich chocolate shell proves that the most sensational desserts don’t always require hours of labor or a complicated list of specialized ingredients.
From the precise technique of achieving that powdery cookie crumb to the crucial step of quick-freezing the rolled balls, every detail in this guide is designed to ensure you produce beautiful, professionally coated Oreo Cake Balls with ease. They are perfect for last-minute gatherings, an ideal project for kids, or simply for satisfying that powerful craving for a sweet, dense, chocolate-packed bite. Remember the key takeaways: use room-temperature cream cheese, process the Oreos until they are fine dust, and chill, chill, chill!
Whether you stick to the traditional dark chocolate coating or venture into exciting variations like peppermint or white chocolate swirls, these truffles are guaranteed to be a massive hit. Go ahead, gather your three ingredients, and get rolling. We encourage you to try this recipe for Oreo Cake Balls soon. If you love how easy and delicious they are, please share this guide with fellow dessert enthusiasts and let us know your favorite dipping variations in the comments below!
Easy 3-Ingredient Oreo Cake Balls (No-Bake Truffles)
Ingredients
Equipment
Method
- Place the entire package of Oreo cookies (including the cream filling) into the bowl of a food processor.
- Process the cookies on high speed until they are finely ground into a fine, uniform crumb. Ensure there are no large chunks remaining. If you do not have a food processor, crush them thoroughly using a rolling pin in a heavy-duty Ziploc bag.
- Reserve approximately 1/4 cup of the crushed cookie crumbs for later decoration, if desired.
- Add the softened cream cheese to the bowl with the remaining crushed Oreo crumbs. Mix thoroughly until a uniform, thick dough forms. The mixture should be firm and easy to handle.
- Cover the bowl tightly with plastic wrap and transfer the dough to the refrigerator. Chill the dough for a minimum of 30 minutes, or up to 1 hour, to firm it up for easier rolling.
- Line two large baking sheets with parchment paper or wax paper. Use a small cookie scoop (approx. 1 tablespoon size) or measure out the mixture to ensure uniformity.
- Roll the dough firmly between your palms to form smooth, dense balls. Place the rolled balls onto the prepared baking sheets.
- Place the baking sheets into the freezer for 15 to 20 minutes. This quick freeze helps the balls hold their shape and prevents them from melting when dipped in the warm chocolate.
- Place the melting chocolate wafers or chips into a microwave-safe bowl. If using, add the shortening or coconut oil. Microwave in 30-second intervals, stirring thoroughly after each interval, until the chocolate is completely smooth and liquid. Do not overheat.
- Remove the chilled Oreo balls from the freezer. Using a toothpick or a dipping fork, immerse one ball fully into the melted chocolate. Tap the fork gently against the side of the bowl to allow excess chocolate to drip off.
- Carefully slide the coated ball onto the parchment-lined baking sheet. If adding sprinkles or crushed cookies, apply them immediately before the coating sets.
- Allow the coated cake balls to rest at room temperature until the chocolate coating is completely firm and set (approximately 1 to 2 hours). For a faster set, transfer them to the refrigerator for about 30 minutes.
- Store the finished Oreo Cake Balls in an airtight container in the refrigerator for up to 1 week. Serve chilled or at room temperature.